ThermoTex TT4-S Скачать руководство пользователя страница 16


Settings 

GBTT4SBA


Page - 16 

5  Settings 

The "Settings" menu of the offline menu contains a large number of parameters for configuring your printer to 
the concrete application. Usually changes are made in this menu mainly during initial commissioning and 
following fundamental changes to the operating conditions of the printer. Changes necessary when processing 
different print jobs, for example with different materials, can usually be implemented with the software settings. 
The complete "Settings" menu can be protected from unauthorised access by a code number (PIN). 


PIN "0000" is adjusted as standard code number for TT4-S. 

 
1.  Press menu in the "ready" state to go to the offline menu. 

2.  Keep pressing 

 until the "Settings" menu appears. Press 

3.  If the "Settings" menu is protected by a PIN, the following input request appears in the display: "PIN: 0000". 

Press 

 and 

 to change the individual digits of the PIN. The digit being changed flashes in the display and 

can be selected with 

and

. Press 

 to accept the input. When all digits have been entered correctly, the 

program goes to the "Settings" menu. 

4.  The parameters are organised in a tree structure. Press 

or 

to make your selection between the individual 

sub-menus. Press 

 to go to the selected sub-menu. 

5.  On reaching the individual parameter level, the current value of the selected parameter appears in the display 

under the parameter name. Press 

 to change the value of a parameter. Press 

and

 to adjust the 

parameter. Press 

 to adopt the value and leave the parameter level. 

6.  To return to the superordinate menu or to the "ready" state, press 

 several times and press 

 in the first 

menu level. Pressing 

 for 2 seconds achieves the same effect. 

 
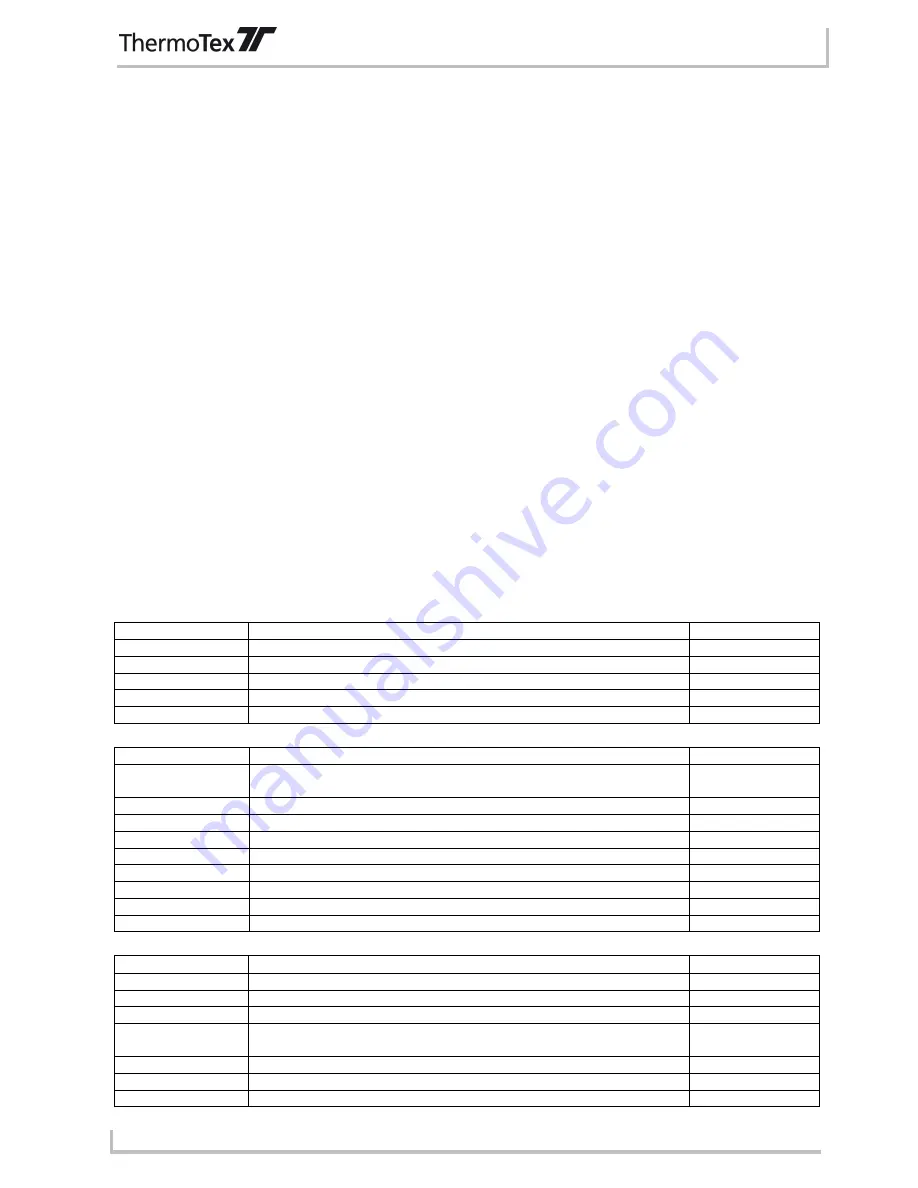
The following table provides a brief overview of the configuration parameters. 
 
Settings - Regional settings 
Parameter 

Meaning 

Default 

Country 

Display language, time and date format 

Germany 

Timezone 

Time zone as per UTC (Universal Time Coordinated) 

UTC+1 

Summer time 

Method for adjusting the summer time 

EU 

Set the date 

Setting the date 

Current date 

Set the time 

Setting the time 

Current time 


Settings - Unit settings 
Parameter 

Meaning 

Default 

Print head offset X 

Offset of the printed image in the label crosswise to the print 
direction 

0.0 mm 

Print head offset Y 

Offset of the printed image in the label in the print direction  

0.0 mm 

Tear-off position 

Parameter for changing the tear-off position 

0.0 mm 

[Dispenser edge] 

Parameter for dispenser light barrier (option) 

[Blade] 

Parameter for cutting blade 

0.0 mm 

Brightness LCD 

Brightness of the background lighting of the display 

10 

Contrast LCD 

Optimising the legibility of the display 

Energy sav. delay 

Delay for changing to the energy saving mode 

5 min 

Debug mode 

Activating the debug mode 

off 


Settings –-Print parameters 
Parameter 

Meaning 

Default 

Heating energy 

Basic setting for print intensity (blackening) 

Printing rate 

Basic setting for printing rate 

75 mm/s 

Transfer print 

Basic setting thermo transfer/thermal direct print ON/OFF 

On 

Film advance 
warning 

Advance warning when remaining film diameter less than defined 
amount 

Off 

Label sensor 

Label detection continuous transparent light/reflection from below 

Transparent light 

Tear-off position 

Additional feed at job end ON/OFF 

Off 

Return transport 

Return transport optimised/always for cutting/dispensing mode 

Optimised 

Содержание TT4-S

Страница 1: ...l GmbH Schutterstraße 14 D 77746 Schutterwald Tel 49 0 781 9616 0 Fax 49 0 781 9616 50 info thermo tex de www thermo tex de GBTT4SBA 002 Operating manual for TT4 S Translated version of the original operating manual ...

Страница 2: ...3 General information for inserting labels and ink ribbons 8 3 4 Inserting labels 9 3 5 Inserting the ink ribbon 10 3 6 Mounting the cutting device 12 4 Operation 13 4 1 Control panel 13 4 2 Symbols 13 4 3 Energy saving mode 13 4 4 Button functions 14 4 5 Configuration menu 15 5 Settings 16 6 Test functions 18 7 External keyboard 20 7 1 Keyboard configuration 20 8 Troubleshooting 22 9 Cleaning 25 ...

Страница 3: ...r data transfer Interfaces TT4 S Serial interface RS232 C 8 bit 1200 230400 baud Serial interface RS422 485 8 bit 1200 230400 baud Parallel interface bi directional as per IEEE1284 USB 2 0 high speed slave for PC connection Ethernet 10 100 Base T LPD RawIP Printing DHCP http FTP SMTP SNMP NTP WLAN card 802 11b g Twinax coax converter 2x USB master for keyboard and scanner standard optional The pri...

Страница 4: ... from wear Core diameter 25 mm Max roll diameter 80 mm Labels Width 4 116 mm Height 5 2000 mm Max thickness 0 35 mm Core diameter 38 76 mm Max roll diameter 210 mm Label sensor transparent light reflection from below Distance to lay edge 5 53 mm Control panel buttons illuminated depending on operating mode LCD graphic display WxH 60x40 in mm Text lines digits 4 approx 20 1 4 Parts of the printer 1...

Страница 5: ...abel which could be pulled through under the print head These could damage the head 3 Ensure the label has a good smooth surface Rough label surfaces act as sandpaper and reduce the service life of the head 4 Clean the head regularly with cotton buds soaked in alcohol 5 Print at the lowest possible head temperature Incorrect handling can damage your print head very quickly 1 6 Instructions for the...

Страница 6: ...atus December 2009 The device fulfils the health and safety requirements of the following EC directives Low voltage directive 2006 95 EC Applied standard EN 60950 1 2006 Electromagnetic compatibility directive 2004 108 EC Applied standards EN 55022 2006 EN 55024 1998 A1 2001 A2 2003 EN 61000 3 2 2006 EN 61000 3 3 1995 A1 2001 A2 2005 Schutterwald 17 12 2009 ThermoTex Nagel GmbH Dietmar Nagel Manag...

Страница 7: ...onnect the printer to a grounded power socket Only connect the printer to units with protective low voltage Ensure that all units being connected printer computer etc are switched off when connecting together Also switch the units off before disconnecting them Ensure that your printer is not exposed to damp or wet conditions The printer can be operated with the lid opened In this condition the rot...

Страница 8: ... the computer The standard printer has a serial RS 232 interface 8 a USB high speed interface 7 and an Ethernet 10 100 Base T interface 5 For a serial connection the RS 232 interface of the printer must be configured according to the settings on your computer Standard settings on delivery Interface Configuration RS 232 Baud rate 115200 Parity none Flow control RTS CTS Data bits 8 Stop bits 1 Ether...

Страница 9: ...paper for labels on the outside is shown as a continuous line the run of paper for labels on the inside as a dotted line ThermoTex rolls of labels are on the outside i e the side being printed is on the outside Exception ThermoTex fix plastic film this is on the inside 7 Adjust the label light barrier 12 so that the actual sensor 11 can register the gap between the labels or the reflection or perf...

Страница 10: ...se hex key to loosen the setscrew 1 at the outer tappet 2 3 Position outer tappet 2 outside the outer edge of the label and tighten the setscrew 1 3 5 Inserting the ink ribbon 1 Film winder 2 Ink ribbon 3 Film unwinder 4 Lever for locking the print head Fig 3 5 Inserting the ink ribbon To prevent premature wear to the print head only use an ink ribbon which is somewhat wider than the material bein...

Страница 11: ...oated side on the inside and the dotted line for rollers with coated side on the outside ThermoTex ink ribbons have the coating on the outside 6 Turn the winder 1 counter clockwise to make the film run smoothly and tautly 7 Swivel the lever 4 clockwise as far as it will go This locks the print head 3 5 1 Adjusting the ink ribbon guide 1 Scale 2 Adjusting screw Fig 3 6 Adjusting the ink ribbon guid...

Страница 12: ...ounted on the printer This makes sure that the label tape is guided properly through the blades of the cutting device Fig 3 7 Mounting the cutting device Attach the cutting device to the printer The positioning pins 1 fit into the holes 2 Push together the two parts in order to connect the plugs 3 4 Tighten the screw 5 When the printer is turned on the cutting device will be detected automatically...

Страница 13: ... functions light up white e g menu or feed In the offline menu active functions light up orange arrows button 4 2 Symbols Depending on the configuration of the printer the symbols shown in the table below can appear in the status line of the display The operator can thus see the current printer status straightaway Symbol Meaning Symbol Meaning Time Print head temperature Date PPP credit Status of ...

Страница 14: ...int job press and hold cancel current print job and delete all print jobs system error press contact hotline if error persists button fault which can be remedied fault which cannot be remedied go to help function brief information is shown for remedying the error offline menu press and release select a value in the parameter level adopt a selected value or start a function press and hold 2s leave ...

Страница 15: ...contents only with card plugged in copy card only with card plugged in PIN protection possible delete card only with card plugged in PIN protection possible print file contents only with card plugged in short status test print status font list device list print head profile monitor mode test grid label profile settings regional settings PIN protection possible device settings print parameters inte...

Страница 16: ...he ready state press several times and press in the first menu level Pressing for 2 seconds achieves the same effect The following table provides a brief overview of the configuration parameters Settings Regional settings Parameter Meaning Default Country Display language time and date format Germany Timezone Time zone as per UTC Universal Time Coordinated UTC 1 Summer time Method for adjusting th...

Страница 17: ...the local net only valid for DHCP OFF Gateway Connection address between local and other networks Off Network error Error status for network problems ON OFF Off Settings Status bar Parameter Meaning Default Clock Display in status bar ON OFF On Calendar page Display in status bar ON OFF On Film stock Display in status bar ON OFF Off WLAN field strength Display in status bar ON OFF Off Ethernet sta...

Страница 18: ... 6 1 Fonts list Printout of a list with the main parameters of the fonts available in the printer The list contains both internal printer fonts and also the loaded fonts Fig 6 2 Devices list Printout of a list of the main hardware components installed in the printer and the connected optional devices Fig 6 3 Print head profile Printout of a curve diagram showing the resistance values of the heated...

Страница 19: ...Test functions GBTT4SBA Page 19 Fig 6 1 Status printout Fig 6 2 Fonts list Fig 6 3 Devices list Fig 6 4 Example label normal printing Fig 6 5 Example label in monitor mode ...

Страница 20: ...djustment of this parameter which is generally based on the DOS configuration The button ALT GR has no function Instead all characters shown on the buttons to the right of the normal characters e g are accessed with ALT Various special characters e g are also accessed using ALT Table 7 1 buttons in the numerical block GR Deutschland FR France UK United Kingdom US USA SG Schweiz SF Suisse BE Belgie...

Страница 21: ...ats the last printed label F3 Repeats the last print job with another query about the variable data F8 Form feed ENTER Outside a print job change between ONLINE and OFFLINE During a print job confirms data input ESC Cancels the data input During a print job same effect as CANCEL SPACE During a print job same effect as PAUSE Shift Entf Deletes the input line Selects labels in the contents directory...

Страница 22: ...ter off and on Inform hotline if occurs again Barcode too long Barcode too long for allocated area of the label Reduce or move barcode Barcode fault Invalid barcode content e g alphanumerical characters in numerical barcode Correct barcode contents Battery flat PC card battery is flat Replace PC card battery Print head defective Hardware fault Switch printer off and on Replace print head if occurs...

Страница 23: ... Hardware fault on cutting blade Switch printer off and on Inform hotline when this happens again Paper end Main label roll used up Insert new roll of labels Ribbon not inserted properly in label light barrier Check run of the ribbon Protocol error Printer receives unknown or incorrect command from computer Depending on kind of error press pause to bypass command or press cancel to cancel print jo...

Страница 24: ...n print image Print head soiled Clean print head Print head defect failure of heated points Replace print head Horizontal white lines in print image Printer is optimised in cutting or dispensing mode with the setting return transport optimised Change return transport to always in setup Print image lighter on one side Print head soiled Clean Incorrect setting of print head press on system Adjust Fa...

Страница 25: ... and a soft cloth 9 3 Cleaning the print head It is possible for impurities such as dust or ink particles from the ink ribbon to accumulate around the print head during printing This results in a clear deterioration in print quality We recommend the following cleaning intervals Thermo direct printing every time after the roll of labels has been changed Thermo transfer printing every time after the...

Страница 26: ...cts to clean the sensors 1 Turn lever 1 counter clockwise to lift print head 2 Take label material and ink ribbon out of the printer 3 Take the hex key 5 out of its holder 4 Compress the stopper spring 3 5 Using the handle 4 pull the label light barrier slowly as far as it will go Release the stopper spring 3 Ensure that the light barrier cable is not pulled taut 6 Clean the label light barrier an...

Страница 27: ...ettled on the blades and on the print roll In this case clean the blades and the print roll at shorter intervals If necessary lubricate the cylindrical surface see arrow of the blade with high performance grease Fig 9 2 Cutting device 10 Spare parts list Designation ThermoTex Article No Cutting device 14076 Perforation scissors 14308 External rewinder 14480 Label trough 13055 CompactFlash memory c...

Отзывы: