background image

Grill2GO  •  23

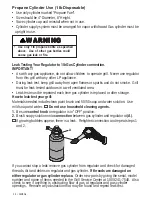
LP Tank Leak Test

For your safety
• 
Leak test must be repeated each time LP tank is exchanged or refilled.
• Do not smoke during leak test.
• Do not use an open flame to check for gas leaks.
• Grill must be leak checked outdoors in well-ventilated area, away from ignition

sources such as gas fired or electrical appliances. During leak test, keep grill away
from open flames or sparks.

Connecting The Adapter Hose To The LP Tank

1. Use only adapter hose approved by safety testing

organizations. (CSA, UL,etc)

2. Turn all control knobs to the OFF position.
3. Turn LP tank OFF by turning hand-wheel clockwise

to a full stop.

4. Remove the protective cap from LP tank valve.

Always use cap and strap supplied with valve.

Use of this POL transport plug (B) (plastic part with
external threads) will defeat safety feature of valve.

Use a clean paint brush and 50/50 soap and water solution. Use mild
soap and water. 

 Do not use household cleaning agents.

Damage to gas train components can result.

Brush soapy solution
onto the shaded areas.

If

"growing"

bubbles appear

do not use or move

    the LP tank. Contact

an LP gas supplier or

your fire department!

Type 1 outlet with
 thread on outside

OPD Hand Wheel

Safety
Relief Valve

Strap and Cap

O f f

Clockwise

A

A

A

A

A

B

B

B

B

B

Содержание 4656110

Страница 1: ... before attempting to assemble and cook Installer assembler Leave these instructionswithconsumer To Consumer Keep this manual for future reference CA CA CA CA CAUTION UTION UTION UTION UTION ASSEMBLY MANUAL Failure to follow all manufacturer s instructions could result in fire or explosion which could cause property damage personal injury or death 4656110 6213 E F 4 36 6047 050 200 01 31 02 Models...

Страница 2: ...nd boxes shown below explain what each heading means Read and follow all of the messages found throughout the manual DANGER Indicates an imminently hazardous situation which if not avoided will result in death or serious injury WARNING Be alert to the possibility of serious bodily injury if the instructions are not followed Be sure to read and carefully follow all of the messages CAUTION Indicates...

Страница 3: ...A ANSI 58 Grill is not to be installed in or on recreational vehicles and or boats Keep any electrical cords and or fuel supply hoses away from any hot surfaces This grill is safety certified for use in the United States and Canada only Do not modify for use in any other location Modification will result in a safety hazard This product is subject to patents pending in the U S and other countries F...

Страница 4: ...al consumer purchaser prior to discovery of the nonconformity In addition in the state of California only you may take the product to the retail establishment from which it was purchased or to any retail establishment selling this product in order to obtain performance under this warranty This warranty does not include the cost on any inconvenience or property damage due to failure of the product ...

Страница 5: ...kTest 14 Operation For Safe UseOfYourGrill 1lbtank 15 SafetyTips 16 IgnitorCheck 16 IgnitorLightingForThisGrill 16 MatchLighting 17 BurnerFlameCheck 17 BeforeYourFirstCookout 17 TurningGrillOff 17 HeatIndicatorInstructions 17 LevelingYourGrill 18 Care GeneralGrillCleaning 18 CleaningBurnerAssembly 19 Non StickSurfacecareanduse 19 Cooking FoodSafety 20 HowToTellIf Meat IsGrilledThoroughly 20 Storin...

Страница 6: ...ing device is on the right when assembling Base is designed to fit into slots at each corner of leg assembly Carton 1 2 Legs Base Body Assembly Base will only fit into legs one way NOTE The twelve Rubber Spacers located on the grill lid are designed to help protect the non stick cooking surface They should not be removed Remove all protective packaging and Product Information Cards before assemby ...

Страница 7: ...d Legs NOTE Use square hole not round hole when assembling Legs to Base NOTE Do not fully tighten fasteners at this time Release leg lock by pulling hook Top View FRONT Unfold legs to locked position A B Plastic Hand Fastener CarriageBolt Qty 4 Qty 4 4 Washer Qty 4 3 ...

Страница 8: ...d twist clockwise Connect regulator to burner tube on right side of grill A B NOTE 1lb tank sold separately Regulatorslides straight into burner Regulator should rest firmly against burner Greasecontainerslides ontoslotonleftsideof base CaponGrease containershouldbeopen wheninstalling 5 6 Ignitor fits into slot in base B1 B2 ...

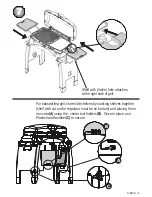
Страница 9: ...t side of grill For transporting grill store side shelves by stacking shelves together shelf with cut out for regulator must be on bottom and placing them on screw A using the center tool holders B Once in place use Plastic hand fastener C to secure B A C 7 ...

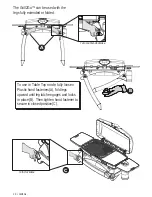
Страница 10: ...s fully extended or folded To use in Table Top mode fully loosen Plastic hand fasteners A fold legs upward until leg latch engages and locks in place B Then tighten hand fastener to secure in closed position C A C B Turncounter clockwise Turnclockwise ...

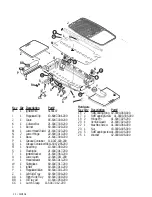
Страница 11: ... 381 000 4 3 Spring Washer 42 9000 390 000 5 3 Nut 43 9000 034 000 6 4 Spring washer 42 9000 380 000 7 10 Spacer 13 6047 006 202 8 2 Spacer 13 6047 006 201 9 2 Self Tapping Screw 41 9000 278 000 10 2 Self Tapping Screw 41 9000 334 000 11 4 Self Tapping Screw 41 9000 355 000 12 2 Washer 42 9000 349 000 13 2 Machine Screw 41 9000 585 000 14 2 Nut 43 9000 005 000 15 2 Spring Washer 42 9000 307 000 2 ...

Страница 12: ...rLatch 22 6047 011 200 V 1 HeatIndicator 69 6047 013 200 W 1 Sightglass 69 6047 017 200 X 1 Ignitor 69 6047 014 200 Y 1 Regulator Valve 69 6047 031 200 Z 1 LeftSideTray 69 6047 008 200 AA 1 Right SideTray 69 6047 009 200 BB 1 OilTrayLid 13 6047 059 200 CC 1 Latch Clasp 11 6047 012 200 CC Hardware Key Qty Description Part 16 2 SelfLockingRing 42 9000 368 000 17 4 SelfTappingScrew 41 9000 335 000 18...

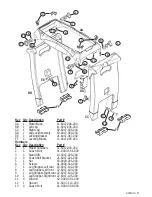
Страница 13: ...11 6047 033 200 2 1 Coach Bolt 41 9000 561 000 3 4 StandOffs 13 6047 026 200 4 4 CoachBoltBracket 21 6047 021 000 5 1 Nut 43 9000 005 000 6 6 Screws 41 9000 544 000 7 1 Leg Stopper Left rear 22 6047 102 200 8 1 LegStopper Leftfront 22 6047 103 200 9 1 Leg Stopper Right rear 22 6047 104 200 10 1 LegStopper Rightfront 22 6047 105 200 11 4 Washer 42 9000 391 000 12 1 Spacer 11 6047 114 200 13 4 Coach...

Страница 14: ...brush and 50 50 soap and water solution Use mild soap and water Do not use household cleaning agents 1 Be sure control knob on regulator is in OFF position 2 Brush soapy solution onto connection between gas cylinder and regulator at A If growing bubbles appear there is a leak Retighten connection and repeat steps 1 and 2 If you cannot stop a leak remove gas cylinder from regulator and check for da...

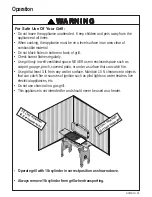
Страница 15: ...porch covered patio or under a surface that can catch fire Use grill at least 3 ft from any wall or surface Maintain 10 ft clearance to objects that can catch fire or sources of ignition such as pilot lights on water heaters live electrical appliances etc Do not use charcoal in a gas grill This appliance is not intended for and should never be used as a heater 3ft 1m minimum 10 ft recommended 3ft ...

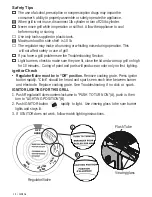
Страница 16: ...e lid and warm up grill on high for 10 minutes Curing of paint and parts will produce an odor only on first lighting Ignitor Check Regulator Valve must be in Off position Remove cooking grate Press ignitor button rapidly Click should be heard and spark seen each time between burner and electrode Replace cooking grate See Troubleshooting if no click or spark IGNITOR LIGHTING FOR THIS GRILL 1 Push R...

Страница 17: ...l produce an odor only on first lighting Turning Grill Off Turn knob to OFF position Make sure Regulator Valve pops up If it does not discontinue use and order new part Disconnect 1lb cylinder or turn off valve on 20lb cylinder MATCH LIGHTING FOR THIS GRILL 1 Push Regulator Valve in and turn counterclockwise to LIGHTING POSITION 2 Wait 3 seconds and place lit match at the mouth of the FLASH TUBE o...

Страница 18: ...up of water over cooking surfaces to loosen grease and food particles and to speed cool down Use supplied cleaning comb to scrape off excess grease and food particles Wipe cooking surface with a paper towel or sponge Remove cooking surfaces and check for signs of leakage into the burner area Clean off any accumulated grease Cooking surfaces can be removed to wash with warm soapy water or to place ...

Страница 19: ...cts out 6 Replace cooking grate VERY IMPORTANT Before cooking again on grill follow Burner Flame Check Non stick Surface Care and Use Use only plastic tools Do not cut food on surface Do not put pots or pans on surface Do not leave lid down for more than 10 minutes without food on the grill Non stick surface may be damaged Clean burner prior to use after storing at the beginning of grilling season...

Страница 20: ...er and utensils when removing cooked foods Cook Cook meat and poultry thoroughly to kill bacteria Use a thermometer to ensure proper internal food temperatures Chill Refrigerate prepared foods and leftovers promptly How To Tell If Meat Is Grilled Thoroughly Meat and poultry cooked on a grill often browns very fast on the outside Use a meat thermometer to be sure food has reached a safe internal te...

Страница 21: ... wires or replace electrode wire assembly Replace ignitor wire electrode assembly ChecktoseeifLPtankisempty Clear burner tubes ReplacewithThermos parts Checkstepsinassembly instructions Problem Burner will not light using ignitor Burner s will not match light Troubleshooting General 1lb Cylinder Possible Cause Highorgustingwinds Low on LP gas Burner and or burner tubes areblocked Problem Flames bl...

Страница 22: ...ienced dealers LP tank must be purged before filling Dealer should NEVER fill LP tank more than 80 of LP tank volume A frosty regulator indicates gas overfill Immediately close LP tank valve and call local LP gas dealer for assistance Do not release liquid propane LP gas into the atmosphere This is a hazardouspractice To remove gas from LP tank contact an LP dealer or call a local fire department ...

Страница 23: ... knobs to the OFF position 3 Turn LP tank OFF by turning hand wheel clockwise to a full stop 4 Remove the protective cap from LP tank valve Always use cap and strap supplied with valve Use of this POL transport plug B plastic part with external threads will defeat safety feature of valve Use a clean paint brush and 50 50 soap and water solution Use mild soap and water Do not use household cleaning...

Страница 24: ...ghten by hand only do not use tools NOTE If you cannot complete connection disconnect hose end and repeat steps 5 and 6 If you are still unable to complete the connection do not use this connector Hold coupling nut and hose end as shown for proper connection to LP tank valve Nipple has to be centered into the LP tank valve Straight Donotinsertanyforeignobjectsintothevalveoutlet Youmaydamagethevalv...

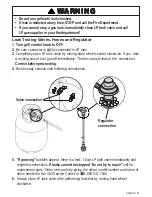
Страница 25: ...ou hear a rushing sound turn gas off immediately There is a major leak at the connection Correct before proceeding 4 Brush soapy solution onto following connections 5 If growing bubbles appear there is a leak Close LP tank valve immediately and retighten connections If leaks cannot be stopped do not try to repair call for replacement parts Order new parts by giving the serial model number and name...

Страница 26: ...orch covered patio or under a surface that can catch fire Use grill at least 3 ft from any wall or surface Maintain 10 ft clearance to objects that can catch fire or sources of ignition such as pilot lights on water heaters live electrical appliances etc Do not use charcoal in a gas grill This appliance is not intended for and should never be used as a heater 3ft 1m minimum 10 ft recommended 3ft 1...

Страница 27: ...rt of the gas system of the RV except directly to the tank itself The additional 20 lb or 30 lb tank is available from your RV dealer and must be mounted on the RV complying with approved RV standards The connection from the tank to the grill must be with a minimum 15 approved hose available from your RV dealer The Grill2GoTM must always be operated at least 10 from the body of the RV Never use th...

Страница 28: ...erSpark are trademarks of W C Bradley Co Grills protected for W C Bradley under one or more of these U S Patents 5 109 834 5 706 797 5 421 319 5 452 707 5 458 309 5 566 606 5 613486 5 579 755 5 765 343 5 765 543 5 931 149 5 996 573 6 135 104 D291 768 D364 535 D372 637 D373 701 D377 735 D397 910 D405 643 D406 005 D406 009 D413 043 D413 229 D415 388 D416 164 D416 441 D417 587 D423 274 D423 876 D428 ...

Отзывы: