background image

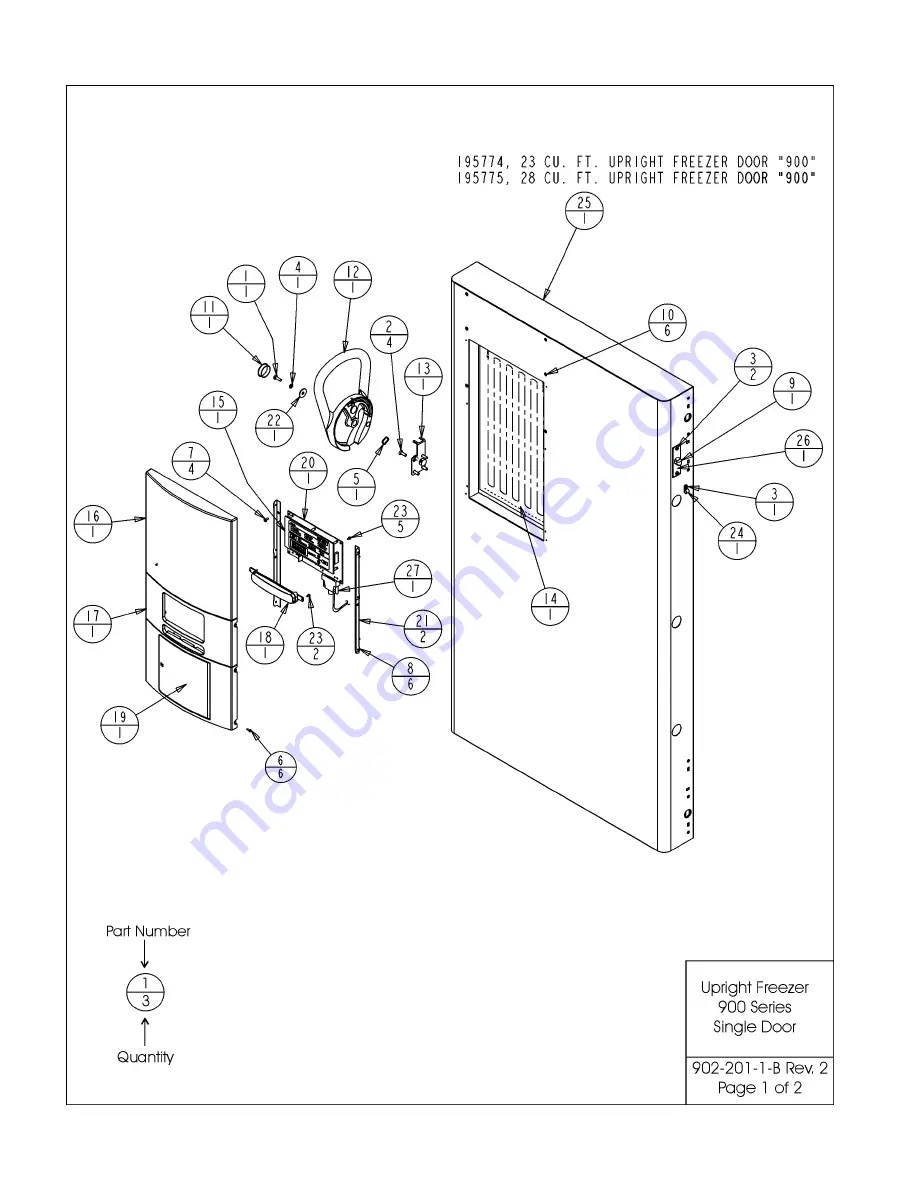
Model 900 Series  ________________________________________________________________________________Parts

7 - 6

Содержание 900 Series

Страница 1: ...900 Series Forma 86C ULT Freezer Operating and Maintenance Manual Manual No 7010902 Rev 8 ...

Страница 2: ... NUMBER 7010902 8 22676 5 26 05 Changed control panel alarm indicators aks 7 22562 3 3 05 Modified software to allow alarms within 5C of set point aks 6 22518 2 3 05 Changed battery bracket assembly aks 5 22362 9 10 04 Changed micro board aks 4 22136 5 5 04 Revised electrical schematics additional vacuum relief information aks 3 22216 22217 22179 3 12 04 Added models 956 and 990 PM updates updated...

Страница 3: ...with this symbol Hot surface s present which may cause burns to unprotected skin or to materials which may be damaged by elevated temperatures Extreme temperature hazards hot or cold Use special handling equipment or wear special protective clothing Always use the proper protective equipment clothing gloves goggles etc Always dissipate extreme cold or heat and wear protective clothing Always follo...

Страница 4: ...Model 900 Series ___________________________________________________________________________Service iii ...

Страница 5: ... Air Filter 4 1 4 3 Cleaning the Condenser 4 1 a Cleaning the Water cooled Condenser 4 1 4 4 Defrosting the Chamber 4 1 4 5 Cleaning the Door Gasket 4 2 4 6 Cleaning the Vacuum Relief Port 4 2 4 7 Replacing the Battery s 4 4 4 8 Preparing the Unit for Storage 4 4 Preventive Maintenance 4 5 Section 5 Factory Options 5 1 5 1 BUS Back Up System 5 1 a Installing the vent stack solenoid and injection a...

Страница 6: ...lays and indicators BUS Optional Back Up System panel Optional temperature recorder or datalogger Figure 1 2 Remote alarm contacts Power Inlet for power cord connection Optional BUS connections for probe and solenoid Power Switch mains disconnect Figures 1 3 and 1 4 Vacuum relief port pressure equalization port Probe cover houses control optional recorder datalogger or 1535 alarm probes Figure 1 4...

Страница 7: ... Silence Silences the audible alarm 5 Alarm Panel indicates the current alarm condition 6 Up and Down Arrows Increases or decreases values toggles between choices 7 Enter Stores the value into memory Figure 1 6 Control Panel 1 2 Model 900 Series ____________________________________________________________Installation and Start Up Figure 1 5 Battery s location and Switch Figure 1 5 Battery mounting...

Страница 8: ...rakes a Choosing the Location Locate the freezer on a firm level surface in an area with an ambient temperature between 18 C and 32 C Provide ample room to reach the mains disconnect switch power switch located on the rear of the freezer b Installing the Wall Bumpers The parts bag located inside the cabinet contains the fol lowing parts Install the bolts into the pre tapped holes on the back of th...

Страница 9: ...rature high temper ature alarm set point low temperature alarm set point and optional BUS set point Default settings are shown in the table below a Setting the Operating Temperature All 900 Series freezers have an operating temperature range of 50 C to 86 C depending on ambient temperature The freezer is shipped from the factory with a temperature set point of 80 C To change the operating temperat...

Страница 10: ...when the freezer chamber temperature has reached or decrease below the low temperature alarm set point To set the low temperature alarm set point 1 Press the Mode key until the Set Low Alarm indicator lights 2 Press the up or down arrow key until the desired low temperature alarm set point is displayed 3 Press Enter to save the setting 4 Press the Mode key until the Run indicator lights for Run mo...

Страница 11: ...Compare the control temperature set point to the temperature of the measur ing device 1 Press the Mode key until the Calibrate indicator lights 2 Press up down arrow to match the display to calibrated instrument 3 Press Enter to store calibration 4 Press the Mode key to return to Run mode Temperature Stabilization Periods Startup Allow 12 hours for the temperature in the cabinet to stabilize befor...

Страница 12: ...udible alarm can be silenced and will ring back every 15 minutes 3 4 Probe Failure Alarm The microprocessor in 900 series freezers continually scans all probes including the control probe heat exchanger probe and condenser probe to ensure that they are operating properly Should an error be detected the Probe Failure alarm will occur as described in 3 1 above If an error is detected with the contro...

Страница 13: ...ending on type of deposits or build up to be removed Do not use liquids that are corrosive to stainless steel or the brazing material copper or nickel CIP Clean In Place Procedure 1 Disconnect the unit from the water supply 2 Drain the unit 3 Rinse with fresh water and drain the unit again 4 Fill with fresh water 5 Add cleaning agent solution and concentration depend ent on deposits or build up 6 ...

Страница 14: ...ize and number of paths available for the air to enter the cabinet and b the pressure difference between the internal cabinet and the ambient room Cabinets with the vacuum relief port operating normally i e vacuum relief port is not iced over will require a mini mum of 30 seconds up to a maximim of 120 seconds for the cabinet to equalize This is also a good indication that the exte rior door is we...

Страница 15: ...t six inches Make sure the tube is completely clear 5 Verify the vacuum relief mechanism is moving freely Depress the valve and release The valve should drop approximately 1 2 and return to its origi nal position when released If the valve fails to spring back it is defective Contact the Technical Services department for a replace ment Replace the check valve and screw to secure 6 Inspect the port...

Страница 16: ...the battery power switch 8 Close lower panel door 4 8 Preparing the Unit for Storage Defrost the unit as described in Section 4 4 This will pre pare the unit for storage Turn off the battery power switch Turn off the freezer power switch Disconnect power to the battery s and to the freezer If the unit has been in service turn it off and disconnect the power cord connector before proceeding with an...

Страница 17: ...hnicians using NIST traceable instruments available in many areas For more information on Preventive Maintenance or Extended Warranties please contact us at the number below Cleaning and calibration adjustment intervals are dependent upon use environmental conditions and accuracy required Tips Fill an upright by starting at the bottom near the probe and add racks to one shelf at a time Allow freez...

Страница 18: ...ning may be required depending on use and environmental conditions 4 2 Check air filter Clean or replace as needed 1 5 f 4 7 Check alarm back up battery Replace Check condenser fan motor for unusual motor noise or vibration 2 Verify and document calibration at the minimum annually 4 3 Clean condenser compartment and wipe off condenser Qualified service technicians only Dispose of properly accordin...

Страница 19: ...pt charged during normal operation by the inte gral battery charger a Installing the vent stack solenoid and injection assembly 1 Install the injection assembly through the 1 2 pre punched hole directly behind the 2 vent stack hole in the center of the chamber ceiling Note Cover the open end of injection assembly with tape to keep insulation from entering the nipple 2 Slide 3 8 flatwasher over ope...

Страница 20: ...e bracket with the tie wrap 11 Tap 8 32 the two pre punched holes located on the inte rior left wall of the freezer Mount the bracket Figure 5 4 shows the Back Up probe mounted on the interior left side wall of the freezer c Connecting the probe solenoid harness 12 Remove the four screws on the freezer back panel and use them to mount the tie wrap anchors as shown in Figure 5 5 Secure the probe wi...

Страница 21: ...lly return to to RUN mode after 5 minutes g Cleaning the Vent Stack Routinely check the vent stack for frost or ice build up The type of frost that forms in the vent stack is generally very soft and may be easily removed with a bristle brush or soft cloth if ice build up has occurred a complete defrost may occasionally be required See section 4 4 for freezer defrost instructions h Disconnecting th...

Страница 22: ...hart Recording will begin in the new program Calibrating the chart recorder The recorder must be in service for 24 hours before per forming the following calibration procedure 1 Place an accurate thermometer in the chamber next to the recorder probe 2 Temperature probes for the recorder are located in the left front corner of the freezer chamber Figure 1 4 3 After about three minutes compare the t...

Страница 23: ...ondenser 195145 195611 The water cooled condenser is a factory installed option and requires a qualified technician at freezer installation The instal lation should include proper adjustment of the regulating valve which controls the discharge pressure Specifications for this option are displayed in figure 5 9 5 5 Five Inner Door Option 189405 189406 189407 195642 The five inner door option is fac...

Страница 24: ...ght motor Specifications Single Door Units Compressors may not cycle off with cabinet running at 86C in a 32C ambient 956 50 C 58 F to 86 C 123 F in an 18C to 32C 64 4F to 89 6F ambient 40 8 W x 77 8 H x 37 0 103 6 x 197 6 x 94 0 cm 30 6 W x 51 5 H x 25 3 77 7 x 130 8 x 64 3 cm 23 0 cu ft 651 3 liters Two 1 HP 2545 BTUH each Non CFC foamed in place urethane 5 0 12 7 cm cabinet 4 5 11 4 cm door 120...

Страница 25: ... which the instrument is designed to withstand safely It depends on the nature of the electricity supply and its overvoltage protection means For example in CAT II which is the category used for instru ments in installations supplied from a supply comparable to public mains such as hospital and research laboratories and most industrial laboratories the expected transient overvoltage is 2500V for a...

Страница 26: ...Model 900 Series ________________________________________________________________________________Parts 7 1 ...

Страница 27: ...Model 900 Series ________________________________________________________________________________Parts 7 2 ...

Страница 28: ...Model 900 Series ________________________________________________________________________________Parts 7 3 Upright Freezer Cabinet Assembly 8602 200 1 B Rev 2 Page 2 of 2 AKS ...

Страница 29: ...Model 900 Series ________________________________________________________________________________Parts 7 4 ...

Страница 30: ...Upright Freezer Cabinet Assembly Double Door 8602 200 2 B Rev 2 Page 2 of 2 AKS Model 900 Series ________________________________________________________________________________Parts 7 5 ...

Страница 31: ...Model 900 Series ________________________________________________________________________________Parts 7 6 ...

Страница 32: ...Model 900 Series ________________________________________________________________________________Parts 7 7 ...

Страница 33: ...Model 900 Series ________________________________________________________________________________Parts 7 8 ...

Страница 34: ...Model 900 Series ________________________________________________________________________________Parts 7 9 ...

Страница 35: ...Model 900 Series ________________________________________________________________________________Parts 7 10 ...

Страница 36: ...Model 900 Series ________________________________________________________________________________Parts 7 11 ...

Страница 37: ...Model 900 Series ________________________________________________________________________________Parts 7 12 ...

Страница 38: ...Model 900 Series ________________________________________________________________________________Parts 7 13 ...

Страница 39: ...Model 900 Series ________________________________________________________________________________Parts 7 14 ...

Страница 40: ...Model 900 Series ________________________________________________________________________________Parts 7 15 ...

Страница 41: ...Model 900 Series ________________________________________________________________________________Parts 7 16 ...

Страница 42: ...Model 900 Series __________________________________________________________________Refrigeration Schematics 8 1 ...

Страница 43: ...Model 900 Series __________________________________________________________________Refrigeration Schematics 8 2 ...

Страница 44: ...Model 900 Series __________________________________________________________________Refrigeration Schematics 8 3 ...

Страница 45: ...Model 900 Series __________________________________________________________________Refrigeration Schematics 8 4 ...

Страница 46: ...Model 900 Series __________________________________________________________________Refrigeration Schematics 8 5 ...

Страница 47: ...Model 900 Series __________________________________________________________________Refrigeration Schematics 8 6 ...

Страница 48: ...Model 900 Series __________________________________________________________________Refrigeration Schematics 8 7 ...

Страница 49: ...Model 900 Series __________________________________________________________________Refrigeration Schematics 8 8 ...

Страница 50: ...Model 900 Series ______________________________________________________________________Electrical Schematics 9 1 ...

Страница 51: ...Model 900 Series ______________________________________________________________________Electrical Schematics 9 2 ...

Страница 52: ...Model 900 Series ______________________________________________________________________Electrical Schematics 9 3 ...

Страница 53: ...Model 900 Series ______________________________________________________________________Electrical Schematics 9 4 ...

Страница 54: ...Model 900 Series ______________________________________________________________________Electrical Schematics 9 5 ...

Страница 55: ...Model 900 Series ______________________________________________________________________Electrical Schematics 9 6 ...

Страница 56: ...uction lifetime warranty foamed in place cabinet evaporator and foamed in place door parts only Please contact your sales representative or Thermo for additional information Replacement or repair of component parts or equipment under this warranty shall not extend the warranty to either the equipment or to the component part beyond the original two year warranty period The Technical Services Depar...

Страница 57: ...this warranty In addition to the standard warranty the foamed in place cabinet design carries a unit production lifetime warranty foamed in place cabinet evaporator and foamed in place door parts only Please contact your sales representative or Thermo for addi tional information Replacement or repair of component parts or equipment under this warranty shall not extend the warranty to either the eq...

Страница 58: ...ick fast to the skin and tear the flesh when you attempt to free yourself Use tongs to withdraw objects immersed in the liquid and handle the object carefully Wear protective clothing Protect your eyes with a face shield or safety goggles safety glasses without side shields do not give adequate protection Always wear gloves when handling anything that is or may have been in immediate contact with ...

Страница 59: ...t venting is not restricted by accumu lated ice or frost Use proper transfer equipment Use a phase separator or special filling funnel to prevent splashing and spilling when transferring liquid nitrogen into or from a dewar or refrigerator The top of the funnel should be partly covered to reduce splashing Use only small easily handled dewars for pouring liquid For the larger heavier containers use...

Страница 60: ...gas reduce the concentration of oxygen and can result in asphyxiation Because CO2 gas is colorless odorless and tasteless it cannot be detected by the human senses and will be breathed as if it were air Breathing an atmosphere that contains less than 18 oxygen can cause dizziness and quickly result in unconsciousness and death Note The cloudy vapor that appears when liquid CO2 is exposed to the ai...

Страница 61: ...e 98 6 F as rapidly as possible followed by protec tion of the injured tissue from further damage and infection Remove or loosen clothing that may constrict blood circulation to the frozen area Call a physician Rapid warming of the affected part is best achieved by using water at 108 F Under no circumstance should the water be over 112 F nor should the frozen part be rubbed either before or after ...

Страница 62: ......

Страница 63: ......

Страница 64: ......

Страница 65: ......

Страница 66: ...Thermo Electron Corporation Controlled Environment Equipment Millcreek Road P O Box 649 Marietta Ohio 45750 U S A Telephone 740 373 4763 Telefax 740 373 4189 ...

Отзывы: