

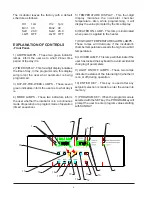


12
If the door is not closed and the control senses
a temperature of 39°C or less after 2 minutes,
the low alarm temperature will go off along
with the compressor. This is not a real alarm
failure. If the door is left open long enough for
this to occur then the user must close the
door sooner so the incubator can recover in
time or set the delay times for a longer period
of time or increase the alarm band.
To adjust the delay timers and the alarm band
follow these instructions:
A.
Press and hold the
and
keys and then
press the ENTER key and the displays will
change to the following:
Use the
key to select 01 and then press
ENTER. The displays will change to the
following:
A number other than 01 might be shown. This
is the delay time setting, in minutes, for the
high alarm. Use the
or
keys to select
your time value and press ENTER and the
displays will change to the following:
This is the delay time setting for the low
alarm. A difference between the high alarm
and low alarm delay that should be noted at
this point is that when you select a value for
the high alarm delay and then turn power off,
that value will appear again when power is
turned on again. The low alarm delay however
will always be 20 minutes when power is
turned on. The reason for this, if the delay is
set for too short of a time and the compressor
goes off, it will be approximately 10 minutes
before the compressor turns back on. This
is due to an internal time delay within the
compressor. The user can change this 20
minutes to a value they desire, but once
power is turned off and on again, it will be 20
minutes again. Use the
or
keys to
select your time value and press ENTER.
The displays will change to the following:
This is the value for the alarm band, the
amount of temperature deviation allowed
before either the high or low delay timers are
started. Use the
or
keys to select your
value and then press ENTER and the displays
will return to their normal operation.
8.
CALENDAR - The clock key allows the user
to set the hours, minutes, and day of the
internal clock. To set the date, month, and
year of the internal clock, the user must select
a configuration mode of 2. To set the date,
month, and year, follow these instructions:
A.
Press and hold the
and
keys
and then press the ENTER key and the
displays will change to the following:
Use the
key to select 02 and then
press ENTER. The displays will change
to the following:
A number other than 01 might be
shown.
This is the day of the month selection.
Use the
or
keys to select the
correct date and then press ENTER
and the displays will change to the
following:
Use the
or
keys to select the
correct month and then press ENTER
and the displays will change to the
following:
Use the
or
keys to select the
correct year and then press ENTER.
The calendar is set and the incubator
will return to normal operation at this
point.
Содержание 3751
Страница 5: ......
Страница 23: ...18 WIRING DIAGRAMS WIRING DIAGRAM 818 INCUBATOR 120V ...
Страница 24: ...19 WIRING DIAGRAM 818 INCUBATOR 230V ...
Страница 27: ......
Страница 29: ......


