DOC NO. 81028
10 OF 11
Rev D 08/17/06 NJL
POWERPAK INSTRUCTIONS
1.
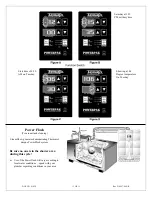
After installation – turn on power to unit at the breaker. You will see a flashing dash and “12” in the
upper window & “00” in the lower window.
2.
First set the clock by pressing the “clock-start-stop” button once. You should see the light next to the
“set clock” come on. Next, press the “day select” button until you reach the day you are at. The day is
indicated on the left side o the upper window. (Monday = 1, Tuesday = 2, etc., etc.).
** (It is very important clock be set for the current day. If you are programming this unit on a Tuesday,
then set the clock and day for Tuesday, day 2.) Using the arrows to the right of both windows set the
current time in military time (24-hour clock). As an example 11:32 am would read 11 in the upper
window and 32 in the lower window. 2:45 PM would read 14 in the upper window and 45 in the lower
window.
3.
Now you will set the “Steam Start Time”. Press the “Clock-Start-Stop” button once. You should see
the light next to the “Start Time” come on and the light next to the “Steam” come on. Using the arrows
set the time you want the steam to begin on that day from now onward. The day is “Select” button for
each day and using the arrows to set the time you want the unit to begin steaming. Always end on the
day you started with to ensure you have all the days programmed.
4.
Next, set the “Steam Stop Time”. Press the “clock-Start-Stop” button once. You should see the light
next to the “Stop Time” come on and the light next to the “Steam” remain on. Using the arrows set the
time you want the steam to stop for that day from now onward. The day is indicated on the left side of
the upper window. To program the rest of the week, press the “Day Select” button the day you started
with to ensure you have all the days programmed.
5.
Now you will set the Powerflush program.
** You must set the “Flush” time at least ½ hour past
the “Steam Stop” time when no one is inside the steam room.
Press the “Clock-Start-Stop” button
once. You should see the light next to the “Start Time” come on and the light next to the “flush” come
on. Using the arrows, set the time you want the flush to start for that day from now press the “Day
Select” button for each day and using the arrows to set the time you want the unit to begin its
Powerflush. Always end on the day you started with to ensure you have all the days programmed. The
Powerflush stops automatically at the end of its cycle. (Approximately 45 minutes).
6.
Next set the temperature. Press the “Clock-Start-Stop” button once. You will see the day indicated now
on the right side of the lower window and the desired temperature in the upper window. Using the
arrows set the temperature you want for that day from now onward. The day is now indicated on the
right side of the lower window. To program the rest of the week, press the “day Select” button for each
day and using the arrows to set the temperature you want for that day. Always end on the day you
started with to ensure you have all the days programmed.
7.
It is now time to jump out of the program area. You are currently in the temperature setting mode.
Make sure your day is correctly set. (Monday = 1, Tuesday = 2, etc., etc.). Remember, the day is now
indicated on the right side of the lower window. Press the “Clock-Start-Stop” button once. This will
take you out of the program mode and into the sleep (non-active) mode. A dash and the current time
should be showing.
** AFTER PROGRAMMING** To have the unit steam immediately, press the
ON/OFF manual button once. You should see the “Steam” light flash continuously.
TECHNICAL SUPPORT 800-776-0711


