34
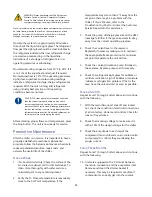
WARNING: Never deactivate the High Refrigerant
Pressure Switch or the Low Compressor Pressure
Switch. Failure to heed this warning can cause serious
compressor damage, severe personal injury, or death.
Note: For chillers with the variable-speed compressor option there is
an initial startup routine that will run the compressor at a fixed
speed for 2 minutes. After this routine the chiller will actively
manage the system to maintain desired set point.
Operate the system for approximately 30 minutes
then check the liquid line sight glass. The refrigerant
flow past the sight glass should be clear. Bubbles in
the refrigerant indicate either low refrigerant charge
or excessive pressure drop in the liquid line.
Indications of a shortage of refrigerant are low
operating pressures or subcooling.
Normal subcooling ranges are from 10°F to 20°F. If it
is not, check the superheat and adjust if required.
Normal superheat is 10°F. If the operating pressures,
sight glass, superheat, and subcooling readings
indicate a refrigerant shortage, charge refrigerant as
required. With the unit running, add refrigerant
using industry best practices until operating
conditions become normal.
CAUTION: A clear sight glass alone does not mean
that the system is properly charged. Also, check
system superheat, sub-cooling, and unit operating
pressures. If both suction and discharge pressures are
low but sub-cooling is normal, a problem other than
refrigerant shortage exists. Do not add refrigerant, as
this may result in overcharging the circuit.
After achieving proper flows and temperatures, press
the Stop button. The unit is now ready for service.
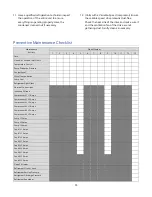
Preventive Maintenance
After the chiller is in service, it is important to have a
properly established preventive maintenance
program. Follow the below maintenance schedule to
reduced potential downtime, repair costs, and
extends the useful life of the chiller.
Once a Week
1.
(Air-Cooled Units Only) Check the surface of the
air-cooled condenser coil for dirt and debris. To
clean, rinse thoroughly with water and use a
mild detergent to any remaining debris.
2.
Verify the To Process temperature is reasonably
close to the Set Point temperature. If the
temperature stays more than 5°F away from the
set point, there may be a problem with the
chiller. If this is the case, refer to the
Troubleshooting Chart or contact the Customer
Service Department for assistance.
3.
Check the pump discharge pressure on the HMI.
Investigate further if the pressure starts to stray
away from the normal operating pressure.
4.
Check the coolant level in the reservoir.
Replenish if necessary making sure to maintain
the appropriate freeze protection for minimum
set point temperature the unit will run.
5.
Check the coolant circulation pump for leaks in
the seal area. Replace pump seal if necessary.
6.
Check the refrigerant sight glass for bubbles or
moisture indication. Sign of bubbles or moisture
indicates a refrigeration problem. If that is the
case, have the unit serviced as soon as possible.
Once a Month
Repeat items 1 through 6 listed above and continue
with the following
7.
With the main disconnect shut off and locked
out, check the condition of electrical connections
at all contactors, starters and controls. Check for
loose or frayed wires.
8.
Check the incoming voltage to make sure it is
within 10% of the design voltage for the chiller.
9.
Check the amp draws to each leg of the
compressor (fans or blowers on air-cooled units)
and pump(s) to confirm they are drawing the
proper current.
Every Three Months
Repeat items 1 through 9 listed above and continue
with the following.
10.
Units are equipped with a Y-strainer between
the return connection and the evaporator inlet.
Remove and clean the strainer basket if
necessary. This may be required more often if
contaminants can easily get into the coolant.
Содержание Accuchiller NQ Series
Страница 1: ......
Страница 2: ......
Страница 6: ...Page Intentionally Blank...
Страница 44: ...38...

