background image

Page |7 

Getting started with your appliance


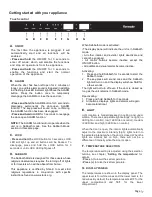
Touch control


A. 

ON/OFF 

The  first  time  the  appliance  is  plugged,  it  will 
automatically  start  and  all  functions  will  be 
enabled. 

• 

Press  and  hold 

the  ON/OFF  for  3  seconds  to     

enter  off  mode,  which  will  disable  the  functions 
and stop all operations from the appliance. 
• 

Press  and  hold 

the  ON/OFF  for  3  seconds  to     

enable  the  functions  and  start  the  normal   
operation of the appliance. 


B. 

ALARM 

When the  door  has  been  left  open  for  2  minutes  or 
longer, an audible alarm sound is triggered in addition 
to a flashing blue LED indicator light above the ALARM 
button.  Press  the  button  once  to  temporarily 
disengage the ALARM or close the open door. 
 
• 

Press and hold 

the ALARM button for 3 seconds to 

disengage  permanently  the  door-open  ALARM 
function. The  key-press  will  sound  once,  confirming 
the ALARM function has been disengaged. 
• 

Press and hold 

ALARM for 3 seconds to reengage 

the door-open ALARM function. 
 

NOTE: 

The ALARM function will not operate when the 

unit  is  in  Sabbath  mode.  See  the  Sabbath  Mode 
section in this same page. 
 

C. 

LOCK 


• 

Press and hold 

the LOCK button for 3 seconds, LOCK 

LED  will  light  up  and  all  buttons  will  be  blocked.  To 
disengage,  press  and  hold  the  LOCK  button  for  3 
seconds or until LOCK LED light goes off.


D. 

SABBATH  


The Sabbath Mode is designed for those users whose 
religious observances requires the turning off of lights 
or for travelers who will be absent from home. 
 
This  appliance  is  certified  by  Star-K  to  meet  strict 
religious  regulations  in  conjunction  with  specific 
instructions found on www.star-k.org. 


When Sabbath mode is activated: 


•The  display panel will  indicate  the unit  is  in  Sabbath 
mode.  
•  All  other  interior  and  exterior  lights  deactivate  and 
cannot be engaged.  
•  All  control  buttons  become  inactive  except  the 
ON/OFF button. 
• All audible and visual alarms become inactive.  


Activating:  
1.  Press and hold Sabbath for 3 seconds to start the 

Sabbath mode. 

2.  The  key-press  will  sound  once  and  the  Sabbath 

light will turn on and the display will show SAB for 
a few seconds.  

The light will not turn off even if the door is closed as 
long as the unit remains in Sabbath mode. 


Deactivating: 

1.  Press and hold Sabbath for 3 seconds. 
2.  All buttons, displays, lights and alarms will again 

become functional. 


E. 

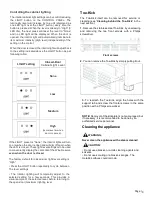
LIGHT


Light  location  is  hidden/recessed  in  ceiling  and  under 
mullion. There are 4 adjustable light settings: no light (no 
LED light on control), low (1 LED lite on control), medium 
(2 LED lite) and high (3 LED lite on control).  
 
When the door is open, the interior lights automatically 
adjust to  the  maximum  intensity (high); lights  return  to 
the selected intensity when the door is closed.


When the 

lights  are  already  set  on  high,  there  will  not  be  a 
difference of intensity when the door is open.


F. 

TEMPERATURE SELECTION


The temperature setting is adjusted using the selection 
buttons,  see  chapter  “

Setting  the  temperature

”  for 

details.


• 

Press (-) 

to lower the set temperature.


• 

Press (+) 

to raise the set temperature.


G. 

DISPLAY PANELS


The temperatures are shown in the display panel. The 
upper level is for white wines and the lower level is for 
red wines. By default, the temperatures sets 46°F for the 
upper  compartment  and  58°F  for  the  lower 
compartment. 

Содержание T24UW905LP

Страница 1: ... MANUAL DE USO Y CUIDADO GUIDE D UTILISATION ET D ENTRETIEN Model Modelo Modele T24UW925LS T24UW925RS T24UW915LS T24UW915RS T24UW905LP T24UW905RP Glass Door Wine Reserve Enfriador de vinos Cellier avec porte en verre ...

Страница 2: ...ance 5 Transporting Installation location Ventilation 5 Getting to know your appliance 6 Getting started with your appliance 7 Touch control Switching the appliance on Setting the temperature 8 Controlling the cabinet lighting 9 Toe Kick 9 Cleaning the appliance 9 Proceed as follows Cleaning behind the Toe kick 10 Odors 10 Light LED 10 Tips for saving energy 10 Operating noises 10 Normal noises Pr...

Страница 3: ...ion Pay special attention to the Important Safety Instructions located at the beginning of this guide Your THERMADOR product is ready and waiting to be used for your next gourmet creation Our products are handcrafted with the highest quality authentic materials to ensure reliable service In the unlikely event that you have a service question please have your model and serial numbers of your produc...

Страница 4: ...ectrical appliances inside the appliance e g heater electric ice maker etc Risk of explosion Never use a steam cleaner to defrost or clean the appliance The steam may penetrate electrical parts and cause a short circuit Risk of electric shock Do not use pointed and sharp edged implements to remove frost or layers of ice You could damage sensitive internal components including the refrigerant tubes...

Страница 5: ...s appliance It is recommended that a separate circuit serving only your refrigerator be provided Use an outlet that cannot be turned off by a switch Do not use an extension cord Transporting The appliance is heavy and must be handled with caution during transportation and installation Because of the weight and dimensions of the appliance at least two persons are necessary to move the appliance int...

Страница 6: ...indow 3 Handle Pro Style or Master Style 4 Full depth cantilever shelves 5 shelves 7 bottles each shelve 5 Separator and touch controls 6 Bottom shelf 1 shelf 6 bottles 7 Toe kick 8 Leveling legs x4 NOTE Overlay model does not includes the stainless door nor the handle WARNING To avoid the appliance tilting due to unbalanced overweight do not pull out all the Wine Racks at the same time Always pus...

Страница 7: ...n conjunction with specific instructions found on www star k org When Sabbath mode is activated The display panel will indicate the unit is in Sabbath mode All other interior and exterior lights deactivate and cannot be engaged All control buttons become inactive except the ON OFF button All audible and visual alarms become inactive Activating 1 Press and hold Sabbath for 3 seconds to start the Sa...

Страница 8: ...et a new temperature press the Selection Buttons or The temperatures can be adjusted individually for each section of the appliance using the left side temperature selection buttons will change the temperature for the upper compartment and using the right side buttons changes the lower compartment temperature The temperature can be displayed in degrees Celsius C or degrees Fahrenheit F The factory...

Страница 9: ...ontents of the Wine Reserve even when the door is closed The factory default for closed door light level setting is High Press the LIGHT button repeatedly to cycle between The level settings The interior lighting will temporarily adjust to the selected setting for a few seconds This provides a visual sample of the selected level before returning to the open door maximum lighting level Toe Kick The...

Страница 10: ...repaired by authorized technicians only Tips for saving energy Install the appliance in a dry well ventilated room The appliance should not be installed in direct sunlight or near a heat source e g radiator cooker If required use an insulating plate Do not block the ventilation openings in the appliance Open the appliance door as briefly as possible Operating noises Normal noises Droning Motors ar...

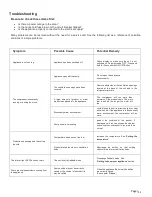
Страница 11: ...duct was placed into the appliance The compressor will run more than normal until the product cools The more that is added the longer the motor will run Excessively warm environment Avoid placing the unit in direct sunlight or near a heat source If the appliance is in an unusually warm environment the compressor will run more Door gasket is not sealing Inspect the condition of the gasket If damage...

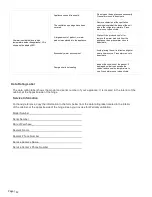
Страница 12: ...ironment Avoid placing the unit in direct sunlight or near a heat source Press alarm once to deactivate Door gasket is not sealing Inspect the condition of the gasket If damaged cold air can escape the cabinet and cause the temperature to rise Press alarm once to deactivate Data Rating Label The data rating label shows the model and serial number of your appliance It is located in the interior of ...

Страница 13: ...Page 13 ...

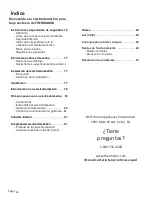
Страница 14: ...ón de la instalación Ventilación 17 Introducción a su electrodoméstico 18 Primeros pasos con su electrodoméstico 19 Control táctil Encendido del electrodoméstico Ajuste de la temperatura 20 Control de la iluminación del gabinete 21 Cubierta Inferior 21 Limpieza del electrodoméstico 21 Proceda de la siguiente manera Limpieza detrás del cubierta inferior Olores 22 Luz LED 22 Consejos para ahorrar en...

Страница 15: ...es importantes de seguridad que se encuentran al comienzo de esta guía Su producto THERMADOR está listo y esperando a ser utilizado en su próxima creación gourmet Nuestros productos están hechos a mano con materiales auténticos de la más alta calidad para garantizar un servicio confiable En el caso poco probable de que tenga una pregunta sobre servicio tenga a mano los números de modelo y de serie...

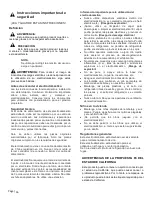
Страница 16: ... utilice dispositivos eléctricos dentro del electrodoméstico p ej calentador máquina de hielo eléctrica etc Riesgo de explosión Nunca utilice un limpiador de vapor para descongelar o limpiar el electrodoméstico El vapor podría penetrar las piezas eléctricas y provocar un cortocircuito Riesgo de descarga eléctrica No utilice elementos con puntas o bordes afilados para retirar la escarcha o las capa...

Страница 17: ...l aire libre En un entorno donde gotee agua En habitaciones donde haya riesgo de congelamiento El electrodoméstico es pesado y debe manipularse con cuidado durante el transporte y la instalación Debido al peso y a las dimensiones del electrodoméstico se necesitan como mínimo dos personas para moverlo hasta su lugar de manera segura y evitar lesiones en las personas o daños en el electrodoméstico A...

Страница 18: ...o Pro o Estilo Maestro 4 Estantes flotantes de profundidad completa 5 estantes 7 botellas cada estante 5 Separador y controles táctiles 6 Estante inferior 1 estante 6 botellas 7 Cubierta inferior 8 Patas niveladoras x4 NOTA El modelo de revestimiento no incluye la puerta de acero inoxidable ni la manija ADVERTENCIA Para evitar la inclinación del electrodoméstico debido a un sobrepeso fuera de equi...

Страница 19: ...agar las luces o para los viajantes que estarán ausentes de su hogar Este electrodoméstico lleva el certificado Star K que indica que cumple con estrictas normas religiosas junto con instrucciones específicas que aparecen en www star k org Cuando el modo Sabbat está activado El panel de visualización indicará que la unidad está en modo Sabbath Sabbat Todas las demás luces interiores y exteriores s...

Страница 20: ...e vinos es de 46 F para el compartimiento superior y de 58 F para el compartimiento inferior Estas son las temperaturas recomendadas pero usted puede ajustar la temperatura a su gusto Para establecer una nueva temperatura presione los Botones de selección o Las temperaturas pueden ser ajustadas individualmente para cada sección del electrodomestico utilizando los botones ubicados al costado del di...

Страница 21: ...inación interior se ajustará temporalmente al ajuste seleccionado durante unos segundos Esto proporciona una muestra visual del nivel seleccionado antes de regresar al nivel de iluminación con la puerta abierta máximo Cubierta Inferior La cubierta inferior propiamente dicho puede ser retirado para reparaciones o limpieza consulte Limpieza detrás de la cubierta inferior en la próxima sección 1 Reti...

Страница 22: ...ores desagradables 1 Apague el electrodoméstico 2 Saque toda la comida y las bebidas del electrodoméstico 3 Limpie el interior Consulte Limpieza del artefacto 4 Limpie todos los contenedores 5 Vuelva a encender el electrodoméstico 6 Controle si después de 24 horas siguen formándose olores Luz LED Su electrodoméstico cuenta con una luz LED que no requiere mantenimiento ubicada en la parte superior ...

Страница 23: ...e lo normal hasta que el producto se enfríe Cuanto más se agregue mayor será el tiempo que el motor estará en marcha Entorno excesivamente templado Evite colocar la unidad bajo la luz solar directa o cerca de una fuente de calor Si el electrodoméstico se encuentra en un entorno inusualmente cálido el compresor funcionará más La junta de la puerta no sella Inspeccione el estado de la junta Si está ...

Страница 24: ...jo la luz solar directa o cerca de una fuente de calor Presione el botón de alarma para desactivarla La junta de la puerta no sella Inspeccione el estado de la junta Si está dañada el aire frío puede escapar del gabinete y causar un incremento de temperatura Presione el botón de alarma para desactivarla Etiqueta de clasificación de datos La etiqueta de clasificación de datos muestra el modelo y el...

Страница 25: ...Page 23 Page 25 ...

Страница 26: ... 29 Transport Lieu d installation Aération 29 Présentation de l appareil 30 Mise en service de l appareil 31 Bouton de commande Mise en marche de l appareil Réglage de la température 32 Commande de l éclairage du meuble 33 Bandeau de socle 33 Nettoyage de l appareil 33 Procédure Nettoyage derrière le bandeau de socle Odeurs 34 Éclairage DEL 34 Conseils pour économiser l énergie 34 Bruits de foncti...

Страница 27: ...particulière aux renseignements sur la sécurité au début de ce guide Votre appareil THERMADOR est prêt à utiliser pour votre prochaine création gastronomique Nos produits sont fabriqués à la main avec des matériaux de la plus haute qualité afin d assurer un service fiable Dans l éventualité peu probable où vous auriez une question concernant un problème technique veuillez avoir à portée de main le...

Страница 28: ...s à l intérieur de l appareil p ex appareils de chauffage machine à glaçons etc Risque d explosion Ne décongelez et ne nettoyez jamais l appareil avec un nettoyeur à vapeur La vapeur risque d atteindre des pièces électriques et de provoquer un court circuit Risque d électrocution Pour détacher le givre ou les couches de glace n utilisez jamais d objets pointus ou présentant des arêtes vives Vous r...

Страница 29: ...on fourni avec cet appareil MISE EN GARDE N installez pas cet appareil À l extérieur Dans un environnement où de l eau dégoutte Dans des locaux à risque de gel MISE EN GARDE Lors de la manipulation ou du déplacement de l appareil évitez d endommager les tuyaux et de provoquer des fuites de réfrigérant Lieu d installation Une pièce bien aérée où l air est sec convient à l installation Le lieu de l ...

Страница 30: ... en porte à faux pleine profondeur 5 tiroirs 7 bouteille sur chaque tiroir 5 Séparateur et boutons de commande 6 Tiroir inférieur 1 tiroir 6 bouteilles 7 Bandeau de socle 8 Pattes de nivellement x4 REMARQUE Le modèle avec revêtement ne comprend pas de porte en acier inoxydable ou de poignée MISE EN GARDE Pour éviter que l appareil ne bascule en raison d un déséquilibre de poids ne pas ouvrir les d...

Страница 31: ... les lumières soient éteintes ou pour les voyageurs qui s absentent de leur domicile Cet appareil est certifié par Star K pour répondre à des règiements religieux rigoureux relativement à des directives précises se trouvant sur www star K org Lorsque le mode Sabbat est activé Le panneau d affichage indique que l appareil est en mode Sabbat Tous les autres éclairages intérieurs et extérieurs se dés...

Страница 32: ...artiment inférieur Ce sont les températures recommandées mais vous pouvez régler la température à votre guise Pour régler une nouvelle température appuyez sur les boutons de sélection ou Les températures peuvent être réglées individuellement pour chaque section de l appareil en utilisant les boutons de sélection de température de gauche pour changer la température du compartiment supérieur et en u...

Страница 33: ...glage par défaut en usine de l intensité lorsque la porte est fermée est Moyenne Appuyez sur le bouton LIGHT plusieurs fois pour passer d un niveau à l autre L éclairage intérieur s ajustera temporairement au réglage sélectionné pendant quelques secondes Cela permet de visualiser le résultat du niveau sélectionné avant de retourner au niveau d éclairage maximum de la porte ouverte Bandeau de socle...

Страница 34: ...ppareil 3 Nettoyez l intérieur de l appareil Voir le chapitre Nettoyage 4 Nettoyez toutes les bouteilles 5 Remettez l appareil en marche 6 Au bout de 24 heures vérifiez si de nouveau des odeurs sont apparues Éclairage DEL Votre appareil est équipé d un éclairage DEL ne demandant pas d entretien et se trouvant dans la partie supérieure de l armoire intérieure sous le meneau Les réparations de cet é...

Страница 35: ...esseur fonctionne davantage afin de refroidir les bouteilles Plus il y a de bouteilles plus le moteur fonctionnera longtemps L environnement est trop chaud Évitez de mettre l appareil en plein soleil Si l appareil se trouve dans un environnement trop chaud le compresseur fonctionnera davantage Le joint d étanchéité de la porte n adhère pas Inspectez l état du joint d étanchéité S il est endommagé ...

Страница 36: ...l se trouve dans un environnement trop chaud le compresseur fonctionnera davantage Le joint d étanchéité de la porte n adhère pas Inspectez l état du joint d étanchéité S il est endommagé l air froid s échappera du meuble et incitera le compresseur à fonctionner davantage Plaque signalétique La plaque signalétique indique le numéro de série et le modèle de l appareil Elle se trouve à l intérieur d...

Страница 37: ...Page 39 Page 37 ...

Страница 38: ...Page 38 ...

Страница 39: ...Page 39 ...

Страница 40: ...Page 40 PN ARAKUA100090 8001087767 T24UW925RS T24UW925LS T24UW915RS T24UW915LS T24UW905RP T24UW905LP 08 2021 Printed in Mexico Impreso en México Imprime au Mexique ...

Отзывы: