ThermaCell ProFLEX Скачать руководство пользователя страница 5

5

Helpful Hints for Using the Insoles


·  Heated Insoles do not get “hot” to the touch and will not get as hot as disposable/chemical    


  warming pads. They are engineered to keep your feet from sweating then freezing, so that your 


  feet remain warm and comfortable. Heated Insoles maintain a steady temperature of 100˚ or   


  111˚F inside your boots or shoes (depending on the heat setting chosen), keeping your feet    


  around normal body temperature.


·  For best results, use Heated Insoles in a cold environment. You are less likely to feel heat output  


  in a warm environment outside of footwear.


·  For a better fit, remove the insoles currently in your footwear (if removable), and replace with  


  Heated Insoles. Make sure footwear is not too tight, tightness naturally causes feet to get cold.


·  Once Heated Insoles have been fully charged, they will provide up to five hours of constant   


  heat on Medium. The outside temperature and insulation of footwear will affect run time. 


·  To prolong battery life, it is recommended that the Insoles be in the No Heat setting when the  


  user is engaged in strenuous activities. At high exertion levels, the body typically generates    


  enough heat to keep the feet warm.


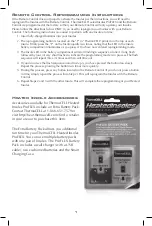
·  The Smart Charging Case should be used as a protective carrying case for the batteries.


·  Maintaining a comfortable heat level while using your Heated Insoles depends upon proper   


  installation and activation of the Insoles, along with the type, fit, insulation, and dryness of the  


  footwear and/or socks being worn.


·  For best performance, it is recommended to wear well insulated boots and medium-to- 


  lightweight socks that wick away moisture. A very heavy sock will prevent heat from reaching  


  your foot. Avoid materials such as cotton that will retain moisture.


·  For best results, turn Heated Insoles on at the first sign of your feet getting cold.


·  Before using Heated Insoles, make sure the inside of your shoes or boots are dry.


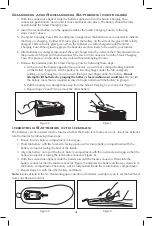
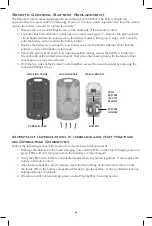
·  The tabs at the heel of the Heated Insoles will assist in easy removal of the Insoles from shoes or  


  boots after use.  Be sure to insert Insoles with the black tab at the heel sticking up.


·  When the batteries are drained during operation, the Insoles will stop generating heat.  It is then  


  time to replace or recharge the batteries.  It is recommended that you keep an extra set of    


  batteries with you to extend the run time of the Insoles.

Care Instructions


·  Store all contents of this ThermaCELL Heated Insoles ProFLEX product in a clean and dry place. 


·  Charge batteries fully before long-term storage and store in the Smart Charging Case.  Recharge  


  the batteries every few months to maintain peak performance.


·  Only use the Smart Charging Case to charge ThermaCELL Heated Insoles ProFLEX batteries.


·  Do not damage the heating elements by excessively bending the Insoles.


·  Cut the Insoles to size only as indicted in instructions and on bottom of Insole.


·  Clean with a damp cloth only.  Do not use chemicals or cleaning agents.


·  Do not submerge in water.  Insoles are highly water resistant, not waterproof.  If Insoles become  


  submerged in water, air dry before attempting to use.


·  Only air-dry the Insoles.  Do not place them on radiators or any other hot surface.  Let the Insoles  


  dry completely before charging and attempting to use again. 

Содержание ProFLEX

Страница 1: ...l thermostat to maintain a steady temperature inside of your shoes or boots keeping your feet around normal body temperature They are intended to be used in a cold setting you are less likely to feel the heat in a warm environment These operating instructions provide clear and concise directions on how to properly use your Heated Insoles ThermaCELL products including the original ThermaCELL Heated...

Страница 2: ...f footwear to remove the batteries It may take up to 4 hours to charge Before proceeding ensure hands are dry Directions 1 Plug the USB Cable into the Smart Charging Case by inserting the micro USB connector smaller end Then plug the USB connector larger end into the wall charger Connect the wall charger to a power outlet When there are no batteries in the Smart Charging Case the two LEDs on the s...

Страница 3: ...ulling up just enough so you can insert the tip if your finger under the battery Do not attempt to lift batteries by grasping the battery s foam cushion as it could tear Do not lift the battery more than is required to insert a finger underneath the battery to grasp it b Pull the battery in a straight line away from the Smart Charging Case connector Figure 7 c Repeat steps 7a and 7b to remove the ...

Страница 4: ...ng by using the buttons on the Remote Control High 111 F Medium 100 F or No Heat standby The green LED light in the battery compartment on each Insole will flash intermittently indicating the heat setting one flash indicates No Heat two flashes indicate Medium Heat and three flashes indicate High Heat 3 The LED light on the Remote Control will flash one time to confirm a heat setting has been tran...

Страница 5: ... is recommended to wear well insulated boots and medium to lightweight socks that wick away moisture A very heavy sock will prevent heat from reaching your foot Avoid materials such as cotton that will retain moisture For best results turn Heated Insoles on at the first sign of your feet getting cold Before using Heated Insoles make sure the inside of your shoes or boots are dry The tabs at the he...

Страница 6: ...oard to its original position making certain the battery is located on the underside of the printed circuit board Now place the housing front with the black rubber spacer piece over the circuit board 5 With the two sides of the Remote Control together secure the two side panels by replacing the four small Phillips screws Important Information if Insoles are Not Heating or Operating Correctly Perfo...

Страница 7: ...followed by four 4 very short flashes to indicate the programming mode is in process The flash sequence will repeat three 3 times and then will time out 4 If you do not see the flash sequence noted in step 3 you have pressed the button too slowly Repeat the process pressing the button two times more quickly 5 During this process press any button located on the Remote Control if you do not press a ...

Страница 8: ...ures Reorient or relocate the receiving antenna Increase the separation between the equipment and the receiver Connect the equipment into an outlet on a circuit different from that to which the receiver is connected Consult the dealer or an experienced radio TV technician for help This device complies with Part 15 of the FCC Rules Operation is subject to the following two conditions 1 this device ...

Отзывы: