background image

quest

quest

1-866-933-7486 

Quest PowerDry 4000 Pro 

Installation, Operation and Maintenance Instructions  

10

www.QuestProtect.com

[email protected]

Evaporator coil frosted continuously, low dehumidifying capacity.

1. Defrost thermistor loose or defective

2. Low refrigerant charge

Compressor runs with POWER button OFF.

1. Defective relay

2. Defective control board

3. Upper housing not sealed to tower

4.4 Refrigerant Charging

If the refrigerant charge is lost due to service or leak, a new charge must be accurately weighed in. If any of the old 
charge is left in the system, it must be removed before weighing in the new charge. Refer to the unit nameplate for 
the correct charge weight and refrigerant type.

4.5 Blower Replacement

The blower has a PSC motor and internal thermal overload protection. If defective, the complete assembly must be 
replaced.

1.   Unplug power cord

2.   Remove the front cover

3.   Remove the 5 screws attaching blower inlet ring

4.  Remove the 4 screws mounting impeller to underside of base plate

5.   Disconnect the blower leads

6.   Reassemble the new blower using the above procedure in reverse

4.6 Thermistor Replacement

The defrost thermistor probe is inserted into the coil measuring coil temperatures and reacts accordingly.

To replace thermistor:

1.  Remove top cover and filter

2.  Remove 5 screws holding front filter bracket

3.  Remove the filter bracket and foam block underneath

4.  Remove the 4 screws holding the control panel in place

5.  Pull the thermistor probe from the evaporator coil, reinsert the new probe into the existing hole

6.  Route the thermistor wire along the side of the heat exchanger

7.  Detach and remove old thermistor wire from board

8.  Attach thermistor probe wire onto board

9.  Reassemble unit

Содержание Quest PowerDry 4000 Pro

Страница 1: ...53704 Toll Free 1 866 933 7486 www QuestProtect com sales QuestProtect com Read and Save These Instructions TS 760 11 14 quest quest 1 Quest PowerDry 4000 Pro High capacity 176 pints day AHAM 22 Gall...

Страница 2: ...nsate Removal 5 2 5 Ducting 5 2 6 POWER Button 5 2 7 PURGE Button 5 2 8 Humidistat 6 2 9 HOURS Button 6 2 10 DEFROST Light 6 2 11 Defrost Cycle 6 2 12 Low Pressure Control 6 3 Maintenance 7 3 1 Air Fi...

Страница 3: ...s for maintenance and service DO NOT INSTALL UNIT WITH THE SERVICE PANELS INACCESSIBLE Avoid directing the discharge air at people or over the water in pool areas If used near a pool or spa be certain...

Страница 4: ...d refrigeration system Dimensions Width 20 Depth 23 Height 40 Weight 135 lbs 2 Operation Place dehumidifier inside structure place condensate hose into a drain or a very large container and turn on To...

Страница 5: ...mped more than 20 feet above the unit a second pump must be added to relay the condensate 2 5 Ducting A detachable rectangular exhaust collar is supplied that will allow 10 round lay flat duct to be a...

Страница 6: ...w the defrost set point due to excessive frost formation the thermistor activates the solid state control and the defrost light The control cycles the compressor off and on by monitoring thermistor te...

Страница 7: ...much as possible before storage 1 Use the pump purge switch see Sec 2 7 and Fig 4 to reduce the water level in the reservoir 2 Stretch the hose flat to drain it completely If the unit will not be expo...

Страница 8: ...s the entire coil from inlet to outlet The mixture of gas and liquid refrigerant enter the accumulator after leaving the evaporator coil The accumulator prevents any liquid refrigerant from reaching t...

Страница 9: ...control board Unit removes some water but not as much as expected 1 Air temperature and or humidity have dropped 2 Check to make sure humidistat is set high enough 3 Humidity meter and or thermometer...

Страница 10: ...rnal thermal overload protection If defective the complete assembly must be replaced 1 Unplug power cord 2 Remove the front cover 3 Remove the 5 screws attaching blower inlet ring 4 Remove the 4 screw...

Страница 11: ...Gravity Drain Option If the condensate pump fails and cannot be replaced immediately the Quest PowerDry 4000 Pro can be used by draining by gravity 1 Unplug the unit and remove the front cover 2 Push...

Страница 12: ...IED OB T STOR ENGRG DEPT 3 PROOFS TO BE APPROVED BY T STOR ENGRG DEPT 4 COLORS BLACK LINES LETTERS ON WHITE BACKGROUND PART NO SHEET REV TITLE DRAWN BY CHECKED BY SIGNATURES DATE SCALE A 1 OF 1 INCHES...

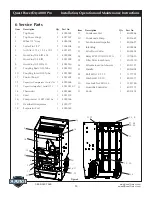
Страница 13: ...ompressor 55mfd 370V 1 4029606 13 Capacitor Impeller 15mfd 371V 1 4033031 07 14 Thermistor 1 4032644 15 Cord 1 4032315 16 Compressor 11 9KBTU R410a 1 4029186 17 Overload Compressor 1 4029177 18 Evapor...

Страница 14: ...reliable means The end user is responsible for normal care This warranty does not cover any defect malfunction etc resulting from misuse abuse lack of normal care corrosion freezing tampering modifica...

Отзывы: