background image


54 

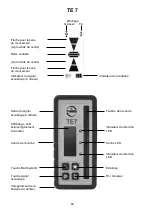
TE 7 


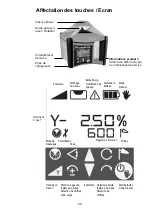
Affichage 

   Grossier     Fin          


Flèche pour le sens  
du mouvement


(A proximité du centre) 
 
Barre centrale 


(A proximité du centre) 


Flèche pour le sens 
du mouvement 


Indicateur du signal 

Indicateur de la batterie


acoustique (3 niveau) 


Sortie du signal  

        Fenêtre de la sonde 

acoustique 

à l’arrière  


Affichange  LCD 
éclairé (également    

        Indicateur de direction 

à l’arrière) 

        LED  


Centre de l‘enoche   


      Centre LED


        Indicateur de direction


        LED  


Touche Marche/Arrêt 

        Éclairage 


Touche signal                                                                                                   Fin / Grossier 
acoustique 


Compartiment de la  
batterie (

à l’arrière)  


Содержание VISION 1N

Страница 1: ...VISION 1N Gebrauchsanleitung DE Instruction manual EN Instructions de service FR ...

Страница 2: ... 7 Einstellung der Nivellier Empfindlichkeit Windy 8 8 TILT Funktion 8 9 Stromversorgung Laser 9 10 Funk Fernbedienung FB V Option 10 11 Empfänger 11 TE 6 12 TE 7 13 12 Überprüfung der Justierung 14 13 Menü 14 14 Lieferumfang 17 15 Betriebsanzeigen und Störungen 17 16 Garantie 17 17 Kurzanleitung 18 18 Technische Daten 19 19 Lieferantenerklärung Sicherheitshinweise 20 20 Entsorgung 21 ...

Страница 3: ...t sich durch Robustheit sowie höchster Präzision aus Made in Germany und sollte auf keiner Baustelle fehlen Damit Sie stets ein einsatzbereites Gerät haben sind folgende Hinweise zu beachten 1 Das Gerät niemals nass im Behälter aufbewahren 2 Genauigkeit vor jedem Einsatz überprüfen da wir keine Haftung für Dejustierung übernehmen können 3 Hinweise zur Behandlung des Akkus beachten 4 Laser Austritt...

Страница 4: ...dus Windy Drehzahloder Scanbeenden Laseraustritt Rotation Ladebuchse Manueller Modus Nivellier anzeige Endanschlag Lageänderung Batterie anzeige Akkufach Optisches Visier Linksdrehung Schrittbetrieb Ziffern u Vorzeichenwahl Rechtsdrehung Schrittbetrieb Scan Produktinfos Rückseite Via QR Code u a Gebrauchsanleitung ...

Страница 5: ...ie Rotationsgeschwindigkeit lässt sich in 4 Stufen re gulieren 0 200 600 und 800 U min Nach zweimaligem Drücken der Rotationstaste hält der Laser an Drehzahl 0 Durch weiteres Drücken der Taste wird die Rotati onsgeschwindigkeit jeweils erhöht Im Stillstand kann der Laserpunkt mit den Tasten Links Rechtsdrehung bewegt werden Wird eine der Tasten gedrückt gehalten beschleunigt sich die Bewegung des ...

Страница 6: ...hließend wird der eingegebene Neigungs wert angefahren Während dieses Vorgangs blinkt das Neigungssymbol Ist der Wert erreicht werden der Neigungswert und das Neigungssymbol dauerhaft angezeigt Falls sich das Gerät durch äußere Einwirkungen wie Erschütterungen oder starke Temperaturunterschiede in seiner Lage verändert wird der Rotationsbetrieb au tomatisch unterbrochen Dadurch werden Fehlmes sung...

Страница 7: ...cken wird ein Minus im Display angezeigt Bei oberer Pfeiltaste Plus gibt es keine entsprechende Anzeige im Display Achtung Im manuellen Modus keine automatische Selbstnivellierung und keine Abschaltung des La sers 5 Ausblend Modus Im Ausblendmodus kann der Laseraustritt auf eine be stimmte Größe und Position gebracht werden Dies ist nur bei rotierendem Laserstrahl möglich Durch 1x Drücken wird die...

Страница 8: ...s gewählt fährt die Laserlinie an diese Posi tion 7 Einstellung der Nivellier Empfindlichkeit Windy Falls während der Arbeit durch Wind Bodenschwingun gen oder leichte Stöße die Rotation immer wieder un terbrochen wird weil das Gerät nachregeln muss be steht die Möglichkeit über die Windy Funktion hier Ab hilfe zu schaffen Durch Drücken der Windy Taste wird die Nivellier empfindlichkeit des Instru...

Страница 9: ...des Betriebs möglich Ein Überladen ist nicht möglich Ladegerät nur in trockenen Räumen einsetzen Die eingesetzten Akkus mit Eneloop Technologie bieten den Vorteil einer geringen Selbstentladung Somit ist ein Nachladen der Akkus bei Nichtbenut zung des Gerätes frühestens alle 6 Monate nötig Im Akkufach können auch normale Alkaline Mono Zellen verwendet werden Diese dürfen auf keinen Fall geladen we...

Страница 10: ...en passenden Kanal um auszuschließen dass es zu Störungen mit anderen Geräten kommt Im Display finden sich die gleichen Angaben wieder wie auf dem Display des dazugehörigen Lasers Ist dies nicht der Fall und wird stattdessen ein Antennensymbol angezeigt kann dies folgende Gründe haben Der Laser ist nicht eingeschaltet Der Radiokanal ist nicht korrekt eingestellt Die Fernbedienung befindet sich auß...

Страница 11: ...über hinaus informiert die Anzeige beim Vermessen darüber in welche Richtung der Empfänger bewegt werden muss Pfeile Sensorfenster zum Laser hinwenden und durch den rotierenden Laserstrahl fahren bis in der LCD eine Anzeige erfolgt Den Emp fänger dann solange dem Pfeil folgend bewegen bis ständig nur der Zentrums Balken angezeigt wird Bei eingeschaltetem Horn ertönt bei Balkenanzeige ein Dauerton ...

Страница 12: ...ngsrichtung Zentrum Balken Pfeil für Bewegungsrichtung Batterieanzeige Anzeige akustisches Signal LCD Anzeige Sensorfenster auch Rückseite Kerbe Zentrum Taste Ein Aus Taste Fein Grob Taste bzw Austritt akustisches Signal Batteriefach Rückseite ...

Страница 13: ...ewegungsrichtung Anzeige akustisches Signal Batterieanzeige 3 Lautstärken Austritt akustisches Sensorfenster Signal Rückseite Beleuchtete LCD Anzeige auch Rückseite LED Richtungs anzeige Kerbe Zentrum Zentrum LED Richtungs anzeige Ein Aus Beleuchtung Taste akustisches Fein Grob Signal Batteriefach Rückseite ...

Страница 14: ... auch in der Y Achse vorneh men Falls alle Markierungen übereinander liegen oder nur unwesentlich max 3 mm voneinander abweichen ist die Justierung in Ordnung Falls größere Abweichungen vorlie gen muss das Gerät von einem Fachbetrieb überprüft und neu kalibriert werden 13 Menü Info und Einstellungen Laser einschalten 5 Sekunden lang drücken InFo INFO Anzeige z B 1 5 CPU Programm Version Sn Serienn...

Страница 15: ...rehzahl wählen dEF rPM 600 600 oder 800 U min einstellen Speichern und nächster Menüpunkt Display Beleuchtungsdauer Lcdb SEC 20 Wählen 0 250 Sekunden Speichern und nächster Menüpunkt Beleuchtungsintensität Lcdb Lich120 Wählen 0 250 Speichern und nächster Menüpunkt Standby Sleep Funktion Zeit einstellen Bei Wert 0 deaktiviert SLP hour 1 Wählen 0 10 Stunden Speichern ...

Страница 16: ...reinstellung für automatische Wahl EU US wählen Achtung Nur für USA und AUS Speichern und nächster Menüpunkt z B UbAt2 52 Volt Batteriespannung FB V Nächster Menüpunkt APO Automat Ausschalten der FB V z B 60 SEC 5 600 Sekunden Serieneinstellung 60 Sek Speichern und nächster Menüpunkt z B Lich140 Display Beleuchtungsintensität Wählen 0 250 Speichern und nächster Menüpunkt Lich z B 20 SEC Display Be...

Страница 17: ...Mängel beim praktischen Gebrauch zei gen so werden diese kostenlos behoben Die Garantiezeit beträgt 36 Monate Ausnahme Akku 1 Jahr ab dem Verkaufsdatum Rechnungsdatum Für die Reparatur oder Umtausch sind Gerät und oder betroffene Teile unverzüglich nach Feststellung des Man gels an THEIS zu senden Keine Garantieansprüche bestehen auf kostenlose Behebung von Fehlern die durch unsachgemäße Behandlun...

Страница 18: ...rstrahls Schrittbetrieb Neigung Anzeige letzte Eingabe Eingabe Y Bestätigung Ziffern und Vorzeichenwahl Ausblendmodus Aktivierung 90 bis 270 Deaktivierung Positionieren des Ausblendbereichs Scanmodus 5 Stufen 10 bis 80 Positionieren der Laserlinie Scanmodus verlassen j Windy Einstellung der Nivellierempfindlichkeit ...

Страница 19: ...8Ah oder 4x 1 5V Alkaline Mono Zelle Betriebsdauer Akku Batterie 2 3 70h 120h Ladezeit 6h Arbeitstemperatur 15 bis 50 C Schutzart IP 67 wasserdicht Gewicht 3 kg Funkfernbedienung Reichweite 1 2 3 200 m Empfänger Option TE 6 TE 7 Empfangsfeld 45 mm 45 mm Reichweite mit Grundgerät 1 3 250 m 350 m Reichweite mit High Power 1 3 550 m 700 m Genauigkeit Fein Grob 2 mm 4 mm Betriebsdauer 2 3 36 h 50 h St...

Страница 20: ...werte als der Klasse 2 3B bei High Power Version zu gelangen Laser nach Möglichkeit nicht auf Personen ausrichten Nicht in den Laser strahl blicken auch nicht mit optischen Instrumenten Es befinden sich keine zu wartenden oder justierenden Teile im Inneren des Gerätes Service darf nur von autorisierten Stellen ausgeführt werden Sicherheitsvorschriften für THEIS HIGH POWER LASERGERÄTE Klasse 3R Der...

Страница 21: ...r Elektro und Elektronik Altgeräte und ihrer Umsetzung in nationales Recht müssen nicht mehr gebrauchsfähige Messwerkzeuge getrennt gesammelt und einer umweltge rechten Wiederverwertung zugeführt werden WEEE Reg Nr DE 10598800 Gemäß der Richtlinie 2006 66 EU müssen nicht mehr gebrauchsfä hige THEIS Lasergeräte oder verbrauchte Akkus Batterien recycelt werden oder können direkt abgegeben werden bei...

Страница 22: ...the Levelling Sensitivity Windy 28 8 TILT Function 28 9 Power Supply of Laser 29 10 Radio Remote Control FB V Option 30 11 Detector 31 TE 6 32 TE 7 33 12 Calibration Check 34 13 Menu 34 14 Delivery Contents 37 15 Special Indications and Troubleshooting 37 16 Warranty 37 17 Brief instructions 38 18 Technical Data 39 19 Supplier Declaration Safety Information 40 20 Disposal 42 ...

Страница 23: ...is distinguished by its rugged ness and high precision Made in Germany and no construction site should do without it To ensure that your device is always ready for use observe the following information 5 Never store the device in the container when it is wet 6 Check the precision every time before you use the equipment since we can accept no liability for misalignment 7 Observe the information on ...

Страница 24: ...display End stop Position change Battery display Mask Disturbance mode Scan Windy Speed or Scan stop Slope Y axis Counter clockwise rotation step mode Selection of num bers and signs Slope Clockwise rotation step mode Selection of numbers and signs On Off Manual mode Productinformation Via QR Code on re verse e g Instruction manual ...

Страница 25: ... 2 Rotation Speed The rotation speed can be regulated in four stages 0 200 600 und 800 RPM Pressing the rotation key two times the laser stops 0 RPM Each time you press the key again the rotation speed increases At a standstill you can move the laser dot using the counterclockwise clockwise rotation keys Pressing and holding down one of the keys speeds up the movement of the laser dot 3 Slope If t...

Страница 26: ...s shown by the flashing levelling display After this the entered slope settings are approached During this procedure the slope symbol blinks Once the values have been reached the slope settings and the slope symbol are displayed permanently lit If external influences shock or temperature change the position of the device the system interrupts rotation and the laser beam the slope and the warning d...

Страница 27: ...u can set both PLUS and MINUS grades While you press the bottom arrow key MINUS is shown on the display With the top Plus arrow key there is no indi cation on the display Important In manual mode there is no automatic laser self levelling 5 Mask Mode In mask mode you can limit the laser exit to a settable range This is only possible with a rotating laser beam i e not in scanning mode By pressing t...

Страница 28: ...This means that if you select scanning mode again at a later date the system traverses to the position of the laser line you selected last 7 Setting the Levelling Sensitivity Windy If while working with the device you have to relevel it due to wind vibrations or slight shocks which interrupt the rotation you can remedy this situation using the Windy function Pressing the Windy key reduces the leve...

Страница 29: ...harging is also possible during operation Overloading is not possible Only use the charger on dry premises The batteries that are used with Eneloop technol ogy have the advantage of low levels of self discharge This means that if you do not use the de vice you only need to recharge it every six months In the battery compartment you can also use normal alkaline mono cells Under no circumstances mus...

Страница 30: ... other devices On the display you can see the same information as on the display of the associated laser If this is not the case and an antenna symbol is displayed this may be due to one of the following reasons The laser is not switched on The radio channel is not set correctly The remote control is out of range of the laser Pressing both arrow keys switches off the laser The FB V switches itself...

Страница 31: ...int the sensor window to the TPL and move it through the rotating laser beam until there is a display on the LCD Then keep following the arrow with the detector until only the centre bar is displayed continuously If the hooter is switched on a continuous tone is issued when the bar is displayed When the arrow is displayed a differently pulsating tone indicates whether the detector is being held to...

Страница 32: ...of movement Centre bar Arrow for direction of movement Battery display Display of audible signal LCD display on reverse too Centre notch On Off button Fine Coarse button Button or issuing of audible signal Battery compartment on reverse Sensor window ...

Страница 33: ...on of movement Display of audible signal Battery display 3 stages Issuing of audible Sensor window signal on reverse Illuminated LCD Display on reverse too LED for direction of movement Centre notch LED for Centre LED for direction of movement On Off Illumination Audible signal Fin Coarse Battery compartment on reverse ...

Страница 34: ...ame for the Y axis If all the marks are on top of each other or are only slightly apart maximum of 2 mm adjustment is OK If the marks are a long way apart you must get a specialist firm to check the equipment and recalibrate it 13 Menu Information and settings Switch on the laser Press for five seconds InFo INFO display e g 1 5 CPU Program Version Sn Factory number 6 digit h Operating hours Next m...

Страница 35: ...m Select start rotation speed dEF rPM 600 Select 600 or 800 rpm Save and next menu item Display of lighting timeout Lcdb SEC 20 Select 0 250 sec Save and next menu item Display of lighting intensity Lcdb Lich120 Select 0 250 Save and next menu item Standby Sleep function set time Deactivated at 0 value SLP hour 1 Choose 0 10 hours Save ...

Страница 36: ...onfirm Channel CH Auto is for automatic selection EU Select US Attention Only for USA und AUS Save and next menu item e g UbAt2 52 Battery voltage FB V Next menu item APO Automatic shut off FB V e g 60 SEC Select 5 600 seconds 60 sec is default Save and next menu item e g Lich140 Display of lighting intensity Select 0 250 Save and next menu item Lich e g 20 SEC Display of lighting time out Select ...

Страница 37: ...ects of this type arise in practical use they will be eliminated free of charge The warranty period is 36 months apart from the rechargeable battery which is 1 year from the date of sale date of invoice You must return the device or its affected components for repair or replacement to THEIS immediately after you establish the defect No guarantee claim or claim free elimination of faults due to inc...

Страница 38: ...00 Traversing the laser beam step mode Slope Display of last input Input Y Confirmation Change sign and digits Mask mode Activation of 90 to 270 Deactivation Positioning the mask area Scanning mode 5 steps 10 to 80 Positioning the laser line Deactivate Scan Mode Windy Setting of re adjustment ...

Страница 39: ...o cells Running time rechargeable battery battery 2 3 70h 120h Charging time 6h Working temperature 15 to 50 C System of protection IP 67 waterproof Weight 3 kg Radio remote control Range 1 2 3 200 m Detector option TE 6 TE 7 Detector field 45 mm 45 mm Range with basic unit 1 3 250 m 350 m Range with High Power 1 3 550 m 700 m Precision Fine Coarse 2 mm 4 mm Running time 2 3 36 h 50 h Power supply...

Страница 40: ...eople Do not look into the laser beam even with optical instruments There are no parts to maintain or adjust inside the device Servicing may only be carried out by authorized persons Safety regulations for THEIS Class 3R HIGH POWER LASER DEVICES Users must observe BGVB2 Accident Prevention Regulations for Laser Radiation in Germany Only trained personnel are allowed to operate this product to avoi...

Страница 41: ... radio communications However there is no guarantee that interference will not occur in a particular installation If this equipment does cause harmful interference to radio or television reception which can be determined by turning the equipment off and on the user is encouraged to try to correct the interference by one or more of the following measures Reorient or relocate the receiving antenna I...

Страница 42: ...recycled in an environmentally friendly way WEEE Reg No DE 10598800 Rechargeable batteries Never put rechargeable batteries in domestic refuse a fire or into water In accordance with Directive 2006 66EC defective or spent rechargeable batteries must be recycled or disposed of in an environmentally friendly way EU countries only In accordance with Directive 2006 66EC non serviceable THEIS laser dev...

Страница 43: ...lage de la sensibilité du niveau Windy 49 8 Fonction TILT 49 9 Alimentation en courant Laser 50 10 Télécommande radio FB V option 51 11 Récepteur 52 TE 6 53 TE 7 54 12 Vérification de l ajustage 55 13 Menu 55 14 Contenu de la livraison 58 15 Affichages de statut et perturbations 58 16 Garantie 58 17 Instructions succinctes 59 18 Caractéristiques techniques 60 19 Déclaration du fournisseur Consigne...

Страница 44: ...ision Made in Germany il devrait être de tous les chantiers Pour assurer durablement le bon fonctionnement de votre appareil nous vous prions de lire attentivement les instructions suivantes 1 Ne jamais ranger un appareil dans son coffret lorsqu il est mouillé 2 Vérifier la précision avant chaque utilisation nous déclinons toute responsabilité en cas de déréglage de l appareil 3 Tenir compte des i...

Страница 45: ...ions de service Inclinaison d axe Y Perturbation Scan Inclinaison Mode de masquage Inclinaison d axe Y Rotation à gauche régime pas à pas Sélection de chiffres et de signe Inclinaison Rotation à droite régime pas à pas Sélection de chiffres Marche Arrêt mode manuel Windy Régime ou finir scan Mode manuel Affichage du niveau Butée finale modification de position Statut de la batterie ...

Страница 46: ...de rotation peut être réglée sur 4 niveaux 0 200 600 et 800 tr min Appuyer deux fois sur la touche Rotation pour arrêter le laser vitesse 0 Appuyer à nouveau sur la touche pour augmenter la vitesse de rotation A l arrêt le point laser peut être déplacé au moyen des touches de rotation à gauche droite Lorsqu une des touches est maintenue enfoncée le mouvement du point laser s accélère 3 Inclinaison...

Страница 47: ...st alors abordée Pendant ce proces sus le symbole d inclinaison clignote Une fois la valeur atteinte la valeur d inclinaison et le symbole d inclinaison restent affichés En cas de modification de la position de l appareil due à des influences extérieures comme des vibrations ou de grands écarts de température le mode Rotation est inter rompu automatiquement Ceci permet d éviter les mesures erronée...

Страница 48: ...aît à l écran lorsque la flèche vers le haut est enfon cée plus Attention L auto nivellement et l arrêt automatiques du laser ne sont pas possibles en mode manuel 5 Mode Masquage En mode de masquage la sortie du rayon laser peut être limitée dans une zone réglable Ceci est uniquement possible lorsque le rayon laser tourne et donc pas en mode Scan Un seul appui active le plus petit masquage possibl...

Страница 49: ... nouveau le mode Scan la ligne laser se déplace dans cette position 7 Réglage de la sensibilité du niveau Windy Si l appareil est sans cesse déplacé par le vent des variations de terrain ou de légers chocs pendant le travail interrompant la rotation il est possible d obtenir de l aide grâce à la fonction Windy Appuyer sur la touche Windy permet de réduire la sensibilité du niveau de l instrument L...

Страница 50: ...ent Aucune surcharge n est possible Utiliser uniquement le chargeur dans des locaux parfaitement secs Les accumulateurs utilisés dotés de la technologie Eneloop offrent l avantage de se décharger très peu lorsqu ils ne sont pas utilisés Les accumulateurs n étant pas utilisés ne doivent donc être rechargés que tous les 6 mois Des piles alcalines normales peuvent également être utilisées dans le com...

Страница 51: ... un canal adéquat pour exclure toute interférence avec d autres appareils Les mêmes indications apparaissent sur l écran de la télécommande que sur l écran du laser correspondant Si ce n est pas le cas et si un symbole d antenne s affiche les raisons peuvent en être les sui vantes Le laser n est pas démarré Le canal radio n est pas correctement réglé La télécommande se trouve hors de portée du las...

Страница 52: ...acé flèche Tourner la fenêtre de la sonde vers le VISION et la déplacer à travers le rayon laser en rotation jusqu à ce que quelque chose apparaisse dans l écran LCD Déplacer alors le récepteur le long de la flèche jusqu à ce que seule la barre centrale s affiche en permanence Un signal continu retentit lorsque la barre s affiche lorsque l avertisseur sonore est allumé L affichage des flèches est ...

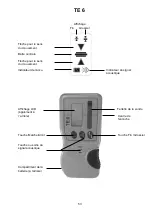
Страница 53: ... Flèche pour le sens du mouvement Indicateur de l accu Indicateur du signal acoustique Affichage LCD également à l arrière Centre de l encoche Touche Marche Arrêt Touche Fin Grossier Touche ou sortie du signal acoustique Compartiment de la batterie à l arrière Fenêtre de la sonde ...

Страница 54: ...cateur du signal Indicateur de la batterie acoustique 3 niveau Sortie du signal Fenêtre de la sonde acoustique à l arrière Affichange LCD éclairé également Indicateur de direction à l arrière LED Centre de l enoche Centre LED Indicateur de direction LED Touche Marche Arrêt Éclairage Touche signal Fin Grossier acoustique Compartiment de la batterie à l arrière ...

Страница 55: ...auchent ou s ils ne divergent que d une valeur négligeable 2 mm max cela signifie que l ajustage est correct Si les divergences sont plus importantes l appa reil doit être confié à une entreprise spécialisée qui le con trôlera et procèdera à son calibrage 13 Menu Informations et réglages Allumer le laser Maintenir enfoncé pendant 5 secondes InFo Indicateur INFO 1 5 CPU Version de programme Sn Numé...

Страница 56: ...part de régime dEF rPM 600 Sélectionner 600 ou 800 tr min Enregistrer et point suivant du menu Durée d éclairage de l écran Lcdb SEC 20 Sélectionner 0 250 secondes Enregistrer et point suivant du menu Intensité d éclairage de l écran Lcdb Lich120 Sélectionner 0 250 Enregistrer et point suivant du menu Fonction Standby Sleep Régler l heure Désactivé à la valeur 0 SLP hour 1 Sélectionner 0 10 heures...

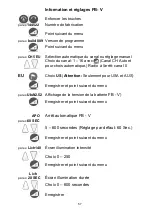
Страница 57: ...ue Radio à l arrêt canal 0 EU Choix US Attention Seulement pour USA et AUS Enregistrer et point suivant du menu parex UbAt2 52 Affichage de la tension de la batterie FB V Enregistrer et point suivant du menu APO Arrêt automatique FB V par ex 60 SEC 5 600 secondes Réglage par défaut 60 Sec Enregistrer et point suivant du menu parex Lich140 Écran illumination intensité Choix 0 250 Enregistrer et poi...

Страница 58: ... utilisation pratique de l appareil ceux ci sont éliminés gratuitement La durée de la garantie s élève à 36 mois 1 an seulement pour les accus à dater de l achat date de la facture Pour la réparation ou le remplacement l appareil et ou les pièces concernées doivent être renvoyées à THEIS immédiatement après avoir constaté le vice Les défauts causés par une manipulation ou une conservation inapprop...

Страница 59: ...ser régime pas à pas Inclinaison Affichage de la dernière valeur Valeur X Confirmation Sélection de chiffres et de signes Mode masquage Activation de 90 à 270 désactivation Positionnement de la zone de masquage Mode Scan 5 niveaux de 10 à 80 Positionnement de la ligne laser Finir mode Scan j Windy Réglage de la sensibilité du niveau ...

Страница 60: ...iMH 4x 1 2 V 8Ah ou 4x piles alcalines 1 5V Autonomie Accu Batterie 2 3 70 h 120 h Temps de charge 6 h Température de service 15 à 50 C Indice de protection IP 67 étanche à l eau Poids 3 kg Télécommande radio Portée 1 2 3 200 m Récepteur option TE 6 TE 7 Champ de réception 45 mm 45 mm Portée avec appareil de base 1 3 250 m 350 m Portée avec High Power 1 3 550 m 700 m Précision Fin Grossier 2 mm 4 ...

Страница 61: ...r dans le rayon laser même à travers un instrument optique quelconque Aucune pièce nécessitant réglage ou entretien n est intégrée à l intérieur de l appareil Seuls les services habilités compétents sont autorisés à pratiquer les opérations de maintenance Prescriptions de sécurité pour les appareils laser HIGH POWER THEIS de la classe 3R L utilisateur est tenu de respecter la BGVB2 directive de pr...

Страница 62: ...oit national les outils de mesure en ordre de marche ne doivent plus être collectés séparément et doivent être recyclés dans le respect de l environnement WEEE N Reg DE 10598800 Accus Ne pas jeter les accus dans les ordures ménagères au feu ou à l eau Les accus défectueux ou usagés doivent être recyclés conformément à la directive 2006 66 EU ou éliminés dans le respect de l environnement Uniquemen...

Страница 63: ...63 ...

Страница 64: ...pour VISION Laserwarnschild für VISION High Power Laser warning label for VISION High Power Signal de danger Laser pour VISION High Power Änderungen vorbehalten Subject to changes Sous réserves de modifications THEIS FEINWERKTECHNIK GMBH 35236 Breidenbach Wolzhausen Germany 17 05 2019 ...

Отзывы: