background image

6.


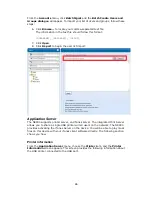
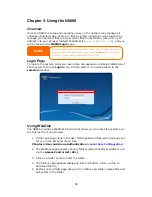
To create a new folder within the current folder, press the New folder button. 

When the screen appears enter a name for the folder. Press OK to create the 

folder. 


7.


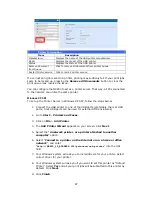
To upload a file from your computer to the current folder, press the New file 

(upload) button. When the screen appears, press Browse and locate the file 

to upload. Press OK and the file is uploaded to the current folder. 


8.


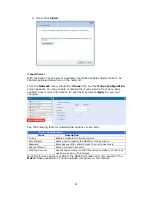
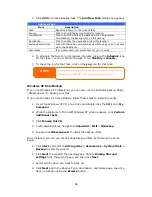
To delete a file or folder, select the file or folder’s check box. Press the Delete 

selected items button. You can also check the check box as the red circle 

indicates to select all files and folders in this folder. 


To access folders with access control, you must first login with a local user account. 


For more information on how to setup user rights to the folders, please check 

Chapter 4: Storage Management >Share Folder > 

Folder Access Control 

List (ACL)

.   


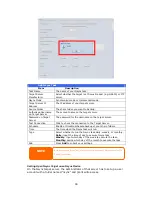
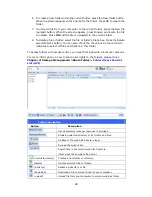
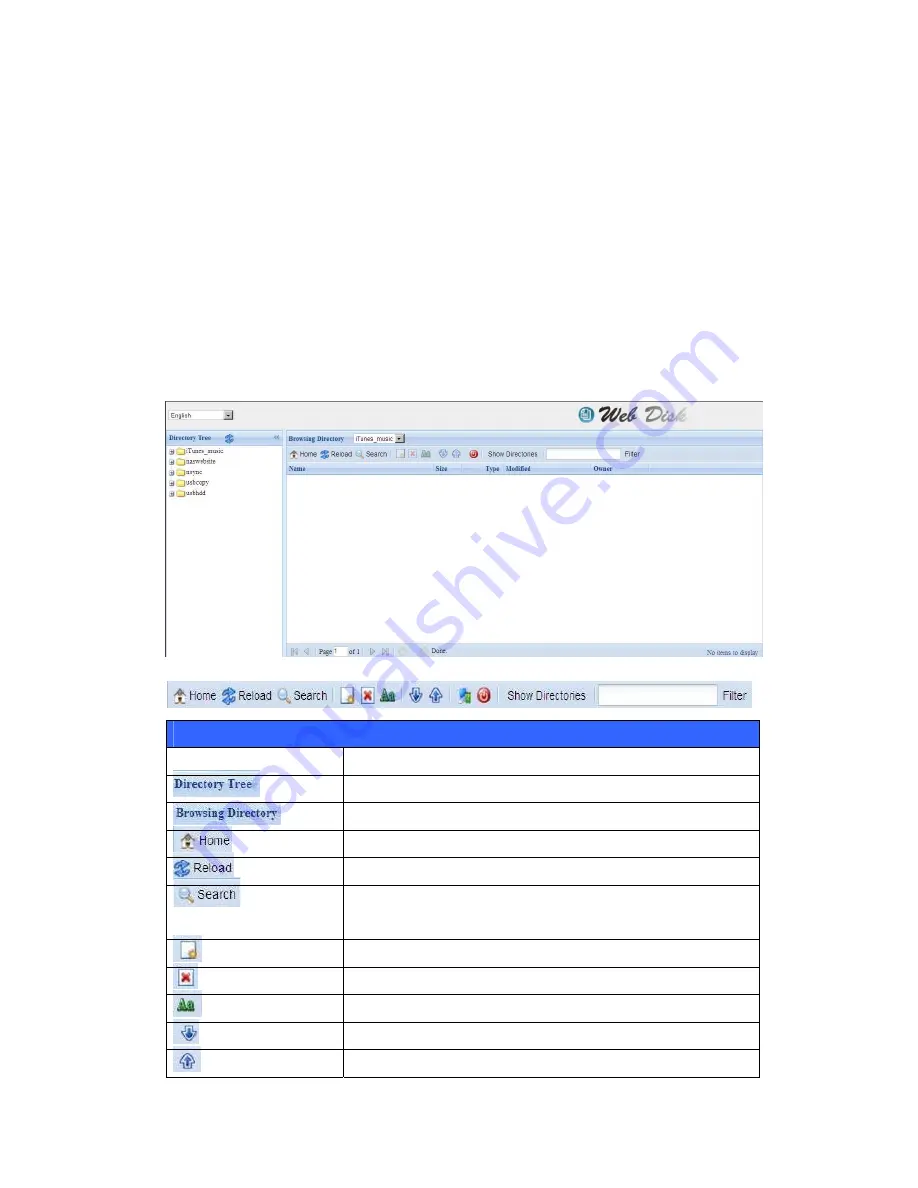
Folder Page Button 

Button Description 


List all directory trees per login user’s privilege.   


Browsing selected directory of its folders and files. 


Go back to the web disk directory layer. 


Re-load the current list. 


Search files in the current web disk directory.   

(Must input the complete file name.) 

(new file/Directory) 

Creates a new folder or directory. 

  (delete) 

Deletes selected files or folders. 

  (Rename) 

Rename a directory or file. 

  (download) 

Download a file to current folder of your computer. 

  (upload) 

Upload file from your computer to current web disk folder. 

 99 

Содержание N8800 IP

Страница 1: ...Thecus N8800 FW v3 00 06 User s Manual...

Страница 2: ...e provide us with your feedback Thecus Technology Corporation reserves the right to modify the contents of this manual without notice Product name Thecus N8800 Manual Version 2 0 Release Date August 2...

Страница 3: ...with relative humidity of 20 85 Using the N8800 under extreme environmental conditions could damage the unit Ensure that the N8800 is provided with the correct supply voltage AC 100V 240V 50 60 Hz 3A...

Страница 4: ...ment 9 Package Contents 9 Front Panel 11 Hard Disk Trays 12 Rear Panel 12 Chapter 2 Hardware Installation 14 Overview 14 Before You Begin 14 Hard Disk Installation 14 Cable Connections 15 Checking Sys...

Страница 5: ...tion 28 re Upgrade 29 tting 30 e Power On Off 31 p On LAN WOL 32 upport 32 33 System Network 37 nfiguration 37 39 figuration 39 erver Configuration 39 CIFS 40 ervice 40 ss Cache 40 ecycle Bin 40 nonym...

Страница 6: ...es Server 91 Module Management 92 Module Installation 92 System Module 92 User Module 92 Backup 92 92 nc Task 93 p an Nsync Target on an Nsync Device 94 p an Nsync Target on Another Device 95 ting N88...

Страница 7: ...ision updated FW 3 00 03 to 3 00 06 119 What s New 119 pansion for iSCSI Target Volume 119 lume Encryption 120 hin Provisioning 121 UN ID 125 Error Corrections 126 Appendix A Product Specifications 12...

Страница 8: ...you to store and share files over an IP network With a Network Attached Storage NAS device you can centralize your files and share them easily over your network With the easy to use web based interfac...

Страница 9: ...ver but it also supports iSCSI initiators Your server can access N8800 as a direct attached storage over the LAN or Internet There is no easier way to expand the capacity of your current application s...

Страница 10: ...crew Kit Key Luck x1 z HDD Compatibility list Card x1 z Multiple Languages Warranty Card x1 Please check to see if your package is complete If you find that some items are missing contact your dealer...

Страница 11: ...e notification 5 Mute button Mute the system fan alarm 6 USB Port USB 2 0 port for compatible USB devices such as USB disks USB printers and USB wireless dongles Note For supported USB wireless dongle...

Страница 12: ...sically secure the hard disk to the unit 4 Latch Use to open and remove or close and secure the tray 5 Handle Pull out HDD tray Rear Panel The N8800 rear panel features ports and connectors Back Panel...

Страница 13: ...t This port is for external UPS device 6 WAN Port WAN port for connecting to an Ethernet network through a switch or router 7 LAN Port WAN port for connecting to an Ethernet network through a switch o...

Страница 14: ...components on the N8800 3 Be careful not to use magnetized screwdrivers around the N8800 s electronic components Hard Disk Installation The N8800 supports eight standard 3 5 SATA hard disks To instal...

Страница 15: ...rk to the WAN port on the back panel of the N8800 2 Connect the provided power cord into the universal power socket on the back panel Plug the other end of the cord into a surge protector socket Press...

Страница 16: ...mal if 1 The Power LED on the Front Panel glows green 2 The HDD Power LED on each HDD tray glows blue assuming all disks are installed 3 The default IP address of the WAN port is 192 168 1 100 on LCD...

Страница 17: ...perform the following steps 1 Insert the installation CD into your CD ROM drive the host PC must be connected to the network 2 The Setup Wizard should launch automatically If not please browse your C...

Страница 18: ...ddress is recommended You may also use a static IP address and enter the DNS Server address manually 7 Change the default administrator password 8 Finished Access the N8800 Web Administrator Interface...

Страница 19: ...eter setting ESC Escape Escape and return to the previous menu There are two modes of operation for the LCD Display Mode and Management Mode Display Mode During normal operation the LCD will be in Dis...

Страница 20: ...r the correct LCD password System will check whether the correct LCD password has been entered The default LCD password is 0000 If correct password is entered you will enter into the Management Mode m...

Страница 21: ...p authentication protocols such as Active Directory AD For more on managing users go to Chapter 4 User and Group Authentication For more information on configuring Active Directory see Chapter 4 User...

Страница 22: ...Printer Server Photo Server 22...

Страница 23: ...ult IP address of 192 168 1 100 your managing PC IP address must be 192 168 1 x where x is a number between 1 and 254 but not 100 2 Login to the system using the administrator user name and password T...

Страница 24: ...of Backup Features set up of the N8800 Moving your cursor over any of these items will display the dropdown menu selections for each group In the following sections you will find detailed explanations...

Страница 25: ...ench German Italian Korean Spanish Russia Polish On the menu bar click Language and the selection list appears This user interface will switch to selected language for the N8800 System Information Inf...

Страница 26: ...m Description CPU Loading Displays current CPU workload of the N8800 CPU Fan Speed Displays current CPU fan status System Fan Speed Displays the current status of the system fan Up Time Shows how long...

Страница 27: ...All Provides all log information including system messages warning messages and error messages INFO Records information about system messages WARN Shows only warning messages ERROR Shows only error me...

Страница 28: ...ion Date Sets the system date Time Sets the system time Time Zone Sets the system time zone Act as NTP Server Select Enable to synchronize with the NTP server Select Disable to close the NTP server sy...

Страница 29: ...g notification emails Auth Type Select the SMTP Server account authentication type SMTP Account ID Set the SMTP Server Email account ID Account Password Enter a new password E mail From Set email addr...

Страница 30: ...ity and accessibility in the case of a power failure From the Status menu choose the UPS item and the UPS Setting screen appears Make any changes you wish and press Apply to confirm changes NOTE The b...

Страница 31: ...m when the battery charge is less than Amount of UPS battery remaining before system should auto shutdown Apply Press Apply to save your changes For a list of supported UPS units see Appendix E UPS Co...

Страница 32: ...Off 8 00 Off 16 00 System will turn off at 8 00 AM on Monday System will turn off at 16 00 PM on Monday if it was on If the system was already off at 16 00 PM on Monday system will stay off Wake Up On...

Страница 33: ...x and confirm your new password in the Confirm Password box Press Apply to confirm password changes There is also password for enter LCD setting you could setup here Enter a new password in the New Pa...

Страница 34: ...ion file to overwrite current system configuration Backing up your system configuration is a great way to ensure that you can revert to a working configuration when you are experimenting with new syst...

Страница 35: ...utdown to turn the system off File System check The File System Check allows you to perform a check on the integrity of your disks file system Under the menu click File system Check and the File Syste...

Страница 36: ...Check the desired RAID volumes and click Next to proceed with the file system check Click Reboot to reboot without running the check Once you click Next you will see the following screen Click Start...

Страница 37: ...work configuration settings as well as service support settings WAN Configuration From the System Network menu choose WAN and the WAN Configuration screen appears This screen displays the network para...

Страница 38: ...orts in parallel to increase throughput Set IP Address by Static Dynamic You can choose a static IP or Dynamic IP and input your network configuration IP IP address of the WAN interface Netmask Networ...

Страница 39: ...e LAN interface Jumbo Frame Support Enable or disable Jumbo Frame Support on the LAN interface IP Specifies the IP address of the LAN interface Netmask Specifies the Network Mask of the LAN interface...

Страница 40: ...ing system Server Message Block Common Internet File System Do the link in network protocol Enable or Disable SMB CIFS protocol for Windows Apple Unix drive mapping File Access Cache File Access Cache...

Страница 41: ...Filing Protocol You can change any of these items and press Apply to confirm your settings A description of each item follows Apple Network Configuration Item Description AFP Server Enable or disable...

Страница 42: ...800 can act as a FTP server enabling users to download and upload files with their favorite FTP programs From the System Network menu choose the FTP item and the FTP screen appears You can change any...

Страница 43: ...me where represents an integer Upload Bandwidth You may set the maximum bandwidth allocated to file uploads Selections include Unlimited 1 2 4 8 16 and 32 MB s Download Bandwidth You may set the maxim...

Страница 44: ...Media Folders window select the folder that contains your media files and click its checkbox 3 The contents in the folder will be scanned for the Media Server The time required for scanning depends on...

Страница 45: ...the Web Disk HTTP Support screen appears This screen displays the service support parameters of the system You can change any of these items and press Apply to confirm your settings A description of e...

Страница 46: ...le or Disable your Nsync Target Server Press Apply to confirm your settings Once Nsync Target has been enabled the other Thecus NAS product is able to operate remote replication to this NAS system Bon...

Страница 47: ...location and ISO Mount Disks Information From the Storage menu choose the Disks item and the Disks Information screen appears From here you can see various items about installed SATA hard disks Blank...

Страница 48: ...he installed hard disk Power ON Hours Count of hours in power on state The raw value of this attribute shows total count of hours or minutes or seconds depending on manufacturer in power on state Temp...

Страница 49: ...tor drive 0 the status of to alert the system adm they should replace thos Count 32 or Current Pending Sector of a hard disk the disk will show Warning This warning is only used inistrator that there...

Страница 50: ...D disks or the Spare Disk RAID Configurations Item Description Disk No Number assigned to the installed hard disks Capacity MB Capacity of the installed hard disks Model Model number of the installed...

Страница 51: ...odules must be reinstalled In addition all system folders that were contained on the Master RAID volume will be invisible Reassigning this volume to be the Master RAID will make these folders visible...

Страница 52: ...e HDD with no RAID support JBOD requires a minimum of 1 disk RAID 0 Provides data striping but no redundancy Improves performance but not data safety RAID 0 requires a minimum of 2 disks RAID 1 Offers...

Страница 53: ...high reliability and high performance RAID 10 is implemented as a striped array whose segments are RAID 1 arrays It has the fault tolerance of RAID 1 and the performance of RAID 0 RAID 10 requires 4...

Страница 54: ...e follow the steps below 1 On the RAID List screen select the RAID volume by clicking on its radio button and click RAID Information to open the RAID Configuration screen 2 On the RAID Configuration s...

Страница 55: ...ow it to automatically rebuild 2 Once rebuilt you can continue to replace any remaining disks in the RAID array 3 When you are done replacing hard drives log on to Web Management Navigate to Storage R...

Страница 56: ...array all together To migrate a RAID 0 RAID 1 RAID 5 or RAID 6 volume follow the steps below 1 From the RAID Configuration screen click Migrate RAID 2 A list of possible RAID migration configurations...

Страница 57: ...p and data is inaccessible 3 To have ZFS file system created doing on line RAID level migration from R1 to R5 or R1 to R6 the all services will restart and volumes user data and iSCSI are read only du...

Страница 58: ...D 1 HDDx2 to RAID 0 HDDx8 RAID 1 HDDx3 to RAID 0 HDDx4 RAID 1 HDDx3 to RAID 0 HDDx5 RAID 1 HDDx3 to RAID 0 HDDx6 RAID 1 HDDx3 to RAID 0 HDDx7 RAID 1 HDDx3 to RAID 0 HDDx8 RAID 1 HDDx4 to RAID 0 HDDx5...

Страница 59: ...AID 6 HDDx4 to RAID 6 HDDx8 RAID 6 HDDx5 to RAID 6 HDDx6 RAID 6 HDDx5 to RAID 6 HDDx7 RAID 6 HDDx5 to RAID 6 HDDx8 RAID 6 HDDx6 to RAID 6 HDDx7 RAID 6 HDDx6 to RAID 6 HDDx8 RAID 6 HDDx7 to RAID 6 HDDx...

Страница 60: ...ume Type Type of volume Can be either USB or iSCSI Name Name assigned to the volume Capacity Capacity of the allocated space Allocating Space for iSCSI Volume To allocate space for an iSCSI volume on...

Страница 61: ...ord Confirm Reenter the chosen password 2 Designate the percentage to be allocated from the Allocation drag bar 3 Enable the iSCSI Target Service by selecting Enable 4 Choose to enable CHAP authentica...

Страница 62: ...dify your setting Press ok to change Delete Volume To delete volume on the current RAID volume follow the steps below 1 Under the Volume Allocation List click Delete The Space Allocation screen appear...

Страница 63: ...th the option changed it will need to reboot system to activate iSCSI Block Size Select the block size with 4K while the iSCSI volume size is over 2TB iSCSI CRC Checksum To enable this option the init...

Страница 64: ...Adding Folders On the Folder screen press the Add button and the Add Folder screen appears This screen allows you to add a folder After entering the information press Apply to create new folder 64...

Страница 65: ...they cannot delete a file from the folder Share Folder Limit Enter the maximum size of the folder in Gigabytes GB The folder cannot grow beyond this limit You can enter a 0 to turn off the share folde...

Страница 66: ...limit You can enter a 0 to turn off the share folder limit Remove Folders To remove a folder press the Remove button from the specified folder row The system will confirm folder deletion Press Yes to...

Страница 67: ...Allow source port 1024 Choose the one which best fits your needs IO Mapping There are three selections available Guest system root account will have full access to this share root root Guest system r...

Страница 68: ...ck to open snapshot schedule setup screen Clicking on schedule button then schedule setup screen appear Checked the enable check box to activate the snapshot scheduled operation The N8800 snapshot is...

Страница 69: ...d groups Select a user or a group from the left hand column and then choose Deny Read Only or Writable to configure their access level Press the Apply button to confirm your settings ACL setting Item...

Страница 70: ...firm your ACL settings If one user has belong the priority Deny Re ed to more than one group but different privilege than ad Only Writable NOTE To setup sub folders ACL click on symbol to extract sub...

Страница 71: ...er stack target volumes which are located in different systems These can be stacked through single network access like SMB or AFP acting as a share folder type From the main menu the stackable feature...

Страница 72: ...here is no user name and password needed to access target volume then leave it blank Once IP with volume have been set you may need to input a valid user name and password to validate your access righ...

Страница 73: ...ccess with settings have been completed Stack target with export share name pmmeeting No Stack Target The Browseable setting will be same method of setting for system share folder It designates whethe...

Страница 74: ...cess it and ACL button will be grayed out If Public is set to No the ACL button will be available on the Stack Target List window Click Apply to save your changes B Activate a Stack Target After your...

Страница 75: ...g After the format is complete the stack target volume will be created successfully You will see the volume s capacity and status in the Stack Target List screen C Edit a Stack Target To make any chan...

Страница 76: ...connected by situations such as power outages or network disconnects When this happens the Reconnect button will available To attempt to reconnect the stack target click Reconnect ISO Mount The ISO Mo...

Страница 77: ...the figure below for reference Select on the ISO mount function and you will have the screen shot appear as following A Add a ISO file From the figure above select ISO file from drop down share list...

Страница 78: ...onfirmation to complete mounting ISO file Or without Mount as ISO file export name input system will automatic to give the export name by ISO file name If left Mount as blink then system will create m...

Страница 79: ...er access using different group policies From the User and Group Authentication menu you can create modify and delete users and assign them to groups that you designate ADS NT Support If you have a Wi...

Страница 80: ...rectory Server or select NT for Windows NT ADS NT Server Name Specifies the ADS NT server name e g adservername ADS NT Realm Specifies the ADS NT realm e g example com Administrator ID Enter the admin...

Страница 81: ...s than five minutes The Administrator Password field is for the password of ADS Active Directory Server not N8800 Local User Configuration From the Accounts menu choose the User item and the Local Use...

Страница 82: ...List is a list of groups this user does not belong to Use the or buttons to have this user join or leave a group 6 Press the Apply button and the user is created NOTE All users are automatically assig...

Страница 83: ...iguration screen 2 Click on Remove button and the user is deleted from the system Local Group Configuration From the Accounts menu choose the Group item and the Local Group Configuration screen appear...

Страница 84: ...a selected group from the system Add Groups 1 On the Local Group Configuration screen click on the Add button 2 The Local Group Setting screen appears 3 Enter a Group Name 4 Enter a Group ID number If...

Страница 85: ...from a group select the user from Members List and press the button 5 Click the Apply button to save your changes Remove Groups 1 On the Local Group Configuration screen select a group name from the l...

Страница 86: ...Server The N8800 supports printer server and Tunes server The integrated Print Server allows you to share a single USB printer will all users on the network The N8800 provides activating the iTunes Se...

Страница 87: ...To set up the Printer Server in Windows XP SP2 follow the steps below 1 Connect the USB printer to one of the USB ports preferably the rear USB ports front USB ports can be used for external HDD enclo...

Страница 88: ...list of function all in one printer is attached to the N8800 ing and fax functions will work Other features such as ly not function Windows Vista To set up the Printer Server in Windows Vista follow...

Страница 89: ...etooth printer 4 Select The printer that I want isn t listed You can press The printer that I want isn t listed to go into next page without waiting for Searching for available printers to finish 5 Cl...

Страница 90: ...t 6 Select or install a printer and then press OK If your printer model is not listed please contact your printer manufacturer for help 7 Windows will attempt to connect to the printer 8 You can choos...

Страница 91: ...changes See the following table for detailed descriptions of each field iTunes Configuration Item Description iTunes Enable or disable the iTunes Service Server Name Name used to identify the N8800 to...

Страница 92: ...ck up data with the N8800 Nsync You can backup a share folder to another N8800 Nsync Target or any FTP server for safe keeping as long as you have appropriate access right on that target When using Ns...

Страница 93: ...Nsync task Server The IP address of your target server Share folder The share folder you would want to backup Last Time The time when the last Nsync task was executed Last Status The status of your la...

Страница 94: ...heck the connection to the Target Server Schedule Enable or Disable schedule backup of your share folders Time The time when the Nsync task will run Type Select whether to run the Nsync task daily wee...

Страница 95: ...0 as an Nsync Target The N8800 can act as an Nsync server enabling another Nsync equipped Thecus NAS at a remote location backup their files to this N8800 From the System Network menu choose the Nsync...

Страница 96: ...ility dmg to your MAC OS X machine and double click to execute it Windows XP Data Backup If you use Windows XP Professional you can also use the Windows Backup Utility Ntbackup exe to backup your file...

Страница 97: ...X does not include any backup software However there are a number of backup solutions available for the Mac OS X including iBackup Psyncx iMSafe Rsyncx Folder Synchronizer X Tri BACKUP Impression Inte...

Страница 98: ...the system enter your user name and password and select Web Disk or Photo server then click Login to log into the system You will be taken to the selected interface Using WebDisk The N8800 provides a...

Страница 99: ...older To access folders with access control you must first login with a local user account For more information on how to setup user rights to the folders please check Chapter 4 Storage Management Sha...

Страница 100: ...olders and files Modified Shows the time of most recent modification of folders and files owner Owner of the file There is also the way by using right click button to bring up contact windows as short...

Страница 101: ...upload their pictures using the Windows XP Publishing Wizard 1 Click on the XP Publishing Wizard icon on top right corner 2 The XP Web Publishing Wizard Client screen appears Click on the link to ins...

Страница 102: ...ture you want to publish On the left pane there will be an icon labeled Publish this folder to the Web 5 Click on this icon and Web Publishing Wizard will start 6 Select the pictures you want to publi...

Страница 103: ...oto Web Server 8 Select N8800 Photo Gallery Wizard to publish your pictures to the N8800 9 Login into the N8800 with your local user name and password 10 Create your album by entering an album name an...

Страница 104: ...11 Select the album you want to upload your pictures to 12 Confirm the target album 13 Windows will show you that the picture upload is in progress 104...

Страница 105: ...shed the Wizard will ask you whether if you want to go to the website Click Finish to go to your Photo Web Server 15 Click on the user s icon to go to that user s album 16 You will see the user s albu...

Страница 106: ...and each description is limited to 255 characters Delete Delete the selected albums or photos NOTE Only logged in users will see these icons To prevent system errors the N8800 sets the following limit...

Страница 107: ...um Uploading Pictures to Albums Uploading pictures to albums using the Web User Interface is easy 1 When the album is created click the album icon to enter the album Initially the album is empty 2 Cli...

Страница 108: ...to the My Computer folder in Windows 2 In the menu bar select Tools and then Map Network Drive 3 The Map Network Drive window appears 4 Assign a drive letter for the share folder 5 Click the Browse bu...

Страница 109: ...esktop You can access the folder by double clicking on the icon Mapping the N8800 as an iSCSI Drive With the N8800 you are able to map it as an iSCSI drive With iSCSI you can remotely access the N8800...

Страница 110: ...Wizard Click Next to continue 4 Leave the default selections and click Next 5 Read the license agreement To continue with the installation click I Agree and then click Next 6 The iSCSI Initiator will...

Страница 111: ...roperties window will appear 8 Select the Discovery tab Under Target Portals click Add 9 Enter the IP address of the N8800 Click OK 10 On the iSCSI Initiator Properties window select the Targets tab W...

Страница 112: ...ick OK to continue If you have enabled CHAP click Advanced Under Advanced Settings check the CHAP login information checkbox and enter your username and password Click OK 12 Right click My Computer on...

Страница 113: ...and you will then be able to use the iSCSI target as a local drive Windows Vista Because Windows Vista has the Microsoft iSCSI Initiator pre installed you will not have to install this piece of softw...

Страница 114: ...to write to an USB storage device the file system must be FAT32 NOTE Adding a Spare Disk With a RAID 1 RAID 5 RAID 6 or RAID 10 volume you can add a spare disk after the initial RAID is setup To add...

Страница 115: ...l Servers HTTPS 1 Navigate to NAT Setting Virtual Server 2 For Enable Virtual Server select Yes 3 Setup the HTTPS Server a Well Known Applications Select User Defined b Local IP Enter 192 168 1 100 c...

Страница 116: ...tray 3 Slide a new hard disk into the tray and fasten the screws 4 Insert the hard disk tray back into the N8800 until it snaps into place You can also lock it with a key if desired 5 The LED blinks...

Страница 117: ...or has occurred Multiple connections to a server or shared resource by the same user using more than one user name are not allowed Disconnect all previous connections to the server or shared resource...

Страница 118: ...accident occurred especially during system booting stage this will become the great feature to prevent system down time Practically while it happened system will try to recovery the DOM 1 from DOM 2...

Страница 119: ...sion for iSCSI Target Volume First the iSCSI volume is now able to expand its capacity from unused space From the volume list simply select the iSCSI volume you like to expand and click the Expand but...

Страница 120: ...checkbox enabled the following message pop up will appear for confirmation After the RAID volume has been created you may remove this USB disk until the next time the system boots The RAID volume can...

Страница 121: ...available in this firmware release With this function the iSCSI capacity can be more flexible and more efficiently serve more users The idea for iSCSI thin provisioning is sharing the available physic...

Страница 122: ...in provision volume by dragging the Allocation bar to the desired size After the size has been determined click OK to confirm Now you will see the iSCSI thin provisioning volume is available from the...

Страница 123: ...xample below 1 The physical size for the iSCSI thin provision volume is 333 88GB You can refer the screenshot above 2 The iSCSI target volume under thin provisioning starts with 333 38GB in physical s...

Страница 124: ...on under thin provisioning the physical capacity 333 8GB The screen shot to setup an iSCSI target volume under thin provisioning of 1700GB iSCSI target volume creation The maximum virtual size is 1430...

Страница 125: ...ze of iSCSI thin provision capacity has used up to 90 2 Each thin provision volume can only create 5 iSCSI target volumes 1 Each RAID volume can only create one iSCSI thin provision volume NOTE When i...

Страница 126: ...Error Corrections None 126...

Страница 127: ...tive humidity non condensing Certifications CE FCC BSMI C Tick RoHS Compliant Software Specifications Network File Protocols Microsoft Networks CIFS SMB Apple Filing Protocol AFP 3 0 Network File Syst...

Страница 128: ...e Japanese Korean Spanish Russian and Polish NTP support Wake on LAN Scheduled Power On Off Event Notification Email notification Buzzer notification LCD UPS Support UPS monitoring via RS 232 or USB i...

Страница 129: ...ilable on our Download Center http www thecus com download php If you are still experiencing problems with your N8800 or require a Return Merchandise Authorization RMA feel free to contact technical s...

Страница 130: ...red on its other hard disk drives RAID Levels The Thecus N8800 supports standard RAID levels 0 1 5 6 10 and JBOD You choose a RAID level when you create a system volume The factors for selecting a RAI...

Страница 131: ...for mission critical applications RAID 10 RAID 10 is implemented as a striped array whose segments are RAID 1 arrays RAID 10 has the same fault tolerance as RAID level 1 RAID 10 has the same overhead...

Страница 132: ...7 disks are of the same size and used in RAID N8800 disk usage percentage is listed below RAID Level Percentage Used RAID 0 100 RAID 1 1 n x 100 RAID 5 n 1 n x 100 RAID 6 n 2 n x 100 RAID 10 50 JBOD 1...

Страница 133: ...can be resolved ADS Benefits ADS lets the N8800 integrate itself with the existing ADS in an office environment This means the N8800 is able to recognize your office users and passwords on the ADS se...

Страница 134: ...F6H500ukUNV Fortress newer Fortress Telecom Axxium Rackmount Patriot Pro Patriot Pro II Patriot INT51 cable Micro Ferrups Best Power Fortress Ferrups f command support Centralion Blazer Clary ST 800 C...

Страница 135: ...600 Serial NOVA AVR 1100 Serial Pulsar Ellipse USBS Serial cable S Premium USBS Serial cable Premium S Ellipse Office 600 Serial cable 750 Serial cable 1000 Serial cable 1500 Serial cable Pulsar EXtr...

Страница 136: ...50A RPF525 625 800 1000 RPT 800A Repotec RPT 162A SMS Brazil Manager III SOLA 325 520 610 620 330 SOLA BASIC Mexico various ISBMEX protocol Socomec Sicon Egys 420 VA Soltec Winmate 525 625 800 1000 So...

Страница 137: ...tested and work well If your UPS is not in the support list be sure that the UPS supports one of following protocols o Safenet software o PhoenixTec protocol o Generic RUPS 2000 Megatec M2501 cable o...

Страница 138: ...ts contributors This product includes software developed by Winning Strategies Inc This product includes software developed by the Apache Group for use in the Apache HTTP server project http www apach...

Страница 139: ...mmit to using it Some other Free Software Foundation software is covered by the GNU Library General Public License instead You can apply it to your programs too When we speak of free software we are r...

Страница 140: ...Program independent of having been made by running the Program Whether that is true depends on what the Program does 1 You may copy and distribute verbatim copies of the Program s source code as you r...

Страница 141: ...esponding machine readable source code which must be distributed under the terms of Sections 1 and 2 above on a medium customarily used for software interchange or b Accompany it with a written offer...

Страница 142: ...te so as to satisfy simultaneously your obligations under this License and any other pertinent obligations then as a consequence you may not distribute the Program at all For example if a patent licen...

Страница 143: ...e software and of promoting the sharing and reuse of software generally NO WARRANTY 11 BECAUSE THE PROGRAM IS LICENSED FREE OF CHARGE THERE IS NO WARRANTY FOR THE PROGRAM TO THE EXTENT PERMITTED BY AP...

Отзывы: