background image

MONOLITH BASIN SYSTEM MANUAL    11

monolith c series

installation

2

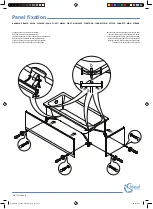
Drill the wall to accept the 3/8” x 2” lag screws.

4

Ensure all brackets are level with each other 

lengthwise, at the correct height, and mounted 

securely so that there will be no gap between the 

Monolith and the wall surface.

1

Mark the bracket mounting points on 

the wall.

3

Attach the brackets throug

h the mounting slots


with the lag screws using the height adjustment to 

ensure that all the brackets are all level and fitted 

at the same height. It is critical that the brackets 

are level 

with one another to ensure

 that  water 

drains 

properly 

out of the 

basin

.

Содержание MONOLITH C Series

Страница 1: ...MONOLITH Basin System C Series installation maintenance ...

Страница 2: ...s List 5 Technical Data 6 Before you Install 10 Installation 14 ADA Compliance 15 Operation 15 Maintenance 16 Cleaning 16 Repairs 17 Damage Prevention 17 Faucets 17 Soap Dispensers 18 Warranty contents 2 MONOLITH BASIN SYSTEM MANUAL ...

Страница 3: ...ash Lab Monolith System C Series is a trough sink specific to wall mounted fixtures for one to four users The basin is constructed from solid surface material mounted on steel brackets and is well suited to commercial and public restrooms MONOLITH BASIN SYSTEM MANUAL 3 ...

Страница 4: ...that you consult the Structural Engineer or General Contractor for advice on the most appropriate mounting method for your project The 90 3 user TSL MON C 90 is pictured for all examples in this guide For the most accurate bracket spacing guide please refer to the shop drawings for your project A Trough 1 B Angled mounting bracket 4 C Drainage funnel 3 D Drainage funnel gasket 3 E Drainage funnel ...

Страница 5: ... 2 00 24 00 20 00 2 00 2 00 86 00 2 00 24 00 5 00 90 00 A A 34 00 15 00 30 00 30 00 15 00 20 42 FINISHED FLOOR LEVEL The 90 3 user TSL MON C 90 is used for all examples in this guide pleases consult the shop drawings for your project before installing For model specific dimensions please refer to the datasheet for your model TSL MON C or download one at thesplashlabusa com ...

Страница 6: ...ll be mounted 3 Cut a saw kerf width slot in the face of one of the sections of plywood to accept the flange on steel studwork as shown Fix the plywood to the steel stud using appropriate wall construction hardware The second layer of plywood is now to be fitted to the back of the 1st piece using flat head woodscrews at 6 centers monolith c series before you install steel stud wall The wall structure...

Страница 7: ...eeded 3 The wall finish drywall plywood etc can now be fitted in the normal manner monolith c series before you install timber stud wall It is recommended that a timber stud framework is constructed to support the Monolith using construction grade 2 x 4 studs This will leave enough void within the wall for the required services for the plumbing installation For maximum strength it is better if the s...

Страница 8: ... appropriate trap is required to connect to the 1 NPT thread on the waste funnel The trap should conform to the current local plumbing codes 3 Water supply pipes for wall mounted faucets should be within the wall void to best allow for connection P Trap Connection Waste Connection monolith c series before you install 3 User 90 Monolith ...

Страница 9: ...s before you install 3 User 90 Monolith Fasteners 3 8 x 2 Lag screws 2 per bracket Required materials not included 1 1 2 NPT P trap 1 per user 1 1 2 drain piping to suit installation Plumbing 1 1 2 P Trap T M V Hot Feed ColdFeed Waste Water Hardware ...

Страница 10: ...racket spacing guide please refer to the shop drawings for your project 3 User 90 Monolith 90 4 32 1 8 Length of trough No of Fixing height inches brackets Suggested bracket fixing centers Point A 20 to 36 Depending 20 to 36 Depending 20 to 36 Depending 4 00 TYP on sink design on sink design on sink design 4 00 TYP see sink drawings see sink drawings see sink drawings 34 TYPICAL 20 3 8 Starting poi...

Страница 11: ...curely so that there will be no gap between the Monolith and the wall surface 1 Mark the bracket mounting points on the wall 3 Attach the brackets through the mounting slots with the lag screws using the height adjustment to ensure that all the brackets are all level and fitted at the same height It is critical that the brackets are level with one another to ensure that water drains properly out of...

Страница 12: ...onolith placed face down fit all waste funnels and gaskets to the funnel adapter plates on the underside of the basin Install one bolt into each T slot pad Ensure that the sealing gasket is correctly fitted into the recess on the funnel and tighten the four bolts 7 When the Monolith T slot pads are resting on the brackets slide the Monolith towards the wall until the rear edge is flush with the wal...

Страница 13: ...MONOLITH BASIN SYSTEM MANUAL 13 monolith c series installation 9 Fit waste trap to drain funnel ...

Страница 14: ...14 MONOLITH BASIN SYSTEM MANUAL monolith c series ADA compliance 24 00 17 85 14 66 5 00 38 00 34 00 29 00 27 00 9 00 11 00 6 00 ADA KNEE AND FOOT CLEARANCE ZONE 17 00 7 00 ...

Страница 15: ...cet or a manual faucet allow the water to flow and wash their hands in the normal manner maintenance The Monolith should be periodically inspected for any damage Also the Monolith should be tested to ensure that the water drains out of the basin and that the drainage waterways are not blocked with any debris ...

Страница 16: ...leaners and a white abrasive pad or sponge For darker colors a polish may be used to enhance the shine For areas where there is the possibility of contact with food a polish formulated for use in food contact areas must be used Where food contact is not likely to occur a simple furniture polish can be used Always follow the manufacturer s instructions for using the polish and for safety concerns C...

Страница 17: ...ents should be promptly flushed with water Contact for even a short period of time can cause surface damage spots or staining Follow the recommended repair procedures described above as needed to repair and or restore the surface to its original condition Severe damage caused by incompatible chemical contact will require professional repair Again contact The Splash Lab technical department for assi...

Страница 18: ...d product 10 years for material used If a defect is found in normal use The Splash Lab will at their discretion repair provide a replacement part or product or make appropriate adjustments Damage caused by accident misuse or abuse is not covered by this warranty Improper care and cleaning will void the warranty Non operation of the product due to environmental conditions beyond our control install...

Страница 19: ... 15 21 General information 310 410 5008 Showroom 8745 Washington Boulevard Studio D Culver City CA 90232 Warehouse Offices 20809 Higgins Court Torrance CA 90501 Technical support info thesplashlabusa com For further contact information visit www thesplashlabusa com ...

Отзывы: