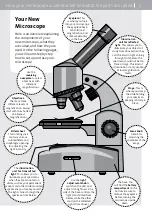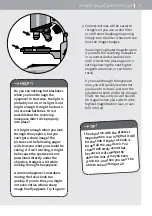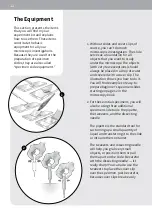
Eyepiece:
This
is where you look
into your microscope.
The eyepiece has a
ten-fold (10x)
magnification and
comes separately
in the box.
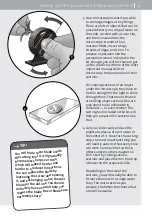
Illumination
unit for reflected
light:
This allows you to
illuminate your objects of
study from above when they
can’t be lit with light shining
through from below. The
specimen should not be too
thick or large. This kind of
illumination is only usable
at low magnification
levels.
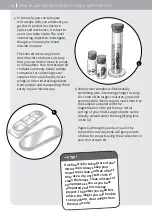
The base: You
will find the
battery
compartment
on the
bottom. Be sure to
remove the eyepiece
before turning the
microscope upside
down.
Use the
light
adjustment knob
to
switch on the LED and
adjust its brightness. One
side of the base controls the
light transmitted from
below, while the other
controls the reflected
light (from above).
Focus knob:
A knob for
adjusting the
sharpness of the
image.
Stage:
This is
where you clamp
the slide holding
your specimen,
keeping it firmly in
place.
Use the
revolving
nosepiece
to select
objectives with
different
magnifications.
Objectives:
There are three
different levels of
magnification. Always
start with the shortest
one (lowest
magnification).
Filter wheel:
This rotating disk
contains various
colored filters and
diaphragm openings
for adjusting the
light intensity.
The
illumination
unit for transmitted
light:
This allows you to
illuminate your specimens
when they are mounted on
slides, such as your permanent
mounts and other slide-mounted
specimens you create yourself.
The light shines through the
specimen from below.
Your New
Microscope
Here is an overview explaining
the components of your
new microscope, what they
are called, and how they are
used. On the following pages,
you will learn step by step
how to set up and use your
microscope.
How your microscope is constructed and what the parts are called
5


