background image

CHANNEL

STB 7017

6

6

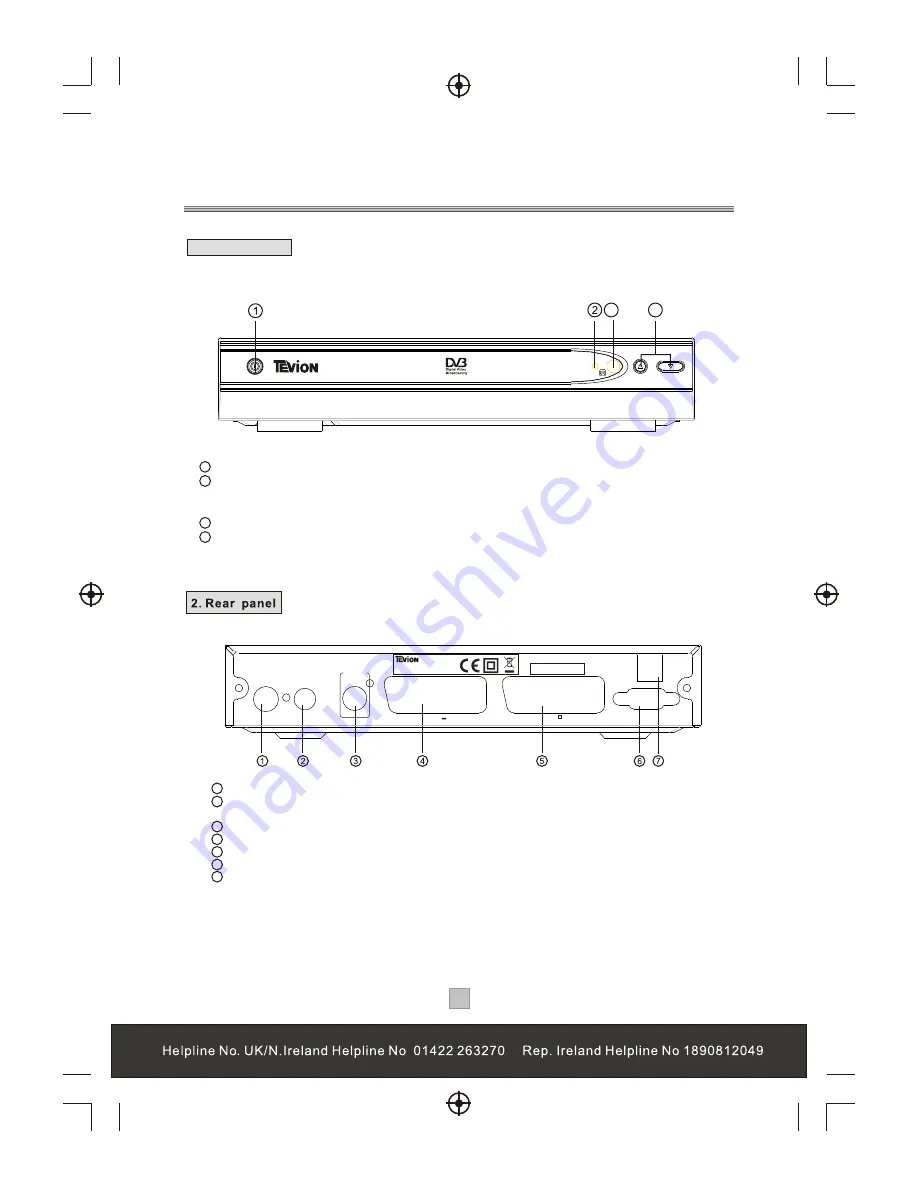
Front  Panel and Rear Panel Illustration 

1. Front panel

1   RF IN : 

 This  socket  connects  to  your  external  aerial.

2   RF LOOP THROUGH:

  This socket will bypass the RF signal to either your TV  or  another 

                                               video system.

3   COAXIAL:

  This socket connects to a coaxial socket on your surround sound system.

4   VCR SCART:

  This socket connects to either a DVD or other video system.

5   TV SCART: 

 This socket connects to your TV.

6   RS-232 PORT:

  This socket is only used for software upgrade.

7   MAINS CABLE: 

 This is used to connect to your main power supply.

1    POWER BUTTON:

   Used to switch the set top box  on and off.

2


Standby Indicator: 

 Used to visually show power state of the set  top box, the green 

      LED will show if turned on the set top box and the red LED will be light  if  the set  top box 
      entered  standby mode.


REMOTE CONTROL SENSOR:

  Used to receive the signal from the remote control.

4    CHANNEL UP/DOWN:

  Used to change channels without using the remote control.

3

4

IN

IN

R

R F

F

LOOP

LOOP

R

R F

F

THROUGH

THROUGH

Coaxial

Coaxial

Digital 
Audio

Digital 
Audio

VCR   O O

VCR   O O

TV

TV

Serial No.:

DIGITAL TERRESTRIAL RECEIVER
POWER SUPPLY:  100-240V~ 50/60Hz
MAX POWER CONSUMPTION: 10WATTS
MADE IN CHINA

100-240V~

50/60Hz

SERVICE

STB 7017

Содержание STB7017

Страница 1: ...ION MANUAL CHANNEL STB 7017 Now you have purchased a Tevion product you can rest assured in the knowledge that as well as your 3 year parts and labour warranty you have the added peace of mind of dedi...

Страница 2: ...vice 21 Technical Specifications 22 Switching on for the first time 10 Automatic channel scan 11 Manual channel scan 11 System Setting A V Setting 12 Antenna Power 13 First Time Installation 13 System...

Страница 3: ...1 1...

Страница 4: ...ove the packaging from each part You will find the following items Digital set top box with fitted mains plug Remote Control with 2XAAA batteries not installed What is Freeview It is the new free digi...

Страница 5: ...et top box are for ventilation Do not cover or block them as it may cause overheating NEVER let children push anything into the holes or slots on the case Servicing There are no user serviceable parts...

Страница 6: ...FAVOURITE Used to access yourfavourite channels 11 RECALL Used to switch betweenthe last two viewed channels 12 LANGUAGE Used to switch betweendifferent audio languages that are broadcasted 13 WIDE U...

Страница 7: ...es O PEN O PEN 1 Open the cover 2 Install batteries 3 Close the cover Using the Remote Control To use the remote control point it towards the front of the digital set top box The remote control has a...

Страница 8: ...edto connect to yourmain power supply 1 POWER BUTTON Used to switch theset top box onand off 2 Standby Indicator Used to visually showpower state of theset top box thegreen LED will show ifturned on t...

Страница 9: ...7 7 Connecting to a Television TV Set top box 100 240V 50 60Hz...

Страница 10: ...8 8 Connecting to a Television and Video VCRor Video system TV Set top box 100 240V 50 60Hz...

Страница 11: ...Connecting to a Surround Sound System 9 9 Audio system 100 240V 50 60Hz Set top box TV...

Страница 12: ...ls information in the STB a TV Setting menu displays Press the LEFT or RIGHT cursor button to choose either 16 9 or 4 3 Press the OK button to continue installation a confirmation message window displ...

Страница 13: ...uit Manual channel scan 1 Press the MENU button to enter the main menu of STB 2 Press the UP or DOWN cursor to select Channel Search 3 Press the OK Button to enter the sub menu 4 Highlight the Search...

Страница 14: ...Press the UP or DOWN cursor to select System Setting 3 Press the OK button to enter the sub menu 4 Press the UP or DOWN button to select A V Setting and Press the OK button to enter its sub menu TV Sh...

Страница 15: ...d reset the STB to factory default setting 1 Enter the System Setting menu press the UP or DOWN button to highlight the First Time Installation 2 Press the OK button to confirm a confirmation window a...

Страница 16: ...buttons 0 9 6 Press the OK button to confirm the changed pin code Software Update This menu allows users to update the software version 1 Enter the System Setting menu press the UP or DOWN cursor to h...

Страница 17: ...election stepping through the channel list selection by number from the on screen channel list and using the Channel Schedule 1 Stepping through the channel list Press the P button to browse up and th...

Страница 18: ...the desired channel directly from Channel Schedule This is displayed by pressing the EPG button on the remote control The Channel Schedule provides the users with a brief description of the programme...

Страница 19: ...d the current programme information by pressing INFO button on the remote control then the programme information table will automatically remove in 3 5 seconds TV Format You can change the TV picture...

Страница 20: ...check the current programme information 3 Press the LEFT or RIGHT cursor to navigate the programme lists for the next seven days 4 Press the UP or DOWN cursor to highlight the desired programme 5 Pre...

Страница 21: ...on to quit the channel list menu and view the channel on full screen Delete a channel 1 Enter the channel list menu press the UP or DOWN cursor to select a channel 2 Press the Yellow button to delete...

Страница 22: ...t 7 Press the EXIT button to quit Remove favourite channels from favourite list 1 Press the MENU button to enter the main menu of the STB 2 Press the UP or DOWN cursor to select Favourite List 3 Press...

Страница 23: ...inserted incorrectly Remote control batteries exhausted Aerial may not be compatable Aerial is damaged misaligned What to do Check mains lead Check fuse Check aerial lead Check aerial Check with deale...

Страница 24: ...ssion stream DVB T TS Profile Level ISO IEC 13818 2 MPEG 2 MP ML compatibleInput Rate 15Mbps Max Video Formats PAL 4 3 16 9 Video Output CVBS RGB Audio Formats MPEG Layer I II 32 44 1 48KHz If at any...

Страница 25: ...DIGITAL TERRESTRIAL RECEIVER...

Страница 26: ...DIGITAL TERRESTRIAL RECEIVER...

Отзывы: