background image

EN

12


Operation and Storage Manual of Panel Heater

IMPORTANT SAFETY MEASURES AND INSTRUCTIONS:

WARNING!

 • Please read this manual before operating the appliance and keep it at a 

safe place for future reference. In case the appliance is obtained by a new 
owner, it should be transferred together with its manual.


CAUTION: 

Children under 3 years of age should be kept away from the 

appliance unless they are under constant supervision. 


Children from 3 to 8 years of age are allowed to operate the on/off button  


ONLY, provided that the appliance is installed and ready for operation and  


such children have been supervised and instructed in safe operation of the  


appliance and they understand all related risks.


Children from 3 to 8 years of age MUST NOT: connect the plug to power  


sockets, make adjustments, clean it or carry out user maintenance  

 operations.
 

This appliance can be used by children older than 8 years of age and  


by people with reduced physical, sensor and mental capabilities, as well  


as by people with insufficient experience and knowledge provided they  


are supervised or instructed in safe operation of the appliance and  


understand the related risks. Children should not be allowed to play with  


the appliance. Cleaning and user maintenance operations must not be  


carried out by children without supervision.


CAUTION: 

Some of the appliance parts may get very hot during operation 

and thus cause burns to users. In case there are children and vulnerable 
people in the room, special attention should be paid.


WARNING: 

Do not cover the appliance in order to 


prevent overheating!

 • The appliance must not be placed right under a socket box! 
 • If the supply cord is damaged, it must be replaced by the manufacturer, its 

service agent or similarly qualified persons in order to avoid a hazard.

 • Before connecting the appliance to the mains, check if the voltage 

indicated on its technical plate corresponds to the voltage of the 
electricity, supplied to your house. 

 • This appliance shall be used only for the purpose it has been designed 

and intended for, i.e. heating of domestic premises. The appliance is not 
intended for commercial/industrial application. Every other use is to be 
considered improper, and therefore dangerous. The manufacturer doesn’t 
bear responsibility for damages arising from improper and irrational use. 
Non-adherence to these instructions would render the warranty invalid!

 • Do not leave your home while the heater is operating: make sure that the 

power switch is in OFF position (panel heaters with mechanical control).

 • Keep inflammable objects, such as furniture, pillows, bedding, paper, 

clothes, curtains etc. at a safe distance of at least 100 cm away from the 
panel heater.

 • Do not operate the appliance in areas of use or storage of combustible 

substances. Do not operate the appliance in areas of combustible media 
(for example in close proximity to inflammable gases or aerosols) – there is 
great risk of explosion and fire!

 • Do not insert and do not allow foreign objects to enter the ventilation 

openings (inlet and outlet) because this will cause electric shock, fire or will 
damage the appliance.

 • The appliance is not suitable for animal breeding. The panel heater is 

intended for domestic/indoor operation only.

 • When positioning the appliance, do not cover the safety grilles; do not 

hamper the incoming and outgoing air flow. All objects must be at a safe 
distance of at least 1 meter away from the appliance front and sides.

 • The most common reason for overheating is dust and fluff deposits in the 

appliance. Clean the ventilation openings on a regular basis with a vacuum 
cleaner, but before that it is very important to disconnect the heater from 
the mains.

 •

Never touch the appliance with wet or moist hands – there is risk for your life!

 • The power socket should be accessible all the time in order to disconnect 

the power plug when needed as fast as possible! Never pull the power 
cord or the appliance itself in order to disconnect it from the mains. 

 • PAY ATTENTION! Outgoing air gets heated during appliance operation (up 

to more than 100°С).

 •

If you decide to stop using an appliance of this kind, it is recommended to make 
it unusable by cutting its power cord after you have disconnected it from the 
mains. It is advisable all possible risks related to the appliance to be secured, 

especially in relation to children that may play with out-of-use appliances. 

 • Warning: Do not use this appliance with a programmer, counter or any 

other mechanism which could automatically turn on the heater – if the 
appliance is covered or positioned incorrectly there is a risk of fire.

 •

Position the power cord in such a way that it does not obstruct the free 
movement of people and cannot be stepped on! Use only approved extension 
cords, which are suitable for this appliance, i.e. they have a compliance sign!

 • Never move the appliance by pulling its power cord; do not use the power 

cord for carrying other objects!

 • Do not bend the power cord and do not pull it against sharp edges; do not 

place the power cord on hot surfaces or open fire!

PACKING

 • After unpacking the appliance, check if its contents are intact and if it has 

not been damaged during transportation! In case a damage or incomplete 
delivery is found, contact your authorized retailer!

 • Do not dispose of the original packing box! It could be used for storage and 

transportation purposes in order to avoid damages during transportation!

 • Disposal of packing material should be done in the appropriate way! 

Children must be prevented from playing with polyethylene bags!

OPERATION AND INSTALLATION OF FEET SET

 • This panel heater is designed to be used indoors. 

I

mportant

: In accordance with Regulation EU 2015/1188 implementing 

Directive 2009/125/EC this electric heating appliance is not intended for wall 

installation!

I

mportant

: In premises bigger than 45 m3, it is recommended to use a 

combination of 2 or more panel heaters. 

 • Do not position the panel heater under a power socket or electricity 

connection box. 

 • DO NOT install/operate the panel heater:

1.  in places where a draught is present, which could influence the control 

settings;

2.  right under a power socket;
3.  in “Volume 1” for bathrooms;
4.  in “Volume 2” if the control board can be reached by a person who is in 

a shower or in a bathtub;

 •

Take the two feet out of the protective polyethylene bag, in case you intend 
to use the provided wheels set – take them out as well.

 •

Either the feet only, or the feet combined with wheels, can be installed to the 
panel heater.

 •

If you intend to use castor wheels, you will need to assemble the provided 
feet and wheels – take the foot with one hand and the wheel in your other 
hand. Insert the metal axis of the wheel into the special opening of the foot 
(there are special openings for the metal axes at the two ends of the foot) at 
a right angle – 90 °(between the axis and the horizontal of the foot).

 • Push the wheel and at the same time be careful not to injure yourself (the 

wheel is not capable to fix itself in one place and it rotates freely around 
its axis).

 • The pressure of your push must not exceed 20-30N (2-3kg). The wheel 

is to be considered safely attached if its axis restrictor has reached the 
cylindrical part in the foot opening.

 • Before starting the set installation check if the panel heater is disconnected 

from the power socket!

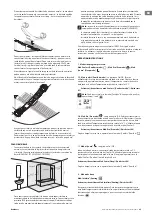
 • The feet are to be installed at the air inlets – it is correct them to be 

Содержание CN 052

Страница 1: ...оатация и съхранение на панелен конвектор ROCONVECTOR ELECTRIC 24 29 Instrucţiuni de utilizare şi depozitare а convectorului de panou EN This product is only suitable for well insulated spaces or occasional use BG Този продукт е подходящ само за надеждно изолирани помещения или нередовна употреба RO Acest produs este adecvat numai pentru spațiile bine izolate sau pentru utilizarea ocazională ...

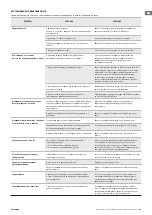
Страница 2: ...s aan uit på av på av 1 sec Step back Стъпка назад Pas înapoi Шаг назад Крок назад Korak nazad Корак назад Krok späť Krok wstecz Vissza lépés Βήμα προς τα πίσω Paso atrás Schritt zurück Træd tilbage Žingsnis atgal Atgriezties Stap terug Ta ett steg tillbaka Gå tilbake 22 2345 Prede ned functions Предварително зададени програмни режими Moduri de program presetate Заранее заданные программные режимы...

Страница 3: ...tiviranje Активирање Aktivovať Aktywacja Aktiválás Ενεργοποίηση Activar Einschalten Aktivering Įjungti Aktivizēt Activeren Aktivering Aktivering Deactivation Деактивиране Dezactivarea Деактивировать Деактивувати Deaktiviranje Деактивирање Deaktivovať Dezaktywacja Deaktiválás Απενεργοποίηση Desactivar Ausschalten Deaktiver Išjungti Deaktivizēt Deactiveren Avaktivera Deaktiver or или sau или чи ili ...

Страница 4: ...chalten Aktivering Įjungti Aktivizēt Activeren Aktivering Aktivering Deaktiválás Απενεργοποίηση Desactivar Ausschalten Deaktiver Išjungti Deaktivizēt Deactiveren Avaktivera Deaktiver Activation Активиране Activarea Активация Активація Aktiviranje Активирање Aktivovať Aktywacja Deactivation Деактивиране Dezactivarea Деактивировать Деактивувати Deaktiviranje Деактивирање Deaktivovať Dezaktywacja or ...

Страница 5: ...Deaktiver Išjungti Deaktivizēt Deactiveren Avaktivera Deaktiver Deactivation Деактивиране Dezactivarea Деактивировать Деактивувати Deaktiviranje Деактивирање Deaktivovať Dezaktywacja Deaktiválás Απενεργοποίηση Desactivar Ausschalten Deaktiver Išjungti Deaktivizēt Deactiveren Avaktivera Deaktiver Activation Активиране Activarea Активация Активація Aktiviranje Активирање Aktivovať Aktywacja Aktiválá...

Страница 6: ... Deactiveren Avaktivera Deaktiver Activation Активиране Activarea Активация Активація Aktiviranje Активирање Aktivovať Aktywacja Aktiválás Ενεργοποίηση Activar Einschalten Aktivering Įjungti Aktivizēt Activeren Aktivering Aktivering Deactivation Деактивиране Dezactivarea Деактивировать Деактивувати Deaktiviranje Деактивирање Deaktivovať Dezaktywacja Deaktiválás Απενεργοποίηση Desactivar Ausschalte...

Страница 7: ...ctivation Деактивиране Dezactivarea Деактивировать Деактивувати Deaktiviranje Деактивирање Deaktivovať Dezaktywacja Aktiválás Ενεργοποίηση Activar Einschalten Aktivering Įjungti Aktivizēt Activeren Aktivering Aktivering Deaktiválás Απενεργοποίηση Desactivar Ausschalten Deaktiver Išjungti Deaktivizēt Deactiveren Avaktivera Deaktiver Basic modes Основни режими Moduri de bază Основные режимы Основні ...

Страница 8: ...i Deaktivizēt Deactiveren Avaktivera Deaktiver Activation Активиране Activarea Активация Активація Aktiviranje Активирање Aktivovať Aktywacja Aktiválás Ενεργοποίηση Activar Einschalten Aktivering Įjungti Aktivizēt Activeren Aktivering Aktivering or или sau или чи ili или alebo albo vagy ή o oder eller arba vai of eller eller Basic modes Основни режими Moduri de bază Основные режимы Основні режими ...

Страница 9: ...νεργοποίηση Desactivar Ausschalten Deaktiver Išjungti Deaktivizēt Deactiveren Avaktivera Deaktiver Activation Активиране Activarea Активация Активація Aktiviranje Активирање Aktivovať Aktywacja Aktiválás Ενεργοποίηση Activar Einschalten Aktivering Įjungti Aktivizēt Activeren Aktivering Aktivering Basic modes Основни режими Moduri de bază Основные режимы Основні режими Osnovni načini rada Основни р...

Страница 10: ...area Деактивировать Деактивувати Deaktiviranje Деактивирање Deaktivovať Dezaktywacja Deaktiválás Απενεργοποίηση Desactivar Ausschalten Deaktiver Išjungti Deaktivizēt Deactiveren Avaktivera Deaktiver Activation Активиране Activarea Активация Активація Aktiviranje Активирање Aktivovať Aktywacja Aktiválás Ενεργοποίηση Activar Einschalten Aktivering Įjungti Aktivizēt Activeren Aktivering Aktivering Ba...

Страница 11: ...rzi izbornik Брзи мени Rýchla ponuka Szybkie menu Gyors menü 22 2345 Comfort mode Eco mode SLEEP 18 2345 Sleep mode 19 2345 SLEEP DELAYST 18 1135 SLEEP DELAYST DELAYST Weekly program 24h 7h Delay start function Γρήγορο μενού Menú rápido Schnellmenü Hurtig Menu Greitas meniu Ātrā izvēlne Snelmenu Snabbmeny Hurtigmeny ...

Страница 12: ...ith a vacuum cleaner but before that it is very important to disconnect the heater from the mains Never touch the appliance with wet or moist hands there is risk for your life The power socket should be accessible all the time in order to disconnect the power plug when needed as fast as possible Never pull the power cord or the appliance itself in order to disconnect it from the mains PAY ATTENTIO...

Страница 13: ...bove mentioned instructions cannot be implemented it is recommended to install the appliance in VOLUME 3 In wet premises the power source must be installed at a height of at least 25 cm above the floor bathrooms and kitchens The installation must be equipped with a safety fuse and the distance between the fuse contacts in disconnected condition should be at least 3 mm Thank you for choosing CN052 ...

Страница 14: ...nction is used the temperature correction has to be set again The factory setting of its value is 0 C Function Adaptive start Adaptive start is a function which predicts and initiates the optimal start of heating in order to reach the set point temperature at the desired time Test according to user instruction documentation The function is tested in a room with a continuous heat demand of 50 60 wi...

Страница 15: ... i e overheating of the appliance The safety thermo turn off device will automatically restore the heater operation when the temperature of the appliance falls below the permissible ultimate values CLEANING It is compulsory first to turn off the appliance through its power switch and to disconnect it from the power socket Before starting the cleaning session you should wait until the panel heater ...

Страница 16: ...o Auxiliary electricity consumption Fan assisted heat output no At nominal heat output elmax 1 91 kW Type of heat output room temperature control select one At minimum heat output elmin 0 00 kW Single stage heat output and no room temperature control no In standby mode el SB 0 00054 kW Two or more manual stages no room temperature control no With mechanic thermostat room temperature control no Wit...

Страница 17: ...ure Avoid obstructions that may prevent normal air exchange between the appliance and the indoor air Open window door detection is not enabled Switch on open window door detection Adaptive start function does not work as required This function works only in weekly mode Switch on Adaptive start function Severely fluctuating room temperature or the appliance learning procedure has not been completed...

Страница 18: ...и трябва да са на разстояние поне 1 метър от уреда отпред и странично Най често срещаната причина за прегряване е натрупването на мъх и прах в уреда Редовно почиствайте с прахосмукачка вентилационните отвори като преди това задължително изключите уреда от електрическата мрежа Никога не пипайте уреда с мокри или влажни ръце съществува опасност за живота Контакта трябва да бъде достъпен по всяко вре...

Страница 19: ...т пръски вода Поради този факт трябва да се монтира в пространство 2 volume 2 виж схема по долу за да се избегне възможността от това контролното табло ключ и терморегулатор на конвектора да бъде достигнато от човек който е под душа или във ваната Минималното разстояние от уреда до воден източник трябва да бъде не по малко от 1 метър и уреда да бъде задължително монтиран на стената Ако не сте сигу...

Страница 20: ...чно комфортна за Вас обикновено на височина около 60см от пода в седнало положение При констатирана разлика в диапазона 4 С можете да зададете нужната корекция в менюто на конвектора Важно условие функцията може да се настройва само след темпериране на отопляемото помещение според вида помещение минималното нужно време е 7 часа с получената разлика между показанието на конвектора и измерената темп...

Страница 21: ... 30минути Функция Адаптивен старт е включена по подразбиране Вграден превключвател за преобръщане Quick start B11 ако конвекторът се наклони с повече от 45 или падне надолу захранването трябва да се изключи и да се покаже на дисплея tilt След възстановяване на устройството в нормалното му положение работата на последната зададена функция трябва да продължи Функция Wi Fi Активиране и деактивиране н...

Страница 22: ...ане на ресурсите и околната среда и да предоставите уреда в организираните изкупвателни пунктове ако има такива ТАБЛИЦА 2 ИЗИСКВАНИЯ КЪМ ИНФОРМАЦИЯТА ЗА ЕЛЕКТРИЧЕСКИ ЛОКАЛНИ ОТОПЛИТЕЛНИ ТОПЛОИЗТОЧНИЦИ Идентификатори на модела CN 052 200 EI CLOUD W F 230V 50Hz Позиция Символ Стойност 1 Мерна единица Позиция Мерна единица Топлинна мощност Вид топлинно зареждане само за електрически акумулиращи локал...

Страница 23: ...тура в помещението Избягвайте блокирания които могат да попречат на нормалния въздухообмен между уреда и въздуха в помещението Функцията за откриване на отворен прозорец врата не е активирана Включете функцията за откриване на отворен прозорец врата Функцията Адаптивен старт Adaptive start не работи както се изисква Тази функция работи само в седмичен режим Включете функцията Адаптивен старт Adapt...

Страница 24: ...distanță față de unitatea și lateral Cea mai frecventa cauza de supraîncălzire este acumularea de scame și praf în unitate Curăţaţi regulat cu aspirator orificiile de ventilare dar înainte de aceasta scoateţi aparatul de la reţeaua de alimentare Nu atingeţi aparatul cu mâini ude există pericol pentru viață Priză trebuie să fie ușor accesibilă pentru a scoate ștecherul când este nevoie cât mai repe...

Страница 25: ...an profesionist Nota în cazul în care condițiile menționate mai sus nu pot fi îndeplinite se recomandă montarea aparatului să fie realizată în spațiul 3 VOLUME 3 În camerele umede bai si bucătarii sursa de alimentare trebuie să fie instalate la o înălțime de cel puțin 25 cm de la podea Instalaţia electrică la care se conectează aparatul trebuie să fie dotată cu o siguranţă automată la care distanţ...

Страница 26: ...cația convectorului 18 С la setată 22 С temperatura reală măsurată senzație de confort 22 C la o înălțime de la podea de 60 cm în acest caz convectorul continuă să reîncălzească încăperea este o pierdere directă de energie dar convectorul nu poate atinge temperatura setată pentru că face măsurarea temperaturii jos la podea și nu se va opri niciodată Este necesar să setați o corecție a temperaturii...

Страница 27: ...defect și t2 la un senzor de scurtcircuit În acest caz convectorul electric este oprit și re punerea în funcțiune va fi posibilă după ce defecțiunea a fost îndepărtată Defecțiunea trebuie eliminată de un specialist calificat DECONECTAREA DE LA ALIMENTARE Dacă convectorul electric este deconectat de la rețeaua electrică acesta nu va schimba temperatura setată și modul de operare rămas înainte de op...

Страница 28: ...variantă Puterea termică nominală Pnom 2 00 kW control manual al sarcinii termice cu termostat integrat nu Puterea termică minimă cu titlu indicativ Pmin 0 00 kW control manual al sarcinii termice ca răspuns la temperatura camerei și sau exterioară nu Puterea termică maximă continuă Pmax C 2 00 kW control electronic al sarcinii termice ca răspuns la temperatura camerei și sau exterioară nu Consumu...

Страница 29: ...tă o temperatură stabilă anterioară stabilă Evitați blocajele care pot interfera cu schimbul normal de aer între unitate și aerul din cameră Funcție de identificare de fereastră ușă deschisă nu este activată Activați funcția de detectare de fereastră ușă deschisă Funcția Start Adaptiv Adaptive start nu funcționează așa cum este necesar Această funcție funcționează numai în modul săptămânal Activaț...

Страница 30: ...RO 30 Instrucţiuni de utilizare şi depozitare а convectorului de panou ...

Страница 31: ...RO Instrucţiuni de utilizare şi depozitare а convectorului de panou 31 Românesc ...

Страница 32: ...TESY Ltd Head office 1166 Sofia Sofia Park Building 16V 2nd Floor PHONE 359 2 902 6666 FAX 359 2 902 6660 office tesy com 206759_001 ...

Отзывы: