background image

David Quick Start Guide v1.0

2

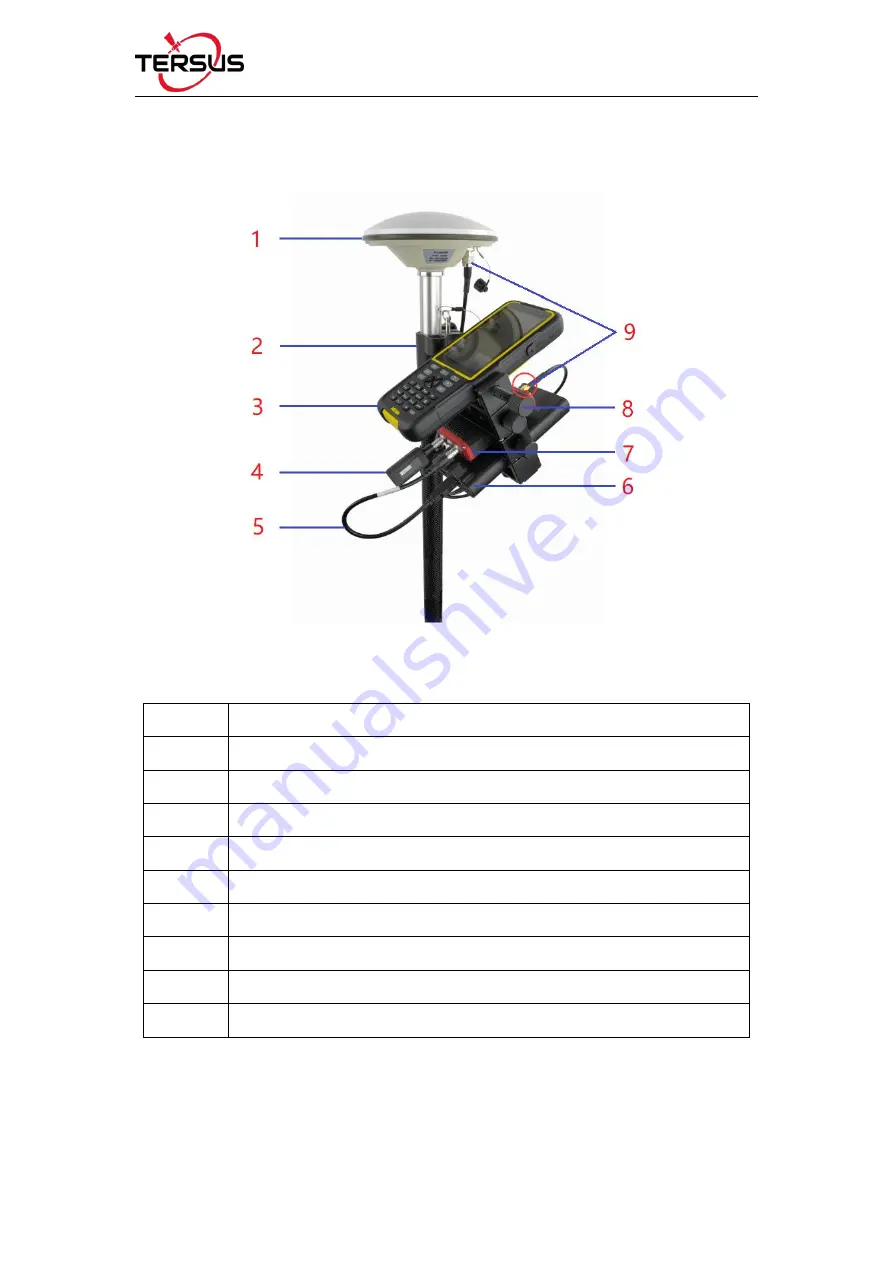
1.1 Rover Kit Network Mode

Figure 1.1 Rover Kit Network Mode

Table 1.1 Devices in Figure 1.1

NO.

Device Name

1

AX3702 GNSS antenna

2

Ranging pole

3

Android device TC20 (not included in the kit)

4

COMM1-Bluetooth module

5

DC-2pin to USB Power Cable

6

Power Bank (not included in the kit)

7

David GNSS receiver

8

Bracket for rover

9

TNC-J to SMA cable 1.5m (GNSS antenna cable)

Содержание David

Страница 1: ...Quick Start Guide David GNSS Receiver Rover Kit Network Mode Rover Kit with 2W Radio Base Kit Network Mode Base Kit with 2W Radio Base Kit with 30W Radio Version 1 0 20190228 ...

Страница 2: ...dio or 2G 3G 4G network accessed via controller and different types of radio five kits for David GNSS Receiver are introduced in this Quick Start Guide Rover Kit Network Mode Rover Kit with 2W Radio Base Kit Network Mode Base Kit with 2W Radio Base Kit with 30W Radio According to the requirements set up the system as per the following pictures David Quick Start Video including Nuwa operation is on...

Страница 3: ... 1 Devices in Figure 1 1 NO Device Name 1 AX3702 GNSS antenna 2 Ranging pole 3 Android device TC20 not included in the kit 4 COMM1 Bluetooth module 5 DC 2pin to USB Power Cable 6 Power Bank not included in the kit 7 David GNSS receiver 8 Bracket for rover 9 TNC J to SMA cable 1 5m GNSS antenna cable ...

Страница 4: ... radio antenna 2 Bracket for 460M antenna 3 TNC TNC converter 4 TNC J to TNC J cable 1m radio antenna extension cable 5 Ranging pole 6 Android device TC20 not included in the kit 7 COMM2 7pin to USB 2W Radio 5pin cable 8 COMM1 Bluetooth module 9 DC 2pin to USB Power Cable 10 Bracket for rover 11 Power Bank not included in the kit 12 David GNSS receiver ...

Страница 5: ...5 AX3702 GNSS antenna 1 3 Base Kit Network Mode Figure 1 3 Base Kit Network Mode Table 1 3 Devices in Figure 1 3 NO Device Name 1 AX3702 GNSS antenna 2 GNSS antenna connector 3 Android device TC20 not included in the kit 4 COMM1 Bluetooth module 5 DC 2pin to USB Power Cable 6 Bracket for base ...

Страница 6: ...m GNSS antenna cable 1 4 Base Kit with 2W Radio Figure 1 4 Base Kit with 2W Radio Table 1 4 Devices in Figure 1 4 NO Device Name 1 AX3702 GNSS antenna 2 GNSS antenna connector 3 2W 460MHz radio 4 COMM2 7pin to USB 2W Radio 5pin cable 5 COMM1 Bluetooth module 6 DC 2pin to Bullet DC Power Cable 7 David GNSS receiver ...

Страница 7: ...Bullet DC connects to Bullet DC to Alligator Clips then clips to 12V power supply 1 5 Base Kit with 30W Radio Figure 1 5 Base Kit with 30W Radio Table 1 5 Devices in Figure 1 5 NO Device Name 1 AX3702 GNSS antenna 2 GNSS antenna connector 3 TNC J to SMA cable 1 5m GNSS antenna cable 4 David GNSS receiver 5 30W radio 6 COMM1 Bluetooth module ...

Страница 8: ...dio 5pin cable 11 Metal plate for radio antenna 12 High Gain Radio Antenna Note Bullet DC connects to Bullet DC to Alligator Clips then clips to 12V power supply 2 Configure and Survey 2 1 Create project or open existed project Launch Nuwa application click Project in the main interface to create a new project or open an existed project refer to Figure 2 1 below Figure 2 1 Project ...

Страница 9: ...ntenna click Connect to complete the device connection refer to Figure 2 2 below Figure 2 2 Connect David 2 3 Configure Rover or Base Back to the Device interface click Rover to enter the Work Mode List create a new rover select Network for Data Link fill up Ntrip or TCP information as shown in Figure 2 3 or select Radio for Data Link select 38400 for Baud Rate as shown in Figure 2 4 ...

Страница 10: ...ase select Network for Data Link and fill up Ntrip information as shown in Figure 2 5 or select Radio for Data Link select 38400 for Baud Rate as shown in Figure 2 6 Figure 2 5 Base Config Network Figure 2 6 Base Config Radio Then click OK to complete rover or base configuration Select this configuration in the Work Mode List click Start to configure the rover or the base ...

Страница 11: ...t Guide v1 0 10 2 4 Survey Work Back to the main interface of Nuwa click Survey to enter the survey interface Users can do survey work including point survey point stakeout line stakeout and etc Figure 2 7 Survey Work ...

Страница 12: ...ich helps you to better use the product Tersus is not liable for damages caused by failure to follow the instructions in the manual Tersus is committed to continually improving product features and performance and the contents of subsequent product manuals are subject to change without notice If the pictures and icons in the manual are different with actual product please refer to the actual produ...

Отзывы: