Termo 630000 Скачать руководство пользователя страница 11

20

21

UK  USER MANUAL

• Open the regulator on the gas bottle.

• Press the control knob down, turn it to 

position O (low) and hold it down for at least 

15-20 seconds.

• While the button is held down, press the 

ignition button (2) until the pilot light at the 

bottom of the gas heater is lit.

• Continue to hold the control knob pressed 

for 20-30 seconds. Turn the control knob to 

the required setting. Repeat the procedure 

again if the pilot light goes out.

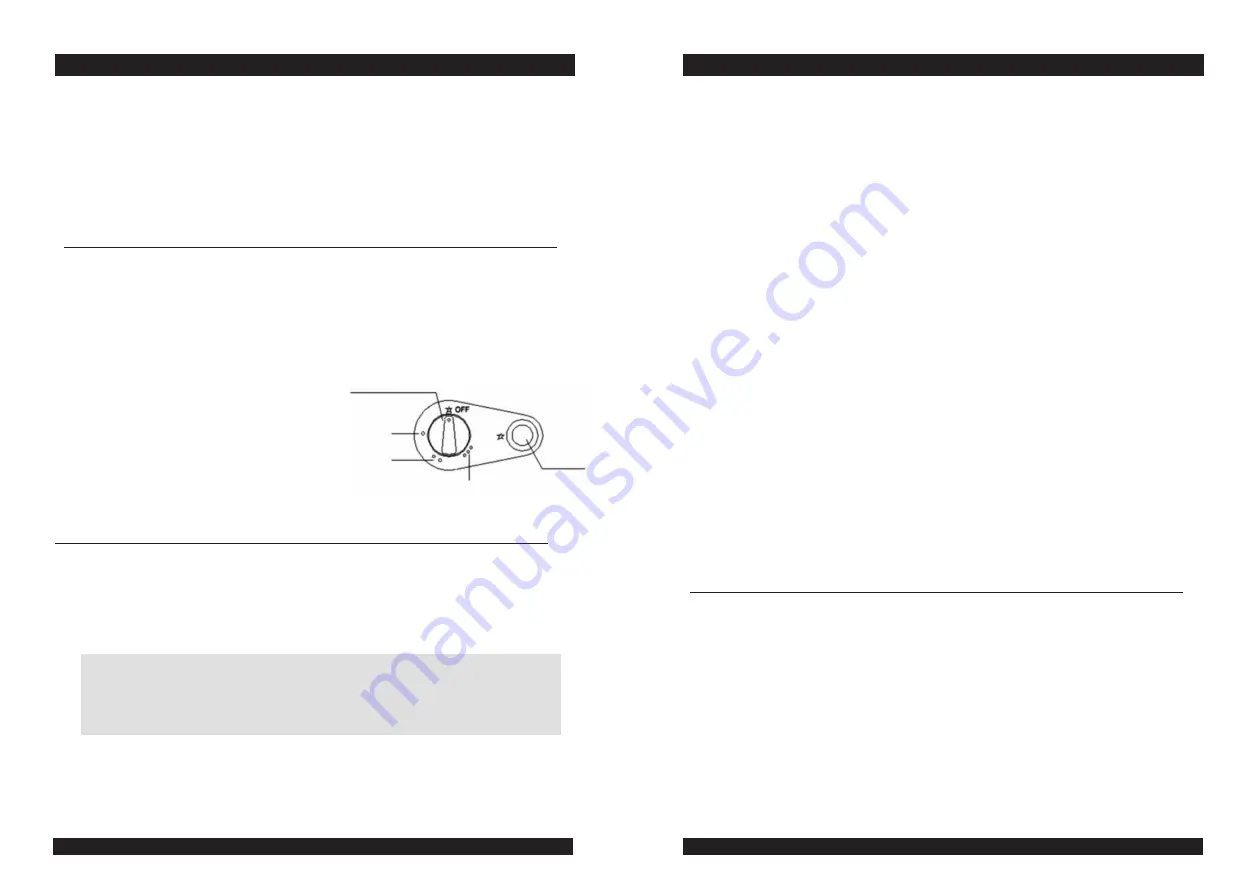
IGNITION AND HEAT CONTROL

Control knob

Low

Medium

High

Ignition button

The gas heater is equipped with an electronic piezo ignition.

UK  USER MANUAL

MAINTENANCE

• The gas supply must be off and the gas heater must be completely cool before any 

maintenance procedures are undertaken. Do not clean the gas heater while it is in 

use.

• The gas heater should be inspected and checked for faults at least once a year so 

that you can safely use it in your home.

• If you discover the gas heater has a fault, you must not use it. Contact your retailer 

for advice.

• Clean the exterior of the gas heater and the storage area to remove dust and dirt 

that may accumulate on the surface of the ceramic elements. Do not knock the 

elements, as this may permanently damage them.

• Never use corrosive cleaning agents to clean the gas heater.

• Check the pilot light when the gas heater is in use. It must burn stably. If it flickers or 

is yellow, the gas heater should be inspected.

• If any parts need to be replaced, they may only be replaced with original spare parts 

from the manufacturer.

• When the gas heater is not in use, we recommend keeping it covered or store it in 

its packaging to minimise dust and dirt collecting on the heater.

BEFORE USE

For the first use, place the product on the wheels and then lift the product by the 

handles straight up and shake the product slightly so that the anti-tip devices are 

restored. These can be activated when the product is transported / stored in a 

horizontal position and then the balls in the anti-tip devices need to return to the 

correct position for the product to function according to the enclosed instructions.

CHANGING THE GAS BOTTLE

• Switch off the gas at the regulator and allow the gas heater to cool down com-

pletely before replacing the gas bottle. Do not attempt to remove the regulator 

while the gas heater is in use.

NOTE!

The first time the gas heater is used, the control knob may need to be heldpressed for 

longer in order for gas to reach the pilot light.

Make sure to follow each step of the instruction.

To turn the gas heater off, turn the control knob to OFF. Then turn the gassupply off at the 

regulator on the gas bottle to completely turn the gas heateroff.

The gas heater must be lit during each use according to the instructions.

Turn on position 1 =

 Low

, wait 40-60 sec - Then turn on position 2 = 

Medium,

 wait

another 40-60 sec to turn on position 3 = 

High

Содержание 630000

Страница 1: ...1 TERMO GASOLKAMIN SV GB Gasolkamin Gas heater Gassovn Art no 630000 630100 N Max 4200W NO ...

Страница 2: ...dast vara igång när den är under uppsikt Gaskaminen får inte flyttas runt när den är igång Undvik att placera föremål mot eller ovanpå gaskaminen Gaskaminen får inte blockeras eller övertäckas När gaskaminen inte används ska regulatorn på gasolflaskan stängas I händelse av läckage ska gaskaminen stängas av omgående och regulatorn på gasolflaskan ska övertäckas med en våt trasa Även om gasolflaskan...

Страница 3: ...en bakre plattan och hjulen ur hålrummet på gaskaminen Sätt fast plattorna och panelerna till varandra med skruvar 8 st enligt bilderna SV BRUKSANVISNING 1 3 2 Montering botten Montera vänster och höger sida med de medföljande två vingmuttrarna Säkra bottenplattan med 4 skruvar ...

Страница 4: ... första användningen Testet ska utföras på alla anslutningar och monteringsdelar Det är viktigt att läckagetestet utförs med full gasolflaska Under testet är det strängt förbjudet att röka och använda öppen eld Gör en tvållösning med 1 del flytande diskmedel och 1 del vatten Öppna regulatorn och testa alla ventiler slangar och anslutningar samt regulatorn med lösningen Om det finns otätheter någon...

Страница 5: ...del vänta ytterligare 40 60 sek för att tända läge 3 Hög Var noga med att varje läge tänds i tur och ordning När gaskaminen ska släckas vrider du regulatorknappen över på OFF Stäng sedan av gasen på regulatorn på gasolflaskan för att stänga av gaskaminen helt UNDERHÅLL Före underhåll av gaskaminen ska gasen vara avstängd och gaskaminen ska ha svalnat helt Rengör inte gaskaminen medan den används G...

Страница 6: ...trollera om gaskaminen står i drag eller om gasolflaskan är tom Om gaskaminen slocknar efter ca 30 minuter kan det tyda på att rummet är dåligt ventilerat Öppna ett fönster eller en dörr för att ventilera rummet och tänd sedan gaskaminen igen SV BRUKSANVISNING ANNAT Kom ihåg att gaskaminen är utrustad med ett ODS säkerhetssystem som utför syrekontroll och flamkontroll Det innebär att gaskaminen sl...

Страница 7: ...s hos kommunens tekniska förvaltning SV BRUKSANVISNING Symbolen för överkorsade soptunnor visar att föremålet ska kasseras separat från hushållsavfall Artikeln ska lämnas in för återvinning enligt lokala miljöbestäm melser för avfallshantering Genom att skilja ett märkt föremål från hushållsavfall hjälper du till att minska volymen av avfall som skickas till förbränningsanläggning ar eller markfyl...

Страница 8: ... used for more than 2 hours at a time The gas heater must not be left on when unsupervised UK USER MANUAL Never move the gas heater around while in use Do not place objects against or on top of the gas heater The gas heater must not be covered When the gas heater is not in use the regulator on the gas bottle must be turned off In the event of a leak immediately turn the gas heater off and cover th...

Страница 9: ...d the wheels out of the inside of the gas heater Screws too be used for the complete product assembly 8 pcs in total as per the steps in this instruction UK USER MANUAL Assembly bottom part Secure the left and right sida panels with 2 butterfly screws 1 2 3 Secure the with 4 screws bottom plate ...

Страница 10: ...d for leaks before first use All connections and joints must be tested It is important that the leak test is undertaken with a full gas bottle Smoking and use of naked flames is forbidden during the test Make a soap solution of 1 part washing up liquid and 1 part water Open the regulator and test all the valves hoses and connections as well as the regulator using the solution If there are leaks an...

Страница 11: ...st burn stably If it flickers or is yellow the gas heater should be inspected If any parts need to be replaced they may only be replaced with original spare parts from the manufacturer When the gas heater is not in use we recommend keeping it covered or store it in its packaging to minimise dust and dirt collecting on the heater BEFORE USE For the first use place the product on the wheels and then...

Страница 12: ...f immediately after it is lit check if the gas heater is standing in a draught or if the gas bottle is empty If the gas heater switches off after approx 30 minutes this is a sign that the room is poorly ventilated Open a window or door to ventilate the room and then relight the gas heater UK USER MANUAL OTHER Remember that the gas heater is equipped with an ODS safety system thatmakes oxygen and f...

Страница 13: ...ble from your local refuse collectiondepartment UK USER MANUAL SERVICE AND REPAIRSWE We provide a warranty on our products in accordance with the legal provisionsapp licable in each country Proof of purchase must be presented submitted Service and repairs are offered free of charge within the warranty period inaccordance 1 The fault is a design or material fault excluding normal wear and tear andm...

Страница 14: ...eovnen må bare være slått på når den er under tilsyn NO BRUKSANVISNING Gassvarmeovnen må ikke flyttes rundt mens den er i bruk Ikke plasser gjenstander opp mot eller oppå gassvarmeovnen Gassvarmeovnen må ikke tildekkes eller overdekkes Når gassvarmeovnen ikke er i bruk må regulatoren på gassflasken stenges Ved lekkasje må gassvarmeovnen stenges øyeblikkelig og regulatoren på gassflas ken må dekkes...

Страница 15: ... og fjern bakplaten og hjulene fra hulrommet gassovnen Fest platene og panelene til hverandre med skruer 8 stk i følge bildene 1 2 NO BRUKSANVISNING Montering av bunnen Monter venstre og høyre side med de medfølgende to vingemutterne 3 Fest bunnplaten med 4 skruer ...

Страница 16: ... må utføres på alle forbindelser og koblingspunkter Det er viktig at tetthetsprøven fo retas med full gassflaske Under testen er røyking og bruk av åpen ild strengt forbudt Lag en såpeoppløsnnig av 1 del flytende oppvaskmiddel og 1 del vann Åpne regulatoren og test alle ventiler slanger og forbindelser pluss regulatoren med oppløsningen Hvis det finnes lekkasjer noen steder vil du se bobler Slå av...

Страница 17: ...sken for å slå gassvarmeovnen helt av Gassovnen skal være tent ved hver bruk i henhold til instruksjonene Slå på posisjon 1 Lav vent 40 60 sek Slå deretter på posisjon 2 Middels vent ytterligere 40 60 sekunder for å slå på posisjon 3 Høy NO BRUKSANVISNING VEDLIKEHOLD Før vedlikehold av gassvarmeovnen må gassen være stengt og gassvarmeovnen må være helt avkjølt Ikke rengjør gassvarmeovnen mens den ...

Страница 18: ...rekk eller om gassflasken er tom Hvis gassvarmeovnen slukner efter ca 30 minutter er det et tegn på at rommet er dårlig ventilert Åpne et vindu eller en dør for å lufte rommet og tenn deretter gassvarmeovnen på nytt FØR BRUK For mer informasjon og tips besøk vår nettside www termognosjo se sv produkter gasolkamin For første gang plasser produktet på hjulene og løft deretter produktet i håndtakene ...

Страница 19: ... kommunens tekniske administrasjon NO BRUKSANVISNING SERVICE OG REPARASJON Vi gir garanti på produktene våre i henhold til de lovbestemmelsene som gjelder i hvert enkelt land Kjøpsbevis må vises frem legges ved Service og reparasjon dekkes i garantitiden under følgende forutsetninger 1 Feilen er en konstruksjons eller materialfeil normal slitasje og misbruk dekkes ikke 2 Det har ikke vært gjort fo...

Страница 20: ...38 39 ...

Страница 21: ...40 TERMO GNOSJÖ VÄRME OCH KYLA AB Gnejsvägen 8 335 32 Gnosjö Tel 0370 91015 info termognosjo se www termognosjo se ...

Отзывы: