background image

6

9. Break gear

The brake gear is a protection against uncontrolled lowering of the gate.

10. Disconnecting the drive manually

The manual release system is used to operate the gate in the event of a power failure.

11. Radio control

Rolling code technology (7.38 x 10    combinations), frequency 433.92 MHz, Transmitter, 

eg 4-channel, allows you to control 4 gates using one transmitter.

12. The metal bottom plate provides a strong and safer assembly.

13. UP/DOWN control buttons. 

19


GÓRA 

DÓŁ 

SET

UP

CODE

DOWN

Fig. 1

Содержание ECO 600 N

Страница 1: ...Installation and user guide for the garage drive for sectional and tilt up doors ECO 600 N ...

Страница 2: ...Check other products of our brands on www sukcesgroup pl ...

Страница 3: ...res 5 6 3 Pre Installation recommendations 7 4 Montage 8 12 5 Programming instruction 12 15 6 Optional connectors and connections 15 16 7 Manual drive disconnection 17 8 Maintenance 17 9 Technical data 18 19 10 Technical specifications 19 22 11 Common faults and solutions 22 24 ...

Страница 4: ...lls Although the drive is equipped with an overload system added of photocells will significantly improve the safety of automatic garage doors 5 Before leaving or entering the garage make sure that the garage door is completely open and stationary 6 After CLOSE command make sure that the garage door is completely closed and stationary 7 Do not hold your hands near the drive and garage door when op...

Страница 5: ...n connect photocells additional receivers wired and wireless wall swi tches signal lamps and pass door protection 7 LED lighting The lighting switch on for each cycle for 3 minutes 8 Connecting emergency power supply In the event of a power failure the drive can be powered from the battery may fall down sharply 14 Check the installation regularly especially wires springs and mountings for signs of...

Страница 6: ...em is used to operate the gate in the event of a power failure 11 Radio control Rolling code technology 7 38 x 10 combinations frequency 433 92 MHz Transmitter eg 4 channel allows you to control 4 gates using one transmitter 12 The metal bottom plate provides a strong and safer assembly 13 UP DOWN control buttons 19 GÓRA DÓŁ SET UP CODE DOWN Fig 1 ...

Страница 7: ...nted locking devices have been removed from the gate before installing the device In the opposite situation you can lose your warranty 4 The power supply socket must be mounted near the place where the drive will be installed 5 There should be a gap with a minimum height of 30 mm at its nearest point between the bottom of the metal rail and the upper part of the garage door Fig 2 3 Pre installatio...

Страница 8: ...et on the inner wall 2cm 15cm above the gate depending on the space available 2 Handle gate Attach the handle door to the internal side of the door as close as possible to the top edge 2 elements rail 3 elements rail Fig 3 Fig 4 A 1500 mm B 1500 mm Łącznik Rys 3 A 1500 mm B 1500 mm connector Fig 5 D 1000 mm E 1000 mm C 1000 mm Łącznik Rys 4 Łącznik C 1000 mm D 1000 mm E 1000 mm connector connector...

Страница 9: ...ements rail Slide rail A and B in the connector Fig 4 3 elements rail Slide the rail C D and E into the connector Fig 5 2 Pull the screw F with the tensioning element to the end of the rail Fig 6 3 Loosen the nut and spring as in Fig 7 4 Tighten the nut as shown in Fig 8 then go to the rail assembly Fig 6 Rys 5 F F ...

Страница 10: ... in the wall bracket Insert the spindle and secure it with the cotter Fig 9 STEP 3 Lift the rail with the drive so that it is position will be horizontal and in the center of the gate Mount the drive rail to the ceiling with mounting brackets Fig 9 Fig 10 STEP 4 Connect with screws the straight arm with the bented arm Place and screw the arms to the gate handle located on the upper edge of the gat...

Страница 11: ...ed to the drive setting Option 1 Mount at the top of the drive Mount the battery using the handle and nuts Fig 12 i Fig 13 Option 2 Mounting on the side of the drive Mount the battery using the handle and nuts see Fig 14 and 15 Rys 9 Fig 10 ona do uchwytu bramy na górnej krawędzi za Rys 10 Fig 11 Fig 12 Fig 13 ...

Страница 12: ...ogramming of limit positions Press and hold SET button untill digit 1 appear The drive is in programming mode Press and hold UP button untill the gate will be in its upper limit position Press and hold DOWN button untill the gate will be in its lower limit position Press SET button to confirm the upper limit position Digit 2 appears Press SET button to confirm the lower limit position SET UP CODE ...

Страница 13: ...ton to increase or DOWN button to decreases overload force Press and hold SET button untill digit 3 appear The drive is in regulation overload force mode The minimum value of the overload force is 1 Press and hold CODE button untill C symbol appear All programmed transmitters has been deleted Repeat the procedure for all added transmitters Press SET button to confirm settings The default value of ...

Страница 14: ...he time or DOWN to decrease the time The display shows numbers from 0 to 9 where 0 auto closing function is turned off 1 minimum closing time it s 15 seconds 9 maximum closing time it s 135 seconds Press the SET button to confirm the settings Press DOWN button to turn on the photocells The digit 11 appear Press and hold UP button until the digit or horizontal bar appears Press UP button again to s...

Страница 15: ...ave normally open voltage free contacts Fig 19 The power of the caution light should not exceed 25 W The external switch should be a NO 5 7 Open stop close input 6 Optional connectors and connections Connection of photocells Fig 17 Connection of the switch Fig 16 Fig 16 GARAGE DRIVE O S C Fig 17 ...

Страница 16: ...ange and the current consumption must not exceed 100 mA When using AC 230 V signal lamps additional relays should be used 3 Pass door protection Fig 19 This function does not allow the gate to be opened when the small wicket door is open Thanks to this the door panel will not be damaged SD AC 230 V IN FLASH LIGHT AC 230 V 24 PE PB GND GND FLASH Relay Fig 18 Fig 19 GARAGE DRIVE pass door protection...

Страница 17: ...the outside so that the mechanism is accessible from the outside Fig 21 1 No special maintenance of the drive s electronic system is required Check at least twice a year that the gate is properly balanced and that all working parts are in good con dition Also check at least twice a year overload force and adjust it if necessary Make sure that the photocells works correctly 2 Bulb replacement Note ...

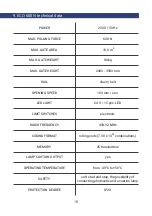
Страница 18: ...lt OPENING SPEED 160 mm sec LED LIGHT 24 V 15 pcs LED LIMIT SWITCHES electronic RADIO FREQUENCY 433 92 MHz CODING FORMAT rolling code 7 38 x 10 combinations MEMORY 25 transmitters LAMP CAUTION OUTPUT yes OPERATING TEMPERATURE from 40 C to 50 C SAFETY soft start and stop the possibility of connecting photocells and a caution lamp PROTECTION DEGREE IP20 19 2 ...

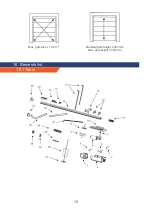
Страница 19: ...19 Max gate area 10 0 m Standard gate height 2400 mm Max gate height 3500 mm 2 10 Elements list 10 1 Table ...

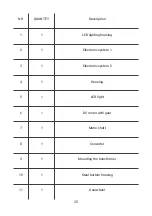
Страница 20: ... 10 11 QUANTITY 1 1 1 1 1 1 1 1 1 1 1 Description LED lighting housing Electronic system 1 Electronic system 2 Housing LED light DC motor with gear Motor shaft Converter Mounting the transformer Steel bottom housing Gearwheel ...

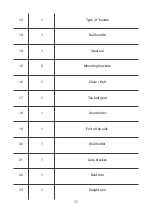
Страница 21: ... 14 15 16 17 18 19 20 21 22 23 1 1 1 2 1 1 1 1 1 1 1 1 Type U handle Rail handle Steel rail Mounting brackets Chain Belt The belt gear Gear holder End of the rails Wall holder Gate bracket Bent arm Sraight arm ...

Страница 22: ...the fuse is not damaged c Check that the transformer low voltage cable is connected to the power board d Check that the wires are connected to the board e Check if the transformer s low voltage side is 26 V AC If there is voltage replace the PCB while if there is no voltage replace the transformer Possible causes Solutions 1 1 1 1 1 1 Belt Chain connector Trolley Warning card Disconnecting the dri...

Страница 23: ...nd if necessary replace the wires connecting the Hall sensor 10 The drive does not work The relay activates The symbol H appears on the display 11 The drive stops after a movement of approx 10 cm The symbol h appears on the display 12 The gate rises but does not move down The symbol appears on the display 13 When the gate closes automatically after opening LED lighting flash 4 time Damaged motor c...

Страница 24: ...terference The new remote control is not compatible with the drive The drive s memory is full The drive reached max number of programmed remotes control The pass door is open Motor shaft damaged External devices are not compatible with the drive a Discharged battery b The battery is incorrectly connected c Damaged wires connecting the battery with the drive a Charge the battery b Check the correct...

Отзывы: