background image

OPERATION   EN

5

In 9006246 (11

2011)

OPERATION

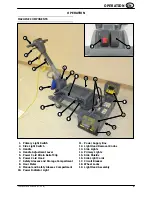
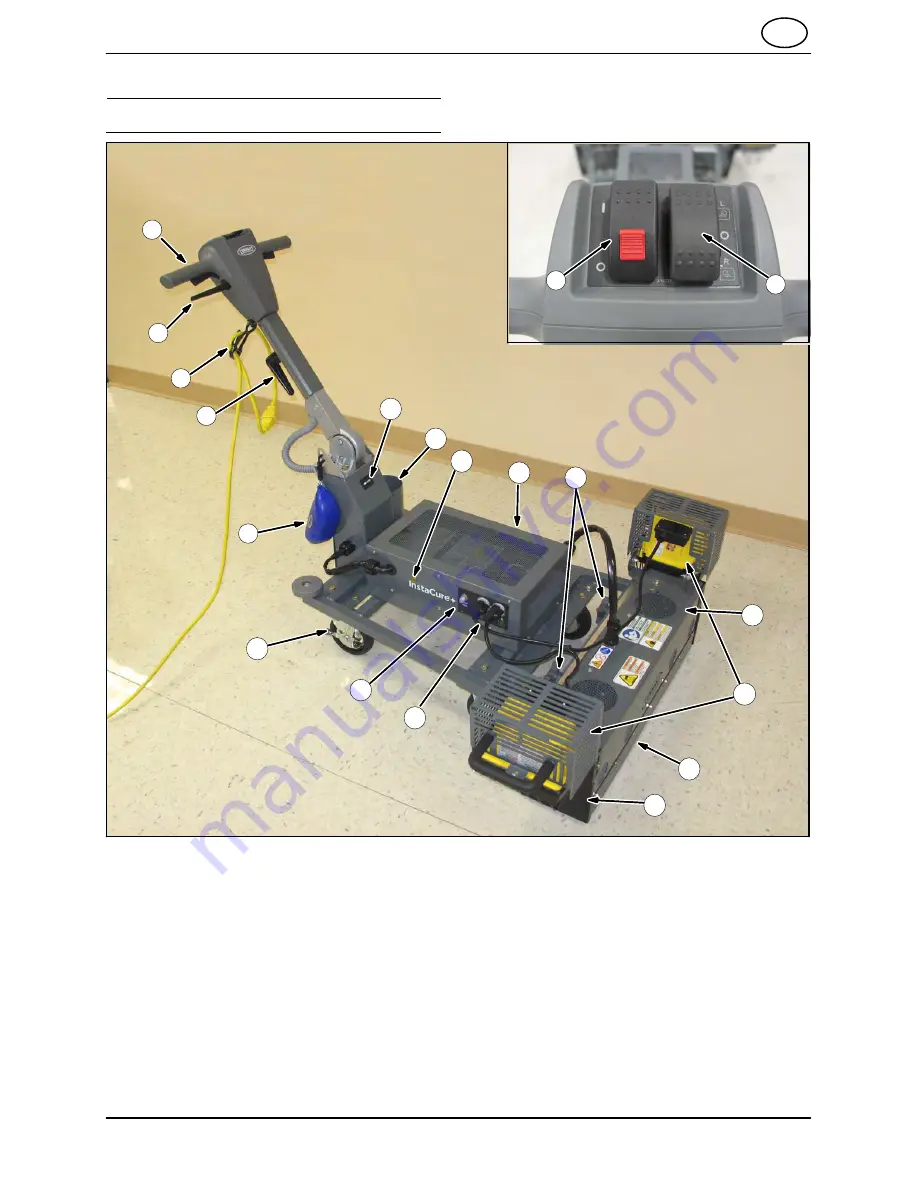
MACHINE COMPONENTS

9

3

7

4

13

14

10

12

5

6

8

11

15

16

17

18

19

2

1

1. Primary Light Switch
2. Side Light Switch
3. Handle
4. Handle Adjustment Lever
5. Power Cord Strain Relief Clip
6. Power Cord Hook
7. Safety Glasses and Storage Compartment
8. Hour Meter
9. Manual and Safety Glasses Compartment

10. Power Indicator Light

11. Power Supply Box

12. Light Head Removal Knobs
13. Side Lights
14. Primary Lights
15. Side Shields
16. Side Light Cords
17. Circuit Breaker
18. Wheel Locks
19. Light Head Assembly

Содержание InstaCure +

Страница 1: ...9006246 Rev 02 3 2012 Operator and Parts Manual EN 9006246 North America www tennantco com InstaCure Manual del operario y lista de piezas ES Manuel op rateur et pi ces FR...

Страница 2: ...NVIRONMENT Please dispose of packaging materials old machine components such as batteries hazardous fluids such as antifreeze and oil in an environmentally safe way according to local waste disposal r...

Страница 3: ...FLOOR COATING APPLICATION 6 HOW THE MACHINE WORKS 6 BEFORE OPERATING 7 CURING WITH THE MACHINE 8 REMOVING THE LIGHT HEAD ASSEMBLY 10 CHANGING LIGHT BULBS 11 MACHINE TROUBLESHOOTING 12 SPECIFICATIONS 1...

Страница 4: ...t UV exposure may cause eye damage Do not operate without wearing UVA UVB protective safety glasses Do not look into UV source FOR SAFETY 1 Do not operate machine For professional use only For use by...

Страница 5: ...g provides a path of least resistance for electrical current to reduce the risk of electrical shock This machine is equipped with a cord having an equipment grounding conductor and grounding plug The...

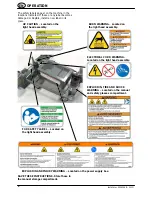
Страница 6: ...L Located on the light head assembly ELECTRICAL CORD WARNING Located on the light head assembly UV CAUTION Located on the light head assembly BURN WARNING Located on the light head assembly EXPLOSION...

Страница 7: ...4 Handle Adjustment Lever 5 Power Cord Strain Relief Clip 6 Power Cord Hook 7 Safety Glasses and Storage Compartment 8 Hour Meter 9 Manual and Safety Glasses Compartment 10 Power Indicator Light 11 P...

Страница 8: ...f this manual for bulb replacement PLANNING FLOOR COATING APPLICATION Before applying the Eco UVC or Eco UVI floor coatings determine which electrical outlet you will plug the Instacure machine into A...

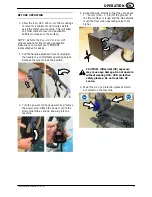
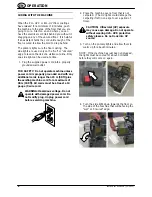
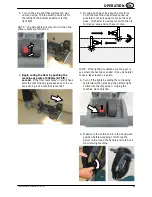
Страница 9: ...lever and adjust the handle to a comfortable operating height Release the lever to lock the position 3 Turn the power cord hook upward and remove the power cord Attach the power cord to the strain re...

Страница 10: ...chine unless power cord is properly grounded and with any additional cords longer than 15 m 50 ft plus the existing machine cord for a maximum of 30 m 100 ft All cords must be at least a 14 gauge 3 wi...

Страница 11: ...e that is too fast 7 Overlap each pass by about 50 mm 2 in Push the machine in as straight a line as possible to make it easier to make the next pass It is better to overlap too much than to to miss a...

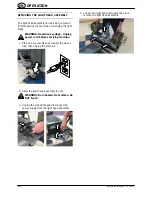
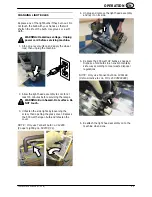
Страница 12: ...NG Hazardous voltage Unplug power cord before servicing machine 1 Stop on a level surface and apply the wheel lock then unplug the machine 2 Allow the light head assembly to cool WARNING Burn hazard H...

Страница 13: ...tes before servicing the lamps WARNING Burn hazard Hot surface Do NOT touch 3 Unfasten the side lights by loosening the screw then opening the glass cover Replace the 500 watt halogen bulb and refaste...

Страница 14: ...cuit breaker tripped Reset circuit breaker Machine CB tripped Reset machine CB Defective cord Replace cord Sticky or tacky floor after curing Curing speed too fast Push machine at a slower pace Lights...

Страница 15: ...andle at maximum 1120 mm 44 in Height handle folded 610 mm 24 in Length 970 mm 38 in Bulbs UV primary 250 watt each 1250 watt total with 5 bulbs Bulbs halogen side lights 500 watt each Volts 120V 60 H...

Страница 16: ...e los materiales del embalaje los componentes usados de la m quina como las bater as y los fluidos peligrosos como el anticongelante y el aceite de forma segura para el medio ambiente de acuerdo con l...

Страница 17: ...ERRA 18 FUNCIONAMIENTO 20 COMPONENTES DE LA M QUINA 20 INSTRUCCIONES DE FORMACI N 21 PLANIFICACI N DE LA APLICACI N DEL REVESTIMIENTO DE SUELOS 21 FUNCIONAMIENTO DE LA M QUINA 21 ANTES DE LA UTILIZACI...

Страница 18: ...correcto No utilice la m quina si no est en buenas condiciones de funcionamiento ADVERTENCIA tensi n peligrosa No utilice la m quina si el cable de alimentaci n est da ado No modifique el enchufe Des...

Страница 19: ...gase alerta Preste atenci n a lo que est haciendo No permita nunca que los ni os jueguen encima o en las proximidades de la m quina 4 Cuando realice operaciones de mantenimiento Pare sobre una superfi...

Страница 20: ...toma de tierra puede provocar descargas el ctricas Consulte a un electricista cualificado o a un miembro del personal t cnico si tiene dudas sobre si el enchufe de pared tiene una toma de tierra adec...

Страница 21: ...EL CABLE EL CTRICO situada sobre el conjunto del portal mparas PRECAUCI N SOBRE UV situada sobre el conjunto del portal mparas ADVERTENCIA SOBRE QUEMADURAS situada sobre el conjunto del portal mparas...

Страница 22: ...si n del cable de alimentaci n 12 Gancho del cable el ctrico 13 Compartimento para las gafas de seguridad y almacenamiento 14 Contador de horas 15 Compartimento para el manual y las gafas de seguridad...

Страница 23: ...nstrucciones sobre la sustituci n de bombillas PLANIFICACI N DE LA APLICACI N DEL REVESTIMIENTO DE SUELOS Antes de aplicar los revestimientos de suelo ECO UVC o Eco UVI intente determinar a qu toma de...

Страница 24: ...ura que le resulte c moda para su uso Suelte la palanca para bloquear la posici n 3 Gire el gancho del cable hacia arriba y retire el cable de alimentaci n Sujete el cable de alimentaci n al clip de l...

Страница 25: ...el cable de alimentaci n est conectado a una toma de tierra y tenga cables adicionales de m s de 15 m 50 pies adem s del cable de la m quina de un m ximo de 30 m 100 pies Todos los cables deben tener...

Страница 26: ...oso y se adhiere a sus zapatos cuando acaba de pasar sobre l significa que est pasando la m quina demasiado r pido 7 Haga que las pasadas se superpongan 50 mm 2 pulg Lleve la m quina lo m s en l nea r...

Страница 27: ...idad para poder transportar la m quina o cambiar las bombillas ADVERTENCIA tensi n peligrosa Desenchufe el cable de alimentaci n antes de revisar la m quina 1 Pare en una superficie nivelada aplique e...

Страница 28: ...uperficie caliente NO tocar 3 Suelte las luces laterales aflojando el tornillo y a continuaci n abra la cubierta de cristal Vuelva a colocar la bombilla hal gena de 500 vatios y apriete la cubierta NO...

Страница 29: ...na activada Restablecer la banda de conducci n de la m quina Cable defectuoso Sustituir el cable Suelo pegajoso despu s de la vulcanizaci n Velocidad de vulcanizaci n excesiva Empujar la m quina a men...

Страница 30: ...4 pulg Longitud 970 mm 38 pulg Bombillas principales de rayos ultravioleta UV 250 vatios cada una 1250 vatios en total por las cinco bombillas Bombillas luces hal genas laterales 500 vatios cada una V...

Страница 31: ...TION DE L ENVIRONNEMENT Veuillez liminer les mat riaux d emballage les composants d anciennes machines comme les batteries les fluides dangereux tels que l antigel ou l huile d une mani re s re au poi...

Страница 32: ...LA TERRE 33 FONCTIONNEMENT 35 COMPOSANTS DE LA MACHINE 35 INSTRUCTIONS POUR LA FORMATION 36 PLANIFICATION DE L APPLICATION DU REV TEMENT DE SOL 36 FONCTIONNEMENT DE LA MACHINE 36 AVANT L UTILISATION 3...

Страница 33: ...a machine si elle n est pas en bon tat de fonctionnement AVERTISSEMENT Tension dangereuse N utilisez pas la machine avec un cordon d alimentation endommag Ne modifiez pas la prise D branchez le cordon...

Страница 34: ...ce que vous faites Ne laissez jamais des enfants jouer sur ou proximit de la machine 4 Lors de l entretien de la machine Arr tez la machine sur une surface horizontale et serrez le frein des roues D...

Страница 35: ...te du conducteur de mise la terre de l quipement peut entra ner un risque de d charge lectrique Si vous avez un doute sur la mise la terre de la prise de courant faites examiner la prise par un lectri...

Страница 36: ...ge AVERTISSEMENT DE CORDON LECTRIQUE Situ e sur le dispositif de la t te d clairage ATTENTION UV Situ e sur le dispositif de la t te d clairage ATTENTION BR LURE Situ e sur le dispositif de la t te d...

Страница 37: ...du cordon d alimentation 12 Crochet du cordon d alimentation 13 Lunettes de s curit et compartiment de rangement 14 Compteur horaire 15 Compartiment de rangement du manuel et des lunettes de s curit...

Страница 38: ...APPLICATION DU REV TEMENT DE SOL Avant d appliquer les rev tements de sol ECO UVC ou Eco UVI d terminez dans quelle prise lectrique vous allez brancher la machine InstaCure Appliquez le rev tement sur...

Страница 39: ...Rel chez le levier pour bloquer la position 3 Tournez le crochet du cordon d alimentation vers le haut et retirez le cordon d alimentation Fixez le cordon d alimentation la pince de d charge de tract...

Страница 40: ...as correctement reli la terre ni avec un cordon suppl mentaire plus long que 15 m 50 pi en plus du cordon existant de la machine pour un maximum de 30 m 100 pi Tous les cordons doivent tre au moins d...

Страница 41: ...sage de la machine vous poussez trop rapidement 7 Faites chevaucher chaque passage de 50 mm 2 po Poussez la machine sur une ligne la plus droite possible afin de faciliter le prochain passage Il est p...

Страница 42: ...machine ou le remplacement des ampoules AVERTISSEMENT Tension dangereuse D branchez le cordon d alimentation de la machine avant de l entretenir 1 Arr tez la machine sur une surface horizontale et ser...

Страница 43: ...SSEMENT Risque de br lure Surface chaude NE touchez PAS 3 D tachez les lampes lat rales en desserrant la vis puis ouvrez le cache en verre Remplacez l ampoule halog ne de 500 Watts et remettez le cach...

Страница 44: ...oupe circuit de la machine Cordon d fectueux Remplacez le cordon Sol visqueux ou collant apr s le traitement Vitesse de traitement trop rapide Poussez la machine plus lentement Lampes teintes Reportez...

Страница 45: ...r poign e repli e 610 mm 24 po Longueur 970 mm 38 po Ampoules UV primaires 250 Watts chacune 1 250 Watts au total avec 5 ampoules Ampoules lampes lat rales halog nes 500 Watts chacune Tension 120 V 60...

Страница 46: ...PARTS InstaCure 9006246 7 2009 44 Fig 1 Cart Group 1 2 3 4 5 4 5 6 7 7 8 9 6 7 7 8 10 10 11 12 13 4 4 8 14 15 16 17 18 19 20 21 22 23 22 23 11 12 24 25 26 27 28 29 30 31 32 33 33...

Страница 47: ...Handle Assy Kit 1 314870 000000 Cs Label Warning Expl Fire Shk 1 15 16931 000000 Screw Hex M8 X 1 25 X 20 8 8 4 16 32491 000000 Washer Flat 0 31 Std 4 17 301745 000000 Cs Cover Column Sppt 1 18 10404...

Страница 48: ...PARTS InstaCure 9006246 7 2009 46 Fig 2 Handle Group 1 4 5 6 7 8 9 10 11 12 13 14 15 13 16 17 18 19 23 20 21 22 24 25 26 27 28 29 30 31 32 33 33 30 29 28 27 31 17 9 2 34 3...

Страница 49: ...3 000000 Lever Cntrl Switch Trex 2 14 130712 000000 Switch Push Spst No 1 15 1034945 000000 Lever Adjmt Handle 1 16 1034181 000000 Cover Handle Tennant Trex 1 17 1043572 000000 Screw 10 14 X 01 5 Spl...

Страница 50: ...PARTS InstaCure 9006246 11 2011 48 Fig 3 Light Head Assembly 1 1 2 3 3 4 5 5 6 7 6 7 8 8 9 10 11 12...

Страница 51: ...Washer Flat 10 Sae 28 4 09739 000000 Nut Hex Lock M5 X 0 80 Nl Ss 14 5 314095 000000 Cs Bracket Guide InstaCure 2 6 74027 000000 Screw Pan Phl M6 X 1 00 X 12 Nl Pl 2 7 16236 000000 Washer Flat 0 26b...

Страница 52: ...PARTS InstaCure 9006246 7 2009 50 Fig 4 Side Lights Group 9 2 3 4 5 6 7 8 8 10 11 12 13 14 15 16 1 3 4 5 6 7 8 8 10 11 12 13 14 15 16 9...

Страница 53: ...Handle Halogen Light 2 5 24592 000000 Screw Hex 10 24 X 0 75 Fmg Pl 4 6 19324 000000 Washer Flat 10 Sae 4 7 06943 000000 Screw Hex M6 X 1 00 X 20 8 8 4 8 32483 000000 Washer Flat 0 25 Sae 4 9 41185 0...

Страница 54: ...PARTS InstaCure 9006246 7 2009 52 Fig 5 Electrical Schematic...

Страница 55: ...PARTS 53 InstaCure 9006246 7 2009 Fig 6 Wire Harness Group 1 Ref Part No Serial Number Description Qty 1 1052526 000000 Cs Harness Wire Head InstaCure 1...

Страница 56: ...PARTS InstaCure 9006246 7 2009 54...

Отзывы: