background image


Auto Step running


6

CH1
OFF

3 2 .  0 0 V
3 2 .  0 0 V

0 6

.  0 0 V

3 .  0 0 0 A

3 .  0 0 0 A

S h i f t

INDEP

OCP

OFF

3 .  0 0 0 A

CH3
OFF

CH2
OFF

OCP

OFF

STORE  SET

CH1   STORE
CH2   STORE
CH3   STORE

CH1 STORE

1 :  32.00 V 2.000A 0001S
2 :  43.50 V 1.253A 0002S
3 :  55.19 V 1.376A 0002S

11

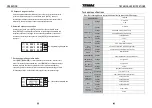
Voltage

5mA

Current

6mA

Voltage

0.05

%

+20 mV

Current

0.1

%

+20 mV

Set

Accuracy

Parallel

Simultaneous

Operation

Load regulation


Power

regulation

Voltage≤3 mV

Current≤6mA

Memory

Store/Recall points 0~90

Timer

1s~9999s

1s

Resolution

Setting


time

Function

Interface

RS232,USB interface

230

W

×

140

H

×

380

L

mm

10Kg (22 lbs)

Indoor use, Altitude up to 2000 m

Dimensions

Weights

Physical

Specification

Operation Environment

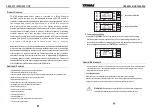
Precautions before operation

1.Unpacking the Instrument


The product has been fully inspected and tested at our factory before shipping. 

    Please carefully  unpack and inspect it to check if there is any damage that may have

    occurred during transportation. If any signs of damage are found, please contact our

    customer service team before operation.

2. 

 Power requirements


The product has been designed to be used with 110V 60Hz power supplies. Make

     certain that the power supply and outlet are properly grounded before use. Do not

     modify the power plug or cord in any way. Use only the power cable that is included

     in the packaging, or a direct replacement.

     Example:

 Set current at 1.500A.

                        Press 

[I SET][1][.][0][0][0][ENTER]

     If the load current through output terminals exceeds the setting value, the 

     instrument will operate in the C.C. mode; if load current does not exceed the 

     setting value, the instrument will operate in the C.V. mode.

3. Over Current Protection Setting

     Press

[OCP] to turn on the 

OCP mode. OCP mode is can be turned off by 

     pressing

 [SHIFT][OCP]

.

4. Voltage/Current Step Setting


While using the rotary knob for changing value, pressing F/C will switch between 

     macro and micro incremental values to either rapidly change or fine tune values. 

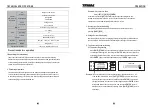
5.  The data storage and call setting


5.1 The data storage setting

            Press 

[SHIFT][STORE]

 to access the data store menu screen. Use the rotary knob

             to select the channel group, and then press

 ENTER.

 Move the cursor selection 

            by pressing the direction key (8,2,4,6) to select voltage, current and delay time; 

            press 

ENTER

, then you can input data directly. Press 

ENTER 

again to store.


Example:

 To set output voltage, current and delay time of the CH1 memory of 

 01


                   to be 15.00V, 3.00A, 20S. Press 

[SHIFT][STORE]

 to access menu screen,  

                   and us rotary knob to select Ch1 STOREl. Then press 

ENTER

 to access CH1 

                   storage interface; move the cursor to the voltage and  press 

ENTER

 to input 

                  voltage with number keys or rotary knob, and then press

 ENTER

  to store

                  data. Repeat for current and delay settings. Press  

[SHIFT][STORE] 

to store

                  all settings.

OPERATION

TECHNICAL SPECIFICATIONS

Содержание 72-8795

Страница 1: ...User s Manual 72 8795 PROGRAMMABLEDC POWERSUPPLY 405 S Pioneer Blvd Springboro OH 45066 mcmelectronics com ...

Страница 2: ...72 8795 PROGRAMMABLEDC POWERSUPPLY Programmable DCPowerSupplySeries Thanks for using our products Please read this manual thoroughly before operation ...

Страница 3: ...ursor down until the calibration interface reads Output Calibration Move the cursor to a corresponding channel and adjust the output voltage by using the rotary knob to equal 32V reading on the voltmeter Press ENTER and then the calibration data of the corresponding channel is stored Move the cursor down into the calibration of the other channels with the same procedure with channels 1 and 2 at 32...

Страница 4: ...gh humidity high radiation and areas with magnetic interference F 104 F Safety Precautions 2 Adjustment And Calibration 2 1 1 Preparation a Power unit on and allow 30 minutes to warm up before calibration b Ambient temperature 23 5 C Humidity Less than RH80 c Select a reliable six and a half digital voltmeter with a current test range more than 5A 2 1 2 Output Calibration Steps Step 1 Press SHIFT ...

Страница 5: ...ontact the authorized reseller of this product for repair or replacement This warranty does not apply to defects and failure resulting from customer actions such as mishandling misapplication overloading power or current unauthorized repair or any modification The reseller and manufacturer hold the right to deny any warranty claims based on these reasons or to fulfill warranty with a similar produ...

Страница 6: ...knob to select the desired output mode Press ENTER to confirm and return to the main screen When the unit operates in series or parallel output modes channel 2 operates as the master CH1 and CH2 will output the settings for Ch2 In independent mode each channel will output it s own individual settings 72 8795 3mV AC 5 3mA 10mV Resolution 100ppm 3mV 100ppm 3mA 10 90 100ms 90 10 10 10 rated load ms T...

Страница 7: ...he packaging or a direct replacement Example Set current at 1 500A Press I SET 1 0 0 0 ENTER If the load current through output terminals exceeds the setting value the instrument will operate in the C C mode if load current does not exceed the setting value the instrument will operate in the C V mode 3 Over Current Protection Setting Press OCP to turn on the OCP mode OCP mode is can be turned off ...

Страница 8: ...el by pressing SHIFT CH to set the cursor to toggle that channel Method 1 Set output voltage by pressing V SET and using the number and decimal keys to key in voltage value then press ENTER Method 2 Press V SET press the rotary knob once and turn the rotary knob to input voltage value The output voltage setting is changed immediately during selection Press ENTER to save the voltage setting Example...

Страница 9: ...nput terminal Press to restore factory settings SHIFT Turn on or off output if a channel is selected you can turn on or off the corresponding channel when you select no channel all channels on turned on or off Move the cursor upward by pressing in the storage settings Move the cursor on the right by pressing in the storage settings SHIFT to toggle the audible alert on or off to access the display ...

Отзывы: