background image


45 

III Features & Configurations | Tenda 


B. 

If you want to allow ONLY the specified wireless clients to join your wireless 

network, select 

Allow

.   

C. 

If  you  want  to  disallow  ONLY  the  specified  wireless  clients  to  join  your 

wireless network, select 

Deny

.   

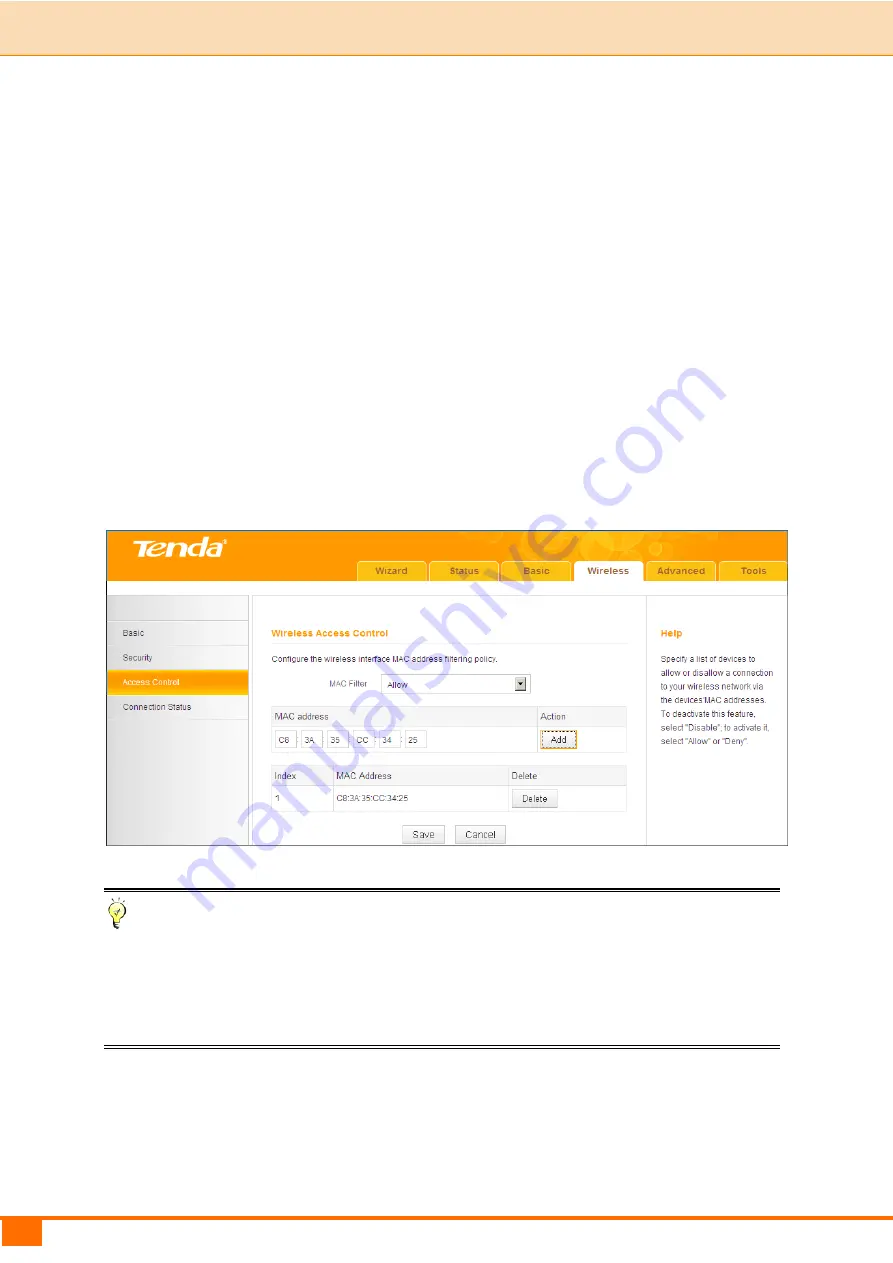
Wireless Access Control Application Example:  

To  only  allow  your  own  notebook  at  the  MAC  address  of  C8:3A:35:CC:34:25  to 

join your wireless network : 


Select 

Allow


Enter 

C8:3A:35:CC:34:25


Click 

Add

 to add the MAC address to the MAC address list.  


Click 

Save 

to save your settings.  


Tip 

If you don't want to configure the complex wireless security settings and want to 

disallow  others  to  join  your  wirele ss  network,  you  can  configure  a  wireless 

access control rule to allow only your own wireless device.  


3.4 Connection Status 

Click 

Wireless  ->  Connection  Status

.  Here  you  can  see  a  list  of  wireless 

Содержание 4G600

Страница 1: ......

Страница 2: ...ld like to know more about our product information please visit our website at http www tendacn com Disclaimer Pictures images and product specifications herein are for references only To improve inte...

Страница 3: ...messages Icon Description Note This format is used to highlight information of importance or special interest Ignoring this type of note may result in ineffective configurations loss of data or damage...

Страница 4: ...ty Setup 9 3G 4G Router Mode 10 Wireless Router Mode DHCP 12 Wireless Router Mode PPPoE 13 Universal Repeater Mode 15 Auto switch System Mode Priority 17 III Features Configurations 19 1 Status 19 WAN...

Страница 5: ...55 5 Tools 59 5 1 Time Date 59 5 2 Firmware Upgrade 61 5 3 Backup Restore 62 5 4 Restore to Factory Default 65 5 5 Change Password 66 5 6 Logs 67 5 7 Reboot 68 IV Appendix 69 1 Configure Your PC 69 W...

Страница 6: ...3G 4G Wireless Router Ethernet Cable Power Adapter Install Guide Resource CD If any of the parts are incorrect missing or damaged contact your Tenda dealer Keep the carton including the original packi...

Страница 7: ...2 I Product Overview Tenda 2 2 LED LED Status Description PWR Solid The device is receiving electric power SYS Blinking System is starting up properly WPS Blinking The device is functioning properly...

Страница 8: ...icon indicates no actual meaning It is only for decoration 2 3 Button Interface Button Interface Description USB USB port for attaching a 3G 4G USB Modem WPS Reset Pressing this button for over 6 sec...

Страница 9: ...e device to a power outlet 2 4 Label 1 Product Model 2 Default Login IP address This IP address is to be used to access the device s settings through a Web browser 3 4 Default login user name password...

Страница 10: ...net access from a remote AP on an existing network see Universal Repeater Mode Note DO NOT expose the device to heat sources Disconnect the device from power supply in thunderstorm weather Keep the de...

Страница 11: ...on wireless router Simply connect it to an Internet enabled DSL fiber optical cable modem Connect the WAN port of the device to an Internet enabled DSL fiber optical cable modem Connect the modem and...

Страница 12: ...device Tip To scan and connect to a remote wireless device see Universal Repeater Mode in 4 Quick Internet Setup Wireless Security Setup To connect the device wirelessly see 2 Join Your Wireless Netw...

Страница 13: ...Web browser say IE In the address bar input the device s LAN IP address 192 168 0 1 by default and press Enter Enter the login password admin by default and click Login The Status screen appears Click...

Страница 14: ...enda 4 Quick Internet Setup Wireless Security Setup Read the following and determine your Internet connection type Then follow the right setup wizard A If you access the Internet via a 3G 4G USB modem...

Страница 15: ...login account your ISP uses a PPPoE connection See Wireless Router Mode PPPoE D If you acquire Internet access from a remote AP on an existing network see Universal Repeater Mode E To learn about the...

Страница 16: ...11 II Quick Setup Tenda Configure your wireless network SSID Channel Key and then click Next Click Finish and wait for the device to restart...

Страница 17: ...12 II Quick Setup Tenda Wireless Router Mode DHCP Select Wireless Router Mode and click Next Select DHCP and click Next Configure your wireless network SSID Channel Key and then click Next...

Страница 18: ...13 II Quick Setup Tenda Click Finish and wait for the device to restart Wireless Router Mode PPPoE Select Wireless Router Mode and click Next...

Страница 19: ...14 II Quick Setup Tenda Select PPPoE enter the PPPoE User Name Password and click Next Configure your wireless network SSID Channel Key and then click Next...

Страница 20: ...vice to restart Tip Five Internet connection types are supported for the wired WAN connection Ethernet DHCP PPPOE PPTP L2TP and Static IP For PPTP L2TP and Static IP see 2 2 WAN Settings Universal Rep...

Страница 21: ...6 II Quick Setup Tenda Enter or select the SSID MAC Channel and security settings exactly the same as the remote AP and then click Next Configure your wireless network SSID and Key and then click Next...

Страница 22: ...ate on the same channel as the remote AP Auto switch System Mode Priority Auto switch System Mode If unchecked system will not switch between the 3G 4G Router Mode and Wireless Router Mode If the Auto...

Страница 23: ...hen only detecting an Ethernet cable If the Auto switch System Mode and Ethernet Priority are selected system will prioritize the Wireless Router Mode when detecting the coexistence of an Ethernet cab...

Страница 24: ...urations 1 Status Click Status to enter the Status screen WAN Status WAN Status in 3G 4G Router Mode 3G 4G Traffic Statistics To view the 3G 4G traffic statistics click Status 3G 4G Traffic Statistics...

Страница 25: ...20 III Features Configurations Tenda WAN Status in Wireless Router Mode WAN Status in Universal Repeater Mode...

Страница 26: ...CP dynamic IP connection However if you connect the router to the Internet with static IP settings provided by your ISP these fields will display the settings you entered whether the router successful...

Страница 27: ...System Time Current system time on this device The device automatically synchronizes the system time with Internet time servers Up Time Displays the time duration indicating how long the router has be...

Страница 28: ...on see 2 7 DHCP Client List Note In the Universal Repeater Mode only the LAN Settings screen is available 2 1 LAN Settings Here you can configure the LAN IP address and subnet mask This IP address is...

Страница 29: ...able to access the Internet Configuration Procedures Change the IP address to the one you wish to use for example 192 168 10 1 Click Save to save your settings 2 2 WAN Settings Click Basic WAN Settin...

Страница 30: ...cess point Name Consult your ISP if you are not clear Dial Number Common numbers are 99 777 and 99 1 Consult your ISP if you are not clear User Name Password Enter the user name and password for your...

Страница 31: ...P A Select PPPoE if your ISP uses a PPPoE connection and gives you a PPPoE user name and a PPPoE password B Select Static IP if your ISP provides you with fixed or static IP address settings special d...

Страница 32: ...e Select DHCP Click Save to save your settings PPPoE PPPoE is a connection mode associated with some DSL connections that requires user name and password Contact your ISP if you need assistance with t...

Страница 33: ...etworks is 1500 bytes or 1492 bytes for PPPoE connections For some ISPs you might need to change the MTU This is rarely required and should not be done unless you are sure it is necessary for your ISP...

Страница 34: ...private enterprise server by creating a VPN across TCP IP based data Enter your ISP provided information to establish a connection Configuration Procedures Internet Connection Type Select L2TP L2TP S...

Страница 35: ...SP if you ar e not c lear Click Save to save your settings PPTP PPTP Point To Point Tunneling Protocol is a network protocol that enables the secure transfer of data from a remote client to a private...

Страница 36: ...works is 1500 bytes or 1492 bytes for PPPoE connections For some ISPs you might need to change the MTU This is rarely required and should not be done unless you are sure it is necessary for your ISP c...

Страница 37: ...are listed in the table below MTU Application 1500 Typical for connections that do not use PPPoE or VPN 1492 Used in PPPoE environments 1472 Maximum size to use for pinging Larger packets are fragmen...

Страница 38: ...example if the cable connected to your device s WAN port is longer than 100m you may need to use 10M full duplex or 10M half duplex for better performance Ensure that your device s WAN port operates w...

Страница 39: ...s optional Click Save to save your settings Note The default DNS settings are recommended Only change the DNS default settings if you know that your ISP requires specific servers If incorrect DNS sett...

Страница 40: ...he computer whose MAC address is allowed by your ISP Also you can manually enter the MAC address that you want to use To restore default MAC address Click Restore Default MAC Click Save to save your s...

Страница 41: ...tain an IP Address Automatically If you disable this feature you have to manually configure the TCP IP settings for all PCs on your LAN to access the Internet Click Basic DHCP Server to enter the scre...

Страница 42: ...the TCP IP settings for all the PCs on your LAN Lease time will be renewed automatically upon expiry If you are not an advanced user the default DHCP server settings are recommended 2 7 DHCP Client Li...

Страница 43: ...he last number of the IP address you want to reserve Here in this example enter 123 Enter the MAC address of 44 37 E6 4F 37 38 Click Add Click Save to save your settings Tip If the IP address you have...

Страница 44: ...39 III Features Configurations Tenda the Repair action to activate the configured static IP addresses...

Страница 45: ...cting to your wireless network see 3 4 Connection Status 3 1 Basic Here you can configure the basic wireless settings of the device Configuration Procedures SSID This is the public name of your wirele...

Страница 46: ...less clients BSSID This is the MAC address of the device s wireless interface SSID Broadcast This option allows you to have your wireless network name SSID publicly broadcast or if you choose to disab...

Страница 47: ...s Shared If selected wireless speed can reach up to 54Mbps Default Key Select a key to be effective for the current WEP encryption For example if you select Key 2 wireless clients must join your wirel...

Страница 48: ...work as well as to add new devices to an existing network without entering long passphrases or configuring complicated settings Simply enter a PIN code or press the hardware WPS button and a secure wi...

Страница 49: ...S LED turns off Repeat the steps above if you want to add more wireless client devices to your device PIN To use this option you must know the PIN code from the wireless client and enter it in the cor...

Страница 50: ...ebook at the MAC address of C8 3A 35 CC 34 25 to join your wireless network Select Allow Enter C8 3A 35 CC 34 25 Click Add to add the MAC address to the MAC address list Click Save to save your settin...

Страница 51: ...es if any connected to the device Tip The Bandwidth here refers to the channel bandwidth instead of wireless connection rate You can know whether there are unauthorized accesses to your wireless netwo...

Страница 52: ...real time of Internet Domain Name System DNS name servers We use a numeric IP address allocated by Internet Service Provider ISP to connect to the Internet the address may either be stable static or m...

Страница 53: ...l Dynamic DNS service It lets you register your domain to their IP address and forwards traffic directed at your domain to your frequently changing IP address If your DDNS service provider provides yo...

Страница 54: ...you have registered with your DDNS service provider Here in this example enter tenda dyndns org Click Save to save your settings Click Remote Web Management enable the Remote Web Management feature e...

Страница 55: ...t gaming or video conferencing applications that are not compatible with NAT Network Address Translation Click Advanced DMZ Host to enter the screen below Note DMZ host poses a security risk A compute...

Страница 56: ...4 3 UPNP The Universal Plug and Play UPnP feature allows network devices such as computers from the Internet to access resources on local host or devices as needed UPnP enabled devices can be discove...

Страница 57: ...Web management interface do not use the number of any common service port 1 1024 Make sure your WAN IP address Internet IP address is a public IP address Private IP addresses are not routed on the Int...

Страница 58: ...r location field and you can remotely access the router from your home Knowledge Center IP Address Here you can specify the IP address for remote management If set to 0 0 0 0 the device becomes remote...

Страница 59: ...an get For example you can equally split the bandwidth so your neighbor can only use up to 2M Internet traffic and you can smoothly enjoy 2M Configuration Procedures Bandwidth Control Check the Enable...

Страница 60: ...if you are not sure of the total volume of Internet traffic that you can have The bandwidth for ADSL DSL line usually refers to the download bandwidth 4 6 Client Filter Available only in 4G600 This s...

Страница 61: ...ow Allow the packets that match the set rule to pass the router For other packets that do not match the set rule the default policy is applied Client Filter Application Example To prohibit PCs within...

Страница 62: ...u are unsure select Both Time Specify a time period for the current rule to take effect Here in this example select 8 00 18 00 Day Select a day or several days of the week for the current rule to take...

Страница 63: ...igurations Tenda Tip The valid service port number range is 1 65535 If you have not set up the system time for this device click Tools Time Date to configure correct time and date settings for the rul...

Страница 64: ...if the device gets disconnected from power supply However it will be updated automatically when the device reconnects to the Internet To activate time based features e g Client Filter the time and dat...

Страница 65: ...not available so you can only set the time and date manually B To set time and date manually synchronize with your PC Internet Time Server Uncheck to disable the feature Specify the time and date man...

Страница 66: ...ou run into a problem with a specific feature of th e device log on to our Website http www tendacn com to download the latest firmware to update your device Note Before you upgrade the firmware make...

Страница 67: ...re you load 5 3 Backup Restore Once you have configured the device the way you want it you can save these settings to a configuration file on your local hard drive that can later be imported to your d...

Страница 68: ...63 III Features Configurations Tenda Click OK on the appearing window Click Save on the File Download window Select a local hard drive to save the file and click Save...

Страница 69: ...64 III Features Configurations Tenda To restore configurations Click Browse Select the configuration file that is saved previously to your local hard drive and click Open...

Страница 70: ...the device to factory default settings Note If you enable this option the device will be restored to factory default values You will have to reconfigure Internet connection settings and wireless setti...

Страница 71: ...Password admin 5 5 Change Password Click Tools Change Password to enter the configuration screen It is strongly recommended that you change the factory default login password Otherwise anyone in your...

Страница 72: ...urrent login password New Password Input a new password Confirm New Password Re enter the new password for confirmation Click Save to save your settings 5 6 Logs Click Tools Logs to enter the configur...

Страница 73: ...68 III Features Configurations Tenda 5 7 Reboot When a certain feature does not take effect or the device is malfunctioning try rebooting the device...

Страница 74: ...Click the icon on the right bottom corner of your desktop Step 2 Click Open Network and Sharing Center Tip If you cannot find the icon on the right bottom corner of your desktop follow steps below Cli...

Страница 75: ...70 IV Appendix Tenda Step 3 Click Local Area Connection Properties Step 4 Find and double click Internet Protocol Version 4 TCP IPv4...

Страница 76: ...ss automatically and Obtain DNS server address automatically and click OK Step 6 Click OK on the Local Area Connection Properties window see Step 4 for the screenshot Windows XP Step 1 Right click My...

Страница 77: ...72 IV Appendix Tenda Step 2 Right click Local Area Connection and select Properties Step 3 Scroll down to find and double click Internet Protocol TCP IP...

Страница 78: ...ndix Tenda Step 4 Select Obtain an IP address automatically and Obtain DNS server address automatically and click OK Step 5 Click OK on the Local Area Connection Properties window see Step 3 for the s...

Страница 79: ...XXXXX is the last six characters of its MAC address You can find the MAC address and or SSID on the label attached to the device s bottom Windows 7 Step 1 Click or from the right bottom of your deskto...

Страница 80: ...75 IV Appendix Tenda Windows XP Step 1 Right click My Network Places and select Properties Step 2 Right click Wireless Network Connection and select View Available Wireless Networks...

Страница 81: ...a Step 3 Double click the name of the wireless network SSID you wish to join and then follow onscreen instructions When Connected appears next to the selected wireless network SSID you have successful...

Страница 82: ...77 IV Appendix Tenda...

Страница 83: ...t your PC s TCP IP settings are configured correctly If you select the Use the following IP address option set your PC s IP address to any IP address between 192 168 0 2 192 168 0 254 Or you can selec...

Страница 84: ...the statically assigned IP addresses to the PC s on LAN are not used by others device s 4 Q I cannot access email and the Internet Some Websites do not open What should I do This problem mainly happen...

Страница 85: ...tings on your PC will not be updated accordingly you must manually remove them from your PC otherwise you may not be able to wirelessly connect to the device This section explains how to remove a wire...

Страница 86: ...81 IV Appendix Tenda Windows XP Right click My Network Places and select Properties Right click Wireless Network Connection and then select Properties...

Страница 87: ...82 IV Appendix Tenda Click Wireless Networks select the wireless network name under Preferred networks and then click the Remove button...

Страница 88: ...y interference received including interference that may cause undesired operation This equipment has been tested and found to comply with the limits for a Class B digital device pursuant to Part 15 of...

Страница 89: ...perating in conjunction with any other antenna or transmitter The manufacturer is not responsible for any radio or TV interference caused by unauthorized modifications to this equipment Radiation Expo...

Отзывы: