Tempo Fitness 611T Скачать руководство пользователя страница 12

12

INTRODUCTION

IMPORT

ANT

PRECAUTIONS

ASSEMBL

Y

BEFORE

YOU 
BEGIN

TREADMILL

OPERA

TION

LIMITED

W

ARRANTY

TROUBLESHOOTING

MAINTENANCE

CONDITIONING

GUIDELINES

BEFORE YOU BEGIN

Congratulations on choosing your treadmill. You’ve taken an important step in developing and sustaining 

an exercise program! Your treadmill is a tremendously effective tool for achieving your personal fitness 

goals. Regular use of your treadmill can improve the quality of your life in so many ways. 

HERE ARE JUST A FEW OF THE HEALTH BENEFITS OF EXERCISE:

• Weight Loss 

• A Healthier Heart

• Improved Muscle Tone

• Increased Daily Energy Levels

The key to reaping these benefits is to develop an exercise habit. Your new treadmill will help you eliminate 

obstacles  that  prevent  you  from  exercising.  Inclement  weather  and  darkness  won't  interfere  with  your 

workout  when  you  use  your  treadmill  in  the  comfort  of  your  home.  This  guide  provides  you  with  basic 

information for using and enjoying your new machine.

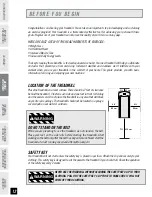
LOCATION OF THE TREADMILL

Place the treadmill on a level surface. There should be 7 feet of clearance 

behind the treadmill, 3 feet on each side and one foot in front for folding 

and the power cord. Do not place the treadmill in any area that will block 

any vent or air openings. The treadmill should not be located in a garage, 

covered patio, near water or outdoors.

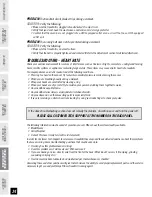
DO NOT STAND ON THE BELT

While you are preparing to use the treadmill, do not stand on the belt. 

Place  your  feet  on  the  side  rails  before  starting  the  treadmill.  Start 

walking on the belt only after the belt has begun to move. Never start the 

treadmill at a fast running speed and attempt to jump on!

SAFETY KEY

Your treadmill will not start unless the safety key is placed in position. Attach the clip end securely to your 

clothing. This safety key is designed to cut the power to the treadmill if you should fall. Check the operation 

of the safety key every 2 weeks.

NEVER USE THE TREADMILL WITHOUT SECURING THE SAFETY KEY CLIP TO YOUR 

CLOTHING. PULL ON THE SAFETY KEY CLIP FIRST TO MAKE SURE IT WILL NOT 

COME OFF YOUR CLOTHING.

WARNING

3 ft

7 ft

3 ft

92 cm

92 cm

1 ft

214 cm

31 cm

WARNING

Содержание 611T

Страница 1: ...TREADMILL USER S GUIDE FOR MODEL 611T...

Страница 2: ......

Страница 3: ...ply enjoy a fuller healthier lifestyle a Tempo Fitness treadmill can help you attain it adding quality performance to your at home workouts with the ergonomics and innovative features you need to get...

Страница 4: ...utlet only See Grounding Instructions Do not wear clothes that might catch on any part of the treadmill Always wear athletic shoes while using this equipment Do not jump on the treadmill At no time sh...

Страница 5: ...n Attach safety key clip to clothing before starting Keep children off and away from this equipment Possibility of serious injury if equipment is used improperly Consult a physician before using this...

Страница 6: ...any forward and back play in the console assembly or handlebars If there is any play in these areas the treadmill has not been properly assembled To prevent damage to the treadmill the assembly instru...

Страница 7: ...ldren off and away from this equipment Possibility of serious injury if equipment is used improperly Consult a physician before using this equipment Stop exercising if you feel pain faint dizzy or sho...

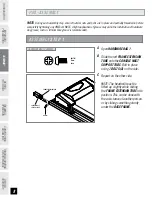
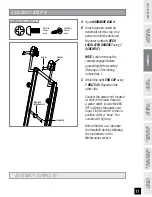
Страница 8: ...f hardware Any grease such as lithium bike grease is recommended PRE ASSEMBLY ASSEMBLY STEP 1 Open HARDWARE BAG 1 Slide the left FRAME EXTENSION TUBE onto the CONSOLE MAST SUPPORT TUBE Bolt in place u...

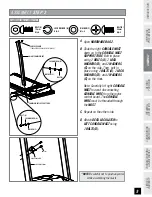
Страница 9: ...ont Note Carefully lift right CONSOLE MAST to avoid disconnecting CONSOLE WIRE from the motor control board The CONSOLE WIRE must be threaded through the MAST Repeat on the other side Attach DECK LOCK...

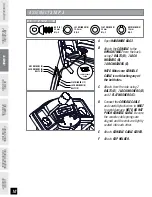
Страница 10: ...he CONSOLE CABLE and carefully tuck wires in MAST to avoid damage NOTE DO NOT PINCH CONSOLE CABLE Be sure the console cable prongs are aligned and the ends are tightly seated into each other Attach CO...

Страница 11: ...ed before proceeding with assembly See page 13 for folding instructions C Attach the right END CAP using 2 BOLTS A Repeat on the other side Connect the power cord located at front of the main frame to...

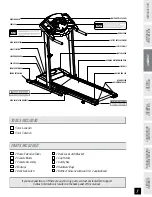
Страница 12: ...ew machine LOCATION OF THE TREADMILL Place the treadmill on a level surface There should be 7 feet of clearance behind the treadmill 3 feet on each side and one foot in front for folding and the power...

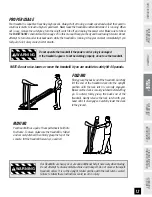
Страница 13: ...not be working properly do not use the treadmill NOTE Do not raise lower or move the treadmill if you are unable to safely lift 45 pounds FOLDING Firmly grasp the back end of the treadmill Carefully...

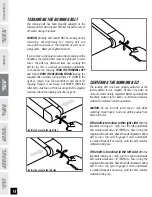
Страница 14: ...wise 1 4 TURN at a time using the supplied Allen wrench Check the belt alignment Allow belt to run a full cycle to gauge if more adjustment is needed Repeat if necessary until the belt remains centere...

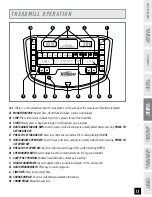
Страница 15: ...m speed change Press after selecting SPEED H SPEED ARROW KEYS Used to adjust speed in small increments 0 1 mph increments I SAFETY KEY POSITION Enables treadmill when safety key is inserted J INCLINE...

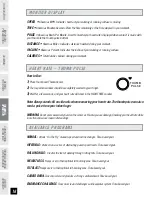
Страница 16: ...d in your workout PULSE Shown as Beats Per Minute Used to monitor your heart rate displayed when contact is made with your thumb to the thumb pulse button DISTANCE Shown as Miles Indicates distance tr...

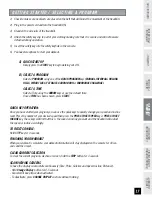
Страница 17: ...Time using the ARROW keys or use the default time Once a TIME has been chosen press START QUICK KEY OPERATION Once you have started your program you can use the quick keys to quickly change your speed...

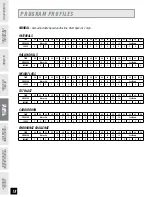
Страница 18: ...4 3 2 1 2 1 1 0 0 WEIGHT LOSS TIME 60 60 60 60 60 60 60 60 60 60 60 60 60 60 60 60 60 60 60 60 PROG SEG Warm Up 1 2 3 4 5 6 7 8 9 10 11 12 Cool Down SPEED 2 2 2 3 2 3 3 4 4 3 3 4 4 3 3 4 3 3 2 2 FAT B...

Страница 19: ...But start slowly and gradually increase your exercise times If you ve been sedentary during the past year it may be a good idea to keep your exercise times to as little as five minutes initially Your...

Страница 20: ...t Association recommends working out at a Target Heart Rate Zone of between 60 and 75 of your maximum heart rate A beginner will want to workout in the 60 range while a more experienced exerciser will...

Страница 21: ...foot about 18 from the wall and the right foot about 12 behind the other foot Lean forward pushing against the wall with your palms Keep your heels flat and hold this position for a count of 15 second...

Страница 22: ...ng to lose weight Improve muscle Reduce stress Prepare for the spring racing schedule Knowing what your goals are will help you develop a more successful exercise program Below are some common exercis...

Страница 23: ...more reflected noise TROUBLESHOOTING TREADMILL Your treadmill is designed to be reliable and easy to use However if you experience a problem please reference the troubleshooting guide listed below PRO...

Страница 24: ...When your hands are constricted by wearing a ring When your hands are dry or cold Try to moisten your palms by rubbing them together to warm Anyone with heavy arrhythmia Anyone with arteriosclerosis...

Страница 25: ...rneath the treadmill Return the treadmill to its previous position EVERY MONTH IMPORTANT Turn off the treadmill with the on off switch then unplug the power cord at the wall outlet Inspect all assembl...

Страница 26: ...ss LIMITED HOME USE WARRANTY Incidental or consequential damages Tempo Fitness is not responsible or liable for indirect special or consequential damages economic loss loss of property or profits loss...

Страница 27: ......

Страница 28: ...To receive additional product information visit us at www tempo fitness com CUSTOMER TECH SUPPORT DO NOT RETURN TO THE RETAILER if you have any problems during assembly or if parts are missing For fa...

Отзывы: