background image


19 


OSD MENU


1.


under working mode, press the menu button

  on the IR remote, to enter the OSD menu ; press the 

menu button again to exit and save modified parameters. 


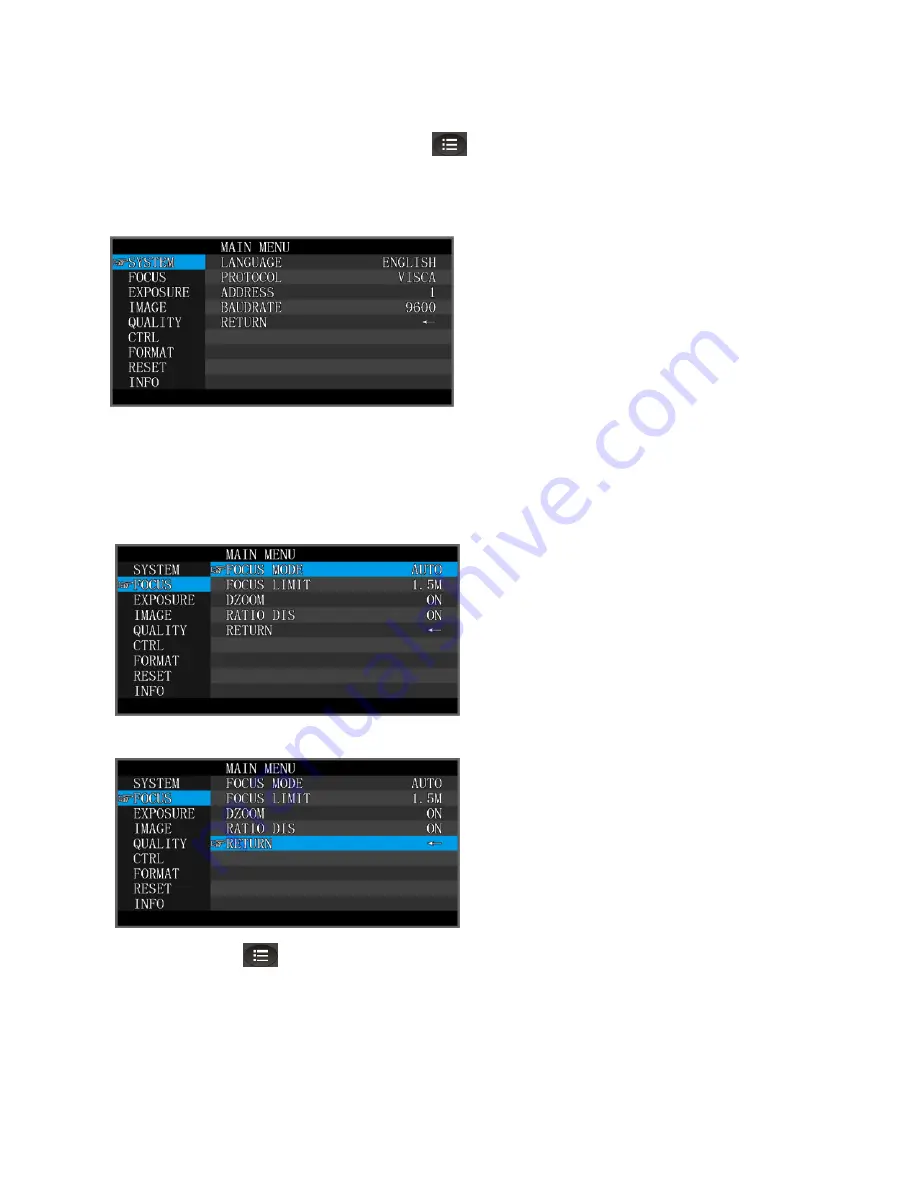
2. Use the navigate button to select the main menu. As above picture, once been selected, the main menu will 

change to grey color background, and the right side will show all parameters under this sub menu :


3. In the second grade menu, press the up/down navigate button to select the sub menu, use left/right navigate 

button to set the parameter


4.Select the last option 

return

and press the right navigate button to get back to previous menu;   


5. Press OSD button 

  again to exit the menu.


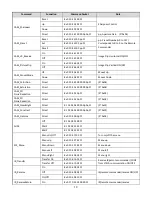
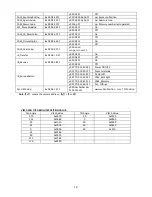
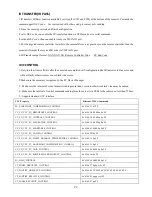
6.OSD Menu Layout: 


Содержание TLC-1000-U2-3

Страница 1: ...USB2 0 HD Video Camera User Manual Version V1 0 English...

Страница 2: ...1...

Страница 3: ...T 5 PRODUCT LIGHLIGHTS PRODUCT SPEC CAMERA INTERFACE CAMERA DIMENSION IR REMOTE 7 LEARNING FUNCTION VISCA IN RS232 PORT 9 SERIAL CONFIGURATION 9 VISCA PROTOCOL 10 PELCO D PROTOCOL 17 PELCO P PROTOCOL...

Страница 4: ...tion and damp during transportation storage and installation 7 Do not detetch the camera housing and cover For any service please contact authorized technicians 8 RF cable and control cable should be...

Страница 5: ...use hands to take the camera head otherwise it may damage the camera rotation structure DO NOT use hands to move the camera head otherwise it may damage the rotation structure or even broke the drivi...

Страница 6: ...uble sided Adhesive 1 Quality Certificate 1 QUICK START 1 1 Check all cable connections before power on 2 DIP Switch Setting at the bottom of the camera Function ARM SW 1 SW 2 Instruction 1 OFF Updati...

Страница 7: ...ol signal to the codec s IR receiver via VISCA IN port OSD Menu Chinese English PRODUCT SPEC Video Format MJPG H 264 1920x1080P30 25 20 15 10 5 1280x720P30 25 20 15 10 5 720x576P30 30 25 20 15 10 5 64...

Страница 8: ...a Lens 5 Dial Switch 9 12VDC Power Input 2 Camera Base 6 Tripod Screw Hole 10 RS232 485Control Port Input 3 IR Receive Panel 7 Installation Hole 11 USB2 0 Port 4 Indicator Light 8 Power Indicator Ligh...

Страница 9: ...was set Green button Codec power button need to learn the button coding Blue button TV power button need to learn the button coding Focus Left Manual focus only valid under manual focus model Zoom Rig...

Страница 10: ...15seconds LED will extinguish 3 All Button Coding long press 3seconds Home number 2 button simultaneously the green indicator LED will start flickering 1HZ to enter all button learning mode get codec...

Страница 11: ...eived during auto focus Part2 Camera Control Command Command Funnation Command Packet Note AddressSet Broadcast 88 30 01 FF Address setting IF_Clear Broadcast 88 01 00 01 FF I F Clear CAM_Power On 8x...

Страница 12: ...1 04 39 0A FF Shutter Priority mode Iris Priority 8x 01 04 39 0B FF Iris Priority mode Bright 8x 01 04 39 0D FF Bright mode Manual control CAM_Shutter Reset 8x 01 04 0A 00 FF Shutter Setting Up 8x 01...

Страница 13: ...4 A1 00 00 00 0p FF 0 0x0E CAM_2D Noise Reduction Direct 8x 01 04 53 0p FF 0 0x05 CAM_3D Noise Reduction Direct 8x 01 04 54 0p FF 0 0x03 CAM_NewBright Direct 81 01 04 A4 00 00 0p 0q FF 0 0x0F CAM_Cons...

Страница 14: ...ght 0 DownLeft YYYY Pan Limit Position TBD ZZZZ Tilt Limit Position TBD Clear 8x 01 06 07 01 0W 07 0F 0F 0F 07 0F 0F 0F FF Part3 Inquiry Command Command Command Packet Return Packet Note CAM_PowerInq...

Страница 15: ...nsfer 8x 09 06 1A FF y0 50 02 FF On y0 50 03 FF Off IR_Receive 8x 09 06 08 FF y0 50 02 FF On y0 50 03 FF Off IR_ReceiveReturn y0 07 7D 01 04 00 FF Power ON OFF y0 07 7D 01 04 07 FF Zoom tele wide y0 0...

Страница 16: ...5 F6 8 0F 1 1000 1 1000 6 F5 6 0E 1 725 1 600 7 F4 8 0D 1 500 1 425 8 F4 0C 1 350 1 300 9 F3 4 0B 1 250 1 215 10 F2 8 0A 1 180 1 150 11 F2 4 09 1 125 1 120 12 F2 08 1 100 1 100 13 F1 8 07 1 90 1 75 06...

Страница 17: ...1 8 18 dB 15 F1 8 16 dB 14 F1 8 14 dB 13 F1 8 12 dB 12 F1 8 10 dB 11 F1 8 8 dB 10 F1 8 6 dB 0F F1 8 4 dB 0E F1 8 2 dB 0D F1 8 0 dB 0C F2 0 dB 0B F2 4 0 dB 0A F2 8 0 dB 09 F3 4 0 dB 08 F4 0 dB 07 F4 8...

Страница 18: ...lt Speed SUM Zoom In 0xFF Address 0x00 0x20 0x00 0x00 SUM Zoom Out 0xFF Address 0x00 0x40 0x00 0x00 SUM Set Preset 0xFF Address 0x00 0x03 0x00 Preset ID SUM Clear Preset 0xFF Address 0x00 0x05 0x00 Pr...

Страница 19: ...xAF XOR Zoom In 0xA0 Address 0x00 0x20 0x00 0x00 0xAF XOR Zoom Out 0xA0 Address 0x00 0x40 0x00 0x00 0xAF XOR Set Preset 0xA0 Address 0x00 0x03 0x00 Preset ID 0xAF XOR Clear Preset 0xA0 Address 0x00 0x...

Страница 20: ...once been selected the main menu will change to grey color background and the right side will show all parameters under this sub menu 3 In the second grade menu press the up down navigate button to se...

Страница 21: ...lue 0dB 15dB only valid when EXP MODE set to MANU mode Defaulted 0 BRIGHT Brightness value 0 27 only valid when EXP MODE set to BRI mode Defaulted 11 FLICK OFF 50Hz 60Hz Defaulted 50Hz BACKLIGHT ON OF...

Страница 22: ...e main menu CTRL MIRROR Set Image Left Right flip ON OFF Defaulted OFF FLIP Set Image Up Down ON OFF Defaulted OFF D N MODE Set Day Night mode DAY NIGHT Defaulted DAY GAIN LIMIT Set auto exposure gain...

Страница 23: ...ke sure the interval of video format switching more than 1 second otherwise black video maybe caused 4 Make sure the interval of control command sending from the server via USB to the camera no less t...

Страница 24: ...23...
Отзывы: