


2
Thank You for purchasing "ModemCOM” from Teltonika Ltd. We hope you will be happy using our product. Please find a
few minutes to read this Quick Start Guide before beginning to work with “ModemCOM”. This could prevent you from
unwanted problems and save your precious time.
“ModemCOM” is a device designed for data transmission via GSM Network. The design of this modem enables the
connection to your PC through COM interface. Once the modem is connected to the PC, you can get access to the Internet via
one of the data transmission type the GSM is supported. “ModemCOM” supports the following data-bearers:
EDGE, GPRS, CSF,
CSD, HSCSD, and SMS.
PACKAGE CONTENTS
1)
Carton.
2)
“ModemCOM” modem.
3)
RS232 connecting cable.
4)
CD with User’s Guide, drivers and Software.
5)
External GSM antenna (just upon special orders).
6)
AC/DC mains adapter.
HOW TO START QUICKLY?
Connecting to PC
1)
Turn off your PC.
2)
Insert the SIM card into modem. Follow the instructions on the device sticker. Make sure, the SIM card is
pushed inside till it fixes.
3)
Plug DB9 connector of the serial (RS232) cable into the modem.
4)
Plug another end of the serial cable to one of the COM ports of PC.
5)
Plug in the AC/DC adapter to power supply socket of “ModemCOM”.
6)
Plug in the AC/DC adapter to power supply network.
7)
Turn on your PC.
Installing “Modem Control Tool”
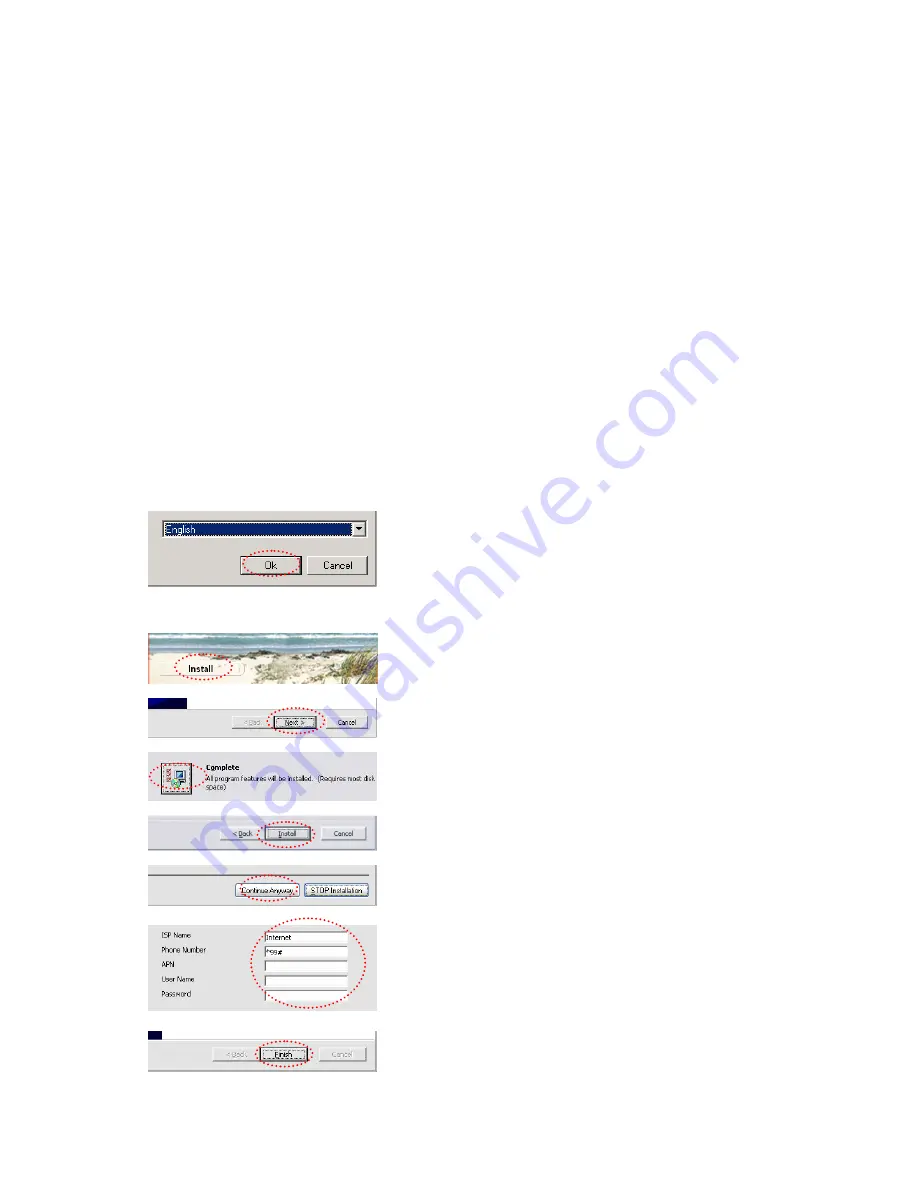
1 Fig.
Step 1 - Open the “ModemCOM” Pack and take only the CD and
plug the CD into the PC CD Drive.
Step 2 – Wait till the system displays the screen “ Select Setup
Langauge”.
Step 3 - Select English and Click “OK” button. Following TELTONIKA
Home screen will appear. (1 Fig.)
Step 4 – Click “Install” button. Following screen will appear. (2 Fig.)
2 Fig.
Step 5 – Click “Next” button. Following screen will appear. (3 Fig.)
3 Fig.
Step 6 – Select „Complete“ button. (4 Fig.)
Step 7 – Click “Next” button. Following screen will appear.
4 Fig.
Step 8 - Click “Install” button. (5 Fig.)
5 Fig.
Step 9 - “Hardware Installation” dialog box will appear, then press
“Continue anyway” button in the dialog box. (6 Fig)
6 Fig.
Step 10 - Enter dial-up connection parameters and press “Next” in
the opened dialog. (7 Fig.)
Note: APN, user name and password ask your GSM operator!
7 Fig.
8 Fig.
Press “Finish” in the opened dialog box “Modem Control tool Setup”.
The installation is done. (8 Fig.)


