background image

13

12

Using the phone

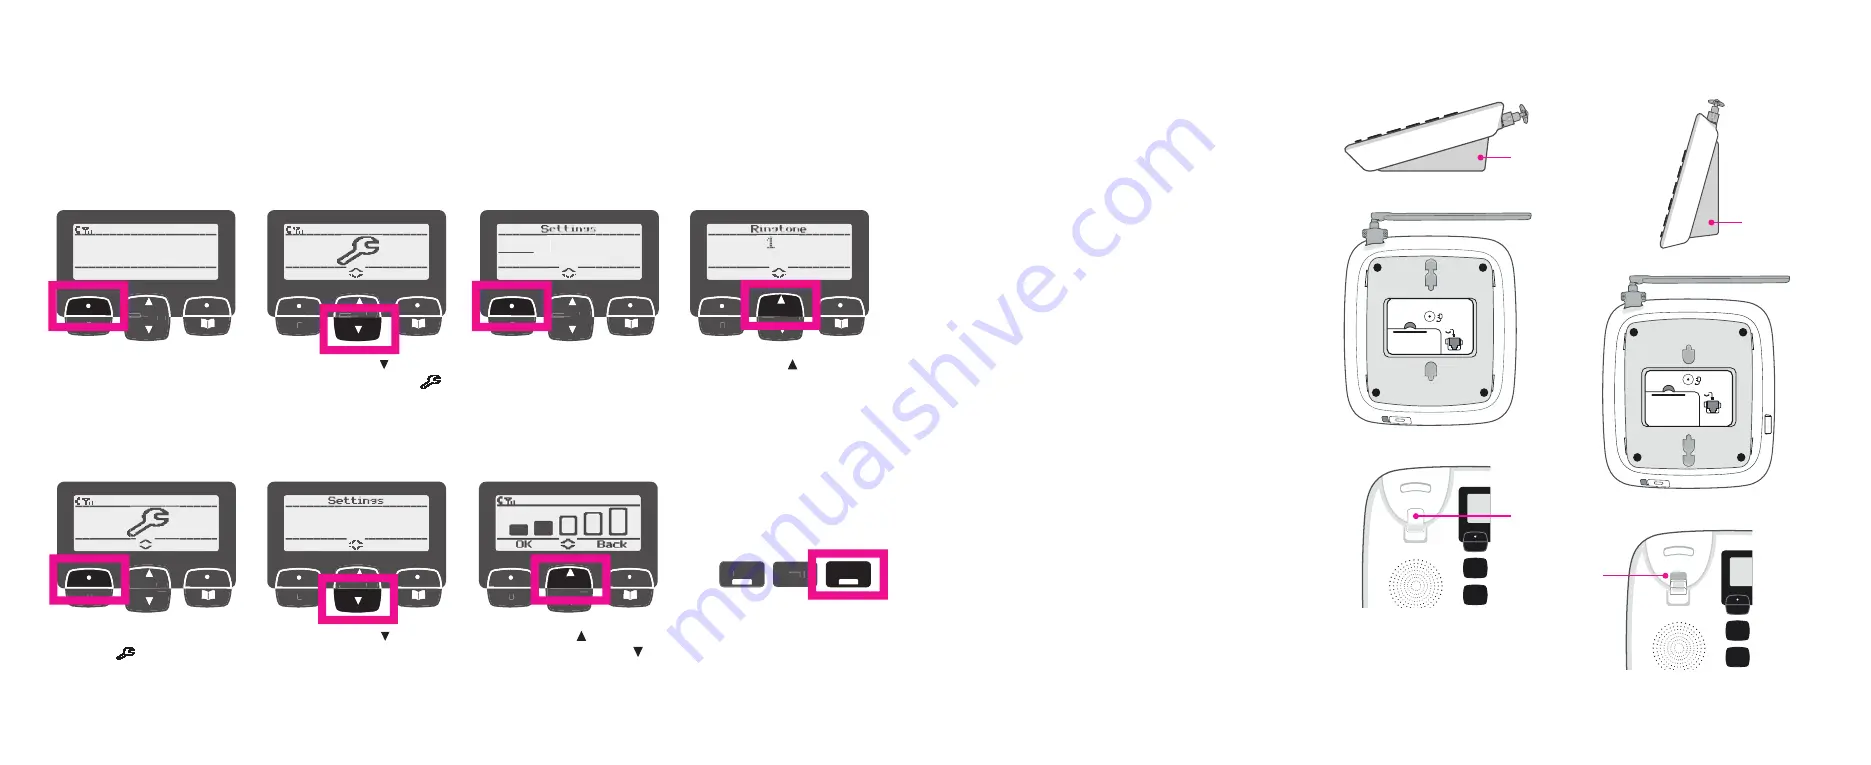
Ringer tone & volume settings

Navigate to the Settings menu to set ringer tone and volume as shown.

Wall mounting

Handsfree/Speaker 

settings

Press the Handsfree button 

to use speaker phone.

Your phone comes ready to be 

placed on a table, but converts 

easily for wall mounting by rotating 

the base plate, as follows:

1.  Turn the phone so that the base faces up. 

2.  Remove the detachable base bracket 

and rotate it 180 degrees so that the 
notches now point upwards. Click it back 
into place on the phone. 

3.  Change the hook switch position for 

hanging the handset up. Use fi nger 
pad to push down the base of the hook 
switch to fl ip it into reverse position with 
hollow end facing up.

4.  Hang handset onto the phone unit so 

that it clicks into the hook switch hollow 
to hold it fi rm.

5.  Keep the phone and power cables 

tidy by running them through the 
provided space.

1.  Starting at the Home 

screen, select the Menu 
Select button.

1.  Return to the Spanner 

symbol 

 screen and 

Select OK.

2.  Use Down arrow


to scroll 

to the Spanner symbol
Select OK.

2.  Use Down arrow


to scroll 

to Ringer volume. Select 
OK.

3. Select Ringer tone OK.

3.  Use Up arrow   to increase 

volume, or Down arrow 
to decrease volume. 
Select OK.

4.  Use Up arrow   to scroll 

through up to 15 melody 
options. Select OK to save 
chosen melody.

Ringer tone

Ringer volume

Desk mount position

Wall mount position

Hook switch 

for desk mount

Wedge shape 

under the top 

of phone

Wedge shape 

under the 

lower edge of 

phone

1
4

5

6

7

8

9

M

*

0

#

2

3

Mute

PQRS

GHI

JKL

ABC

R

Back

Calls

List

DEF

MNO

TUV

WXYZ

 VOL

Handsfree

1
4

5

6

7

8

9

M

*

0

#

2

3

Mute

PQRS

GHI

JKL

ABC

R

Back

Calls

List

DEF

MNO

TUV

WXYZ

 VOL

Handsfree

1
4

5

6

7

8

9

M

*

0

#

2

3

Mute

PQRS

GHI

JKL

ABC

R

Back

Calls

List

DEF

MNO

TUV

WXYZ

 VOL

Handsfree

Notches 

Down

Notches 

Up

Mute

Hook switch 

hollow end up 

for wall mount

You will see that the notches point downwards and 

the high point of the wedge shape is at the top of 

the phone. 

You will see that the wedge shape is now at the 

lower edge of the phone. 

R

Back

Back

Calls

List

List

O1-O1

Menu

12:O1

R

Back

Back

Calls

List

List

Ringer

tone

Ringer

Ringer

OK

Back

R

Back

Back

Calls

List

List

OK

Back

R

Back

Back

Calls

List

List

Melody

OK

Back

R

Back

Back

Calls

List

List

OK

Back

R

Back

Back

Calls

List

List

R

Back

Back

Calls

List

List

Ringer

volume

Ringer

Ringer

OK

Back


VOL

+

Handsfree

List

List

Back

Calls

Back

Calls

Back

Calls

Содержание Priority Assist Phone

Страница 1: ...1 1 An easy guide for setting up your phone Priority Assist Phone ...

Страница 2: ... of an emergency Emergency back up via Telstra s 3G 4G network so you can continue to make calls in case of a service outage Up to 8 hours battery back up in case of a mains power outage 9 programmable speed dial keys so you can easily reach important contacts with one button press see page 11 for details An Emergency Contacts card for quick reference to your important contacts and speed dial numb...

Страница 3: ... guide for setting up your Phone Priority Assist Phone PriorityAssistPhone QSG_V3 indd 1 2 9 19 9 07 am Emergency Contacts Keep track of your important contacts in case of emergencies Speed Dial Number Name Phone Number 1 2 3 4 5 6 7 8 9 1 4 5 6 7 8 9 M 0 2 3 Mute PQRS GHI JKL ABC R Back Calls List DEF MNO TUV WXYZ VOL Handsfree ...

Страница 4: ... the grey phone cable supplied connect the phone to your telephone socket 3 Check for dial tone Pick up your handset and check that you have a dial tone If a dial tone is heard you will be able to make and receive calls now In the event of a phone line or power outage you should still hear a tone Your Telstra Priority Assist Phone will automatically switch over to the battery and or emergency mobi...

Страница 5: ...he most of your phone by setting up these features Time date Speed dial numbers Important contacts If you have problems setting up your phone please call us on 13 22 00 Display screen Scroll down Back Scroll up Select Calls list Antenna Handsfree Speaker Alphanumeric buttons Handset Recall last missed call Select Mute Contacts Volume ...

Страница 6: ... alphanumeric buttons to set current time 4 digits Select Next 5 Use the alphanumeric buttons to set current date Select Save You will hear a beep and see Saved on screen Time date Navigate to the Set time date menu to adjust the date and time as shown Important contacts NavigatetotheContactsmenutoinputthenames andphonenumbers asshown Speed dials Navigatetothespeeddialsmenu to input up to 9 speed ...

Страница 7: ...Select OK 3 Select Ringer tone OK 3 Use Up arrow to increase volume or Down arrow to decrease volume Select OK 4 Use Up arrow to scroll through up to 15 melody options Select OK to save chosen melody Ringer tone Ringer volume Desk mount position Wall mount position Hook switch for desk mount Wedge shape under the top of phone Wedge shape under the lower edge of phone 1 4 5 6 7 8 9 M 0 2 3 Mute PQR...

Страница 8: ...play Make sure the power adapter is plugged into a 240V powerpoint and the other end is plugged into the base of phone Make sure the power point is switched on The screen will display Low Signal Strength 3G or 4G Check the antenna is screwed correctly onto the phone Ensure the antenna is in the upright position Move the phone to another area in your premises and or closer to a window until more si...

Страница 9: ... a battery installed This is so your phone can automatically draw on the phone battery power in the event of a power outage Your fully charged phone battery will remain operational for up to 8 hours in the event of a power outage Note It is important that your phone is plugged into a power source at all times This will ensure that your phone battery is fully charged when you need it Your Telstra P...

Отзывы: