


2
3
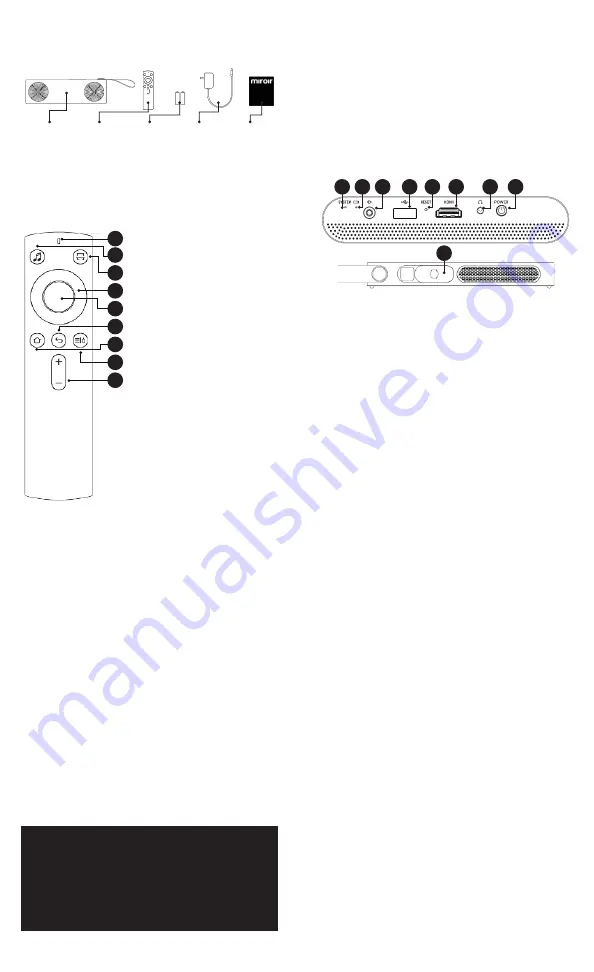
5. Reset button -
Performs a force restart
6. HDMI interface
7. 3.5 mm headphone socket
8. On/off button
9. Dust cover for lens -
After connecting the power
supply, slide the dust cover to
reveal the lens.
Product Overview and Powering
on/off
Performing a force restart
If the system crashes or becomes unresponsive, insert
a pointed object into the Reset button and wait for the
white indicator to turn off, indicating that the projector has
switched off. Then hold down the power button to restart
the projector.
Bluetooth speaker mode
1. To enable Bluetooth speaker mode, press the speaker
button on the remote control.
2. You can also enable Bluetooth speaker mode by sliding
the lens dust cover.
Bluetooth speaker controls on remote control:
/- button: Adjusts the volume.
Speaker button: Returns to projector mode.
The other buttons on the remote control have no function.
Important
After enabling Bluetooth speaker mode, keep the
connected Bluetooth device within 10 m of the projector.
Built-in Lithium-ion Battery
This product contains a lithium-ion battery. Please note the
following battery safety information:
1. If you do not plan to use the product for an extended period,
charge the battery at least once every 3 months to prevent the
battery from discharging. When storing the product for period
of longer than one year, we recommend charging once per year
to discharge and reactivate the battery.
2. After use, disconnect the power supply to avoid damaging the
battery due to excessive charging.
3. Use the product at temperatures of 0 to 40°C with a relative
humidity of 20-70% and keep it away from hot and humid
environments and sources of heat.
4. Store the product in a dry place away from moisture and
corrosive materials.
5. Do not use chemical cleaning products (e.g. soap or detergent)
to clean the product.
6. Do not disassemble the product, subject it to impacts or falls, or
place it in open flames or water.
7. If the battery inside the product expands, leaks or emits an
odor, discontinue use immediately.
8. Do not use the product in strong electrostatic or
electromagnetic environments, as this may damage the
battery’s safety mechanism and present a safety hazard.
9. Do not use or store the product at high temperatures (e.g. in
direct sunlight or in a hot vehicle), as this may cause the battery
to overheat, catch fire or malfunction and reduce the battery’s
lifespan.
Getting Started
1. Place the product in a suitable location with the lens
pointing at the projection surface.
2. Hold down the power button to turn on the projector. The
white indicator will turn on and the system
will load.
3. Follow the startup wizard or go to “System settings—
Networks” and connect to your wireless network.
9
3
1
4
5
6
7
8
2
1. System indicator -
Switched on: Constant
white
2. Charging indicator -
Charging: Red
Charging complete:
Green
3. Power-in socket
4. USB 2.0 interface
Your Miroir Projector
Package contents and product specifications
1x
Main
unit
1x
Remote
control
2x
AAA
batteries
1x
Power
adapter
1x
Instruction
manual
Remote Control
1. Indicator
2. Speaker button
Switch between projector/
speaker mode
3. Projector settings
View the projector settings
4. Direction buttons
Move the focal point up/
down/left/right. During
video playback, hold down
the left/right direction
buttons to rewind/fast-
forward the video
5. Play/pause/confirm button
Confirm focal point; on the
video playback interface,
short press to play/pause
the video.
6. Return button
Return to previous interface
7. Home screen button
Return to home screen
8. Menu/air mouse button
Short press: Display menu,
Long press: Air mouse
9. /- button
Adjust the volume
Pairing the Remote Control
If the remote control disconnects from the projector,
bring the remote control to within 0.5 m of the
projector and press the “Confirm” and “Return” buttons
simultaneously until the indicator starts to flash,
indicating that the remote control is connected to the
projector.
Images are provided
for reference only and
may differ from the
actual product.
2
1
4
3
7
5
6
8
9
Learn More
To learn more about your Miroir Projector
and its operations, to review specs, and
find answers to frequently asked
questions, please visit:
www.miroirusa.com/M280A
Содержание M280A
Страница 1: ...Quick Start Guide Smart Mini Pro Projector...
Страница 12: ...www miroirusa com MICRO280A 07 28 2020...


