background image

1VV0301421, Rev 1.2

Copyright © 2017 Telit. All rights reserved.

4


Run the HomeKit Demo 

Step 

Power cycle the SKB board (press and release the 

RESET button with power ON), 

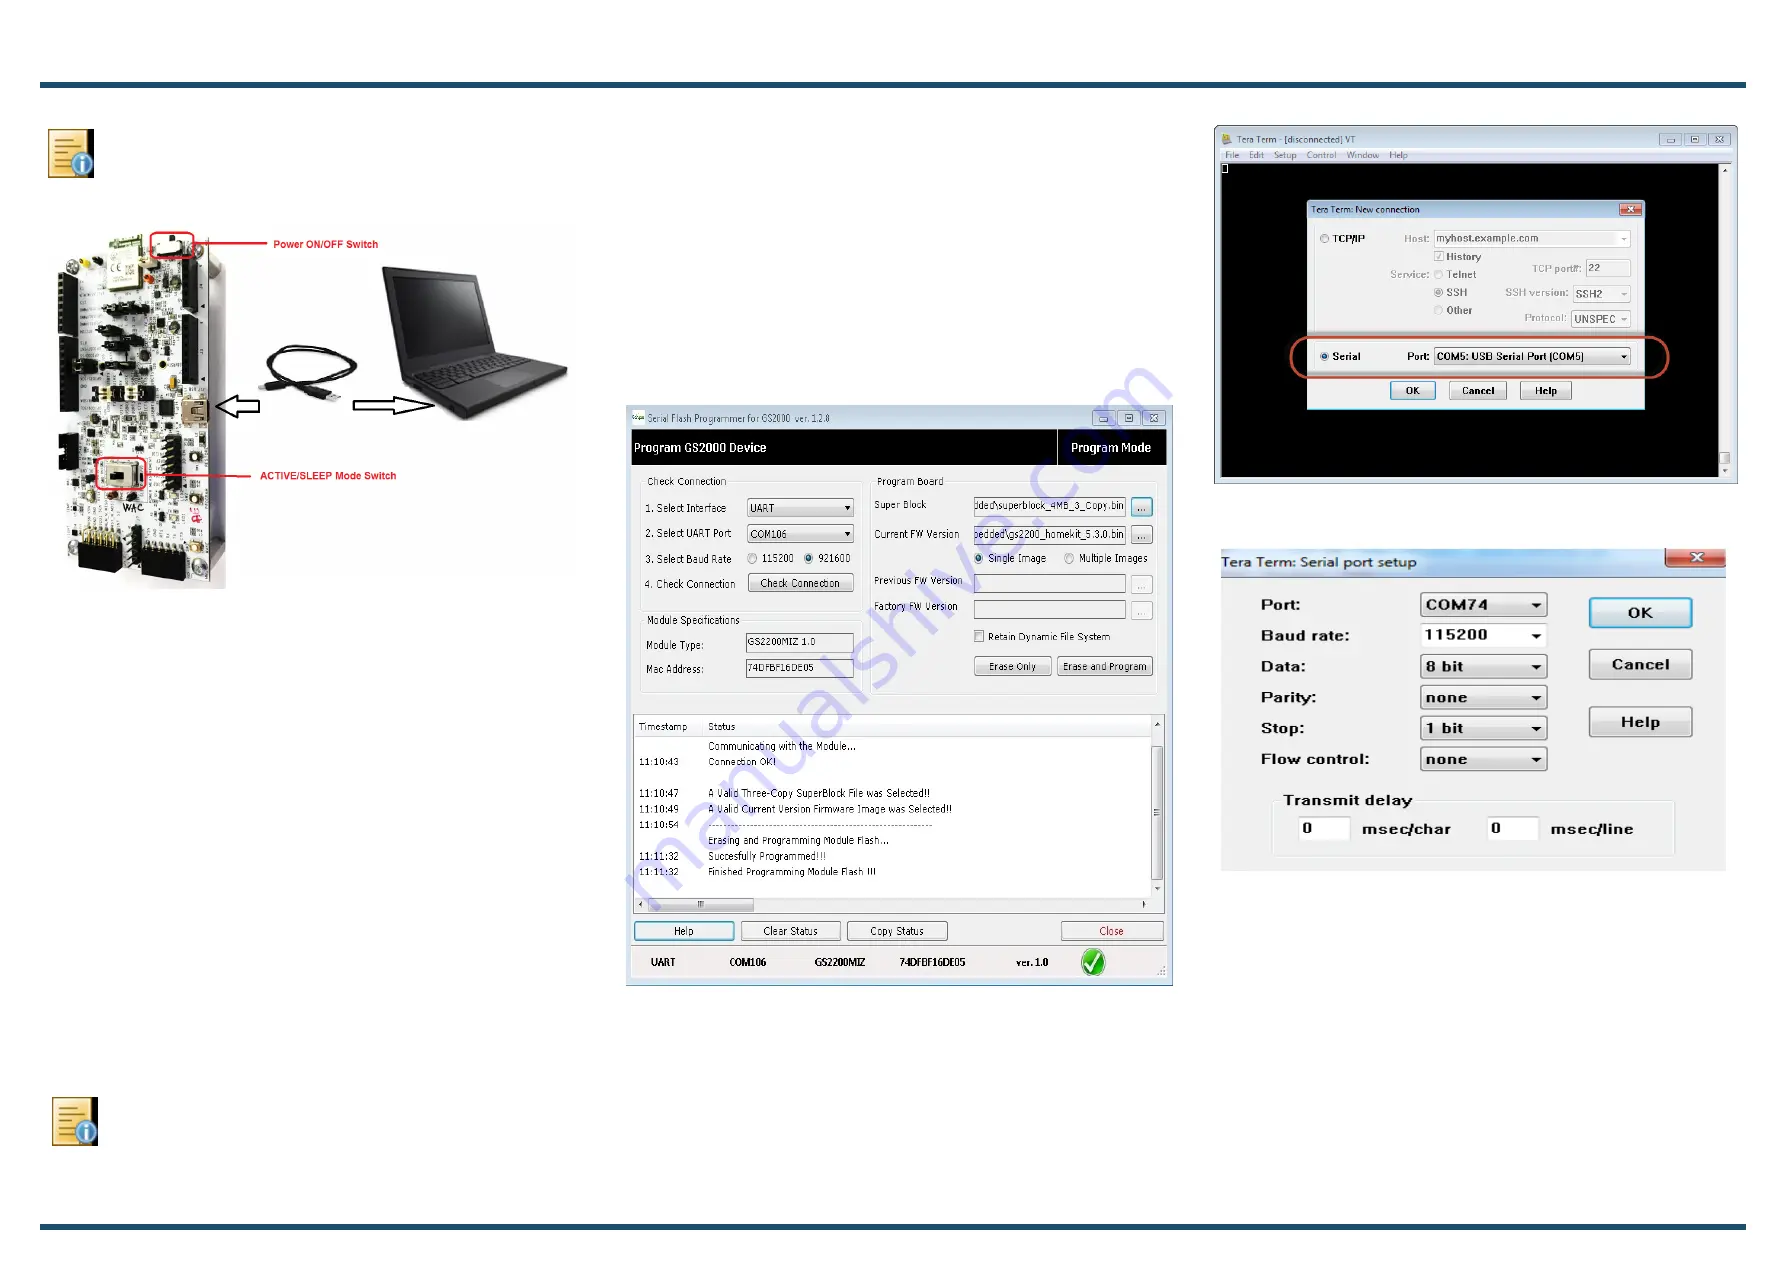
Setup the Serial port as shown below:

Step 

Launch the GainSpan Serial Flash Programmer GUI 

utility (gs2k_flashprogram.exe) from the following locations:

For AEK Package - \Tools\GS_programming_tool\.
For ADK including SDK Package - \ADK\HomeKit\Tools\GS_pro-
gramming_tool.

Step 

Click 

Check Connection

Step 

Select UART interface and the port assigned to the 

SKB at 921600 baud.

Step


4


Press and hold down both the PROGRAM and 

RESTORE buttons, simultaneously press and release the RESET 
button to put the GS2200 SKB into flash programming mode. 
Later, release the PROGRAM and RESTORE buttons.

Note:

 If the status reported is Connection OK - proceed, 

else repeat steps 2 through 6 carefully verifying the UART 
settings are correct and ensure the button pressing 

sequence exactly as described.

Step 

After “Connection OK” is displayed, select the “Super 

Block” file and the “Current FW Version” file located at the 
respective locations.
For AEK - “\QuickStart\” 
and for ADK including SDK - “\ADK\HomeKit\QuickStart\”

Step


9


Click 

Erase and Program 

and wait for the 

programming utility to indicate it has finished programming -
“Successfully Programmed” logs would be printed.

3


Connect the Serial Terminal

Open a Serial Terminal Emulation Software. Select the serial COM 
port associated with the SKB board. TeraTerm VT is used in this 
example. If not available, download a copy of Tera Term VT at: 

http://ttssh2.sourceforge.jp/

Light Sensor Demo

Note: 

If it is the first time connecting the board, 

windows may take a few minutes to install the USB serial 
port driver.

Содержание GS2200M SKB

Страница 1: ...package or the HomeKit ADK including SDK package is complete and ready to download Download and unzip the package for firmware binaries Step 1Plug the mini USB cable one end of the USB port to GS2200 SKB USB and the other end of the USB port to the computer or laptop Quick Start Guide Step 1Login at https wifi telit com secure login select SDK Builder tab and proceed to select the following option...

Страница 2: ...uttons Note If the status reported is Connection OK proceed else repeat steps 2 through 6 carefully verifying the UART settings are correct and ensure the button pressing sequence exactly as described Step 8 After Connection OK is displayed select the Super Block file and the Current FW Version file located at the respective locations For AEK QuickStart and for ADK including SDK ADK HomeKit QuickS...

Страница 3: ...type demo 2 Step 4 Connect to a Network Note Connecting to a Network can be performed in two ways 1 Manual Method Using SSID and PWD Commands 2 WAC Provisioning Refer GS2K Hostless HomeKit User Guide section WAC Provisioning under Chapter 4 This QSG provides steps for manual method Step 5 Enter the below commands Enter SSID command Example SSID GainSpanDemo Enter PWD command Example PWD 1234567890...

Страница 4: ...ticates the HomeKit Accessory Step 11 Upon successful Pairing tap Done Step 12 The light sensor value will be displayed on the HOME App The sensor is located at one of the corners of SKB labeled as U4 The Light sensor value can be changed using a torch or by covering the sensor and the values can be monitored in the HOME App Tera Term logs For Pairing and Data fetching procedure ...

Страница 5: ...module for optimum reception which needs to be done once in the lifetime of the product unless the flash is erased completely for some reason GS2K Memory Map and File System Application Note Provides the memory architecture of the Wi Fi modules and provide details about types of memory location and content of various items in these memory locations For further information please visit the website ...

Отзывы: