background image


-- 

 52

52 / 69 

 / 69 


Figure 4-11


 Specify an Application Window 

116. 17.


Click 

Next

Note: 

You may leave this screen blank. 

117. 18.


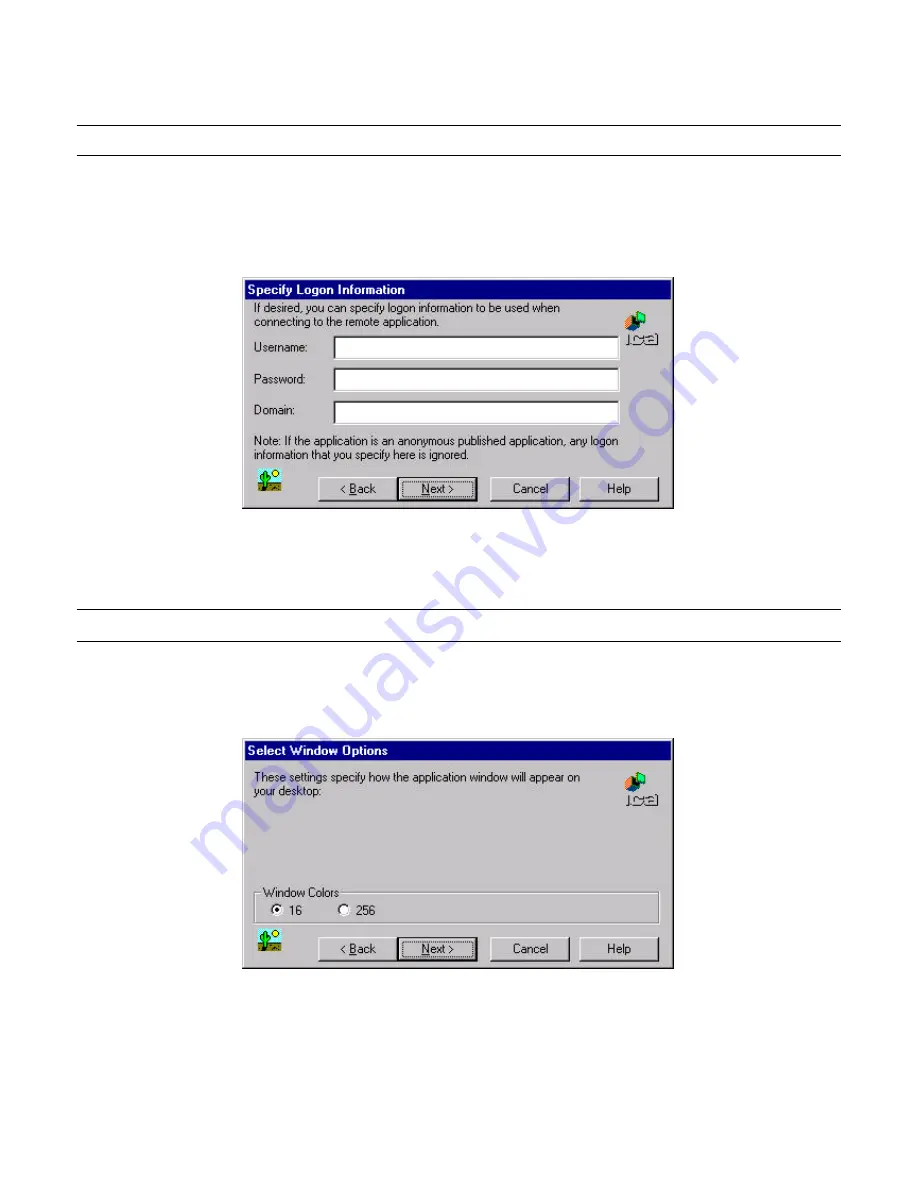
You can enter your username, password and domain to log on to the 

server.  This saves you from logging on each and every time to the server or 

application (see Figure 4 -12). 


Figure 4-12


Specify Logon Information Window 

118. 19.


Click 

Next

Note: 

You may leave this screen blank. 

119. 20.


The Select Window Options window allows you to specify 16 or 256 colors 

for the ICA session (see Figure 4-13). 


Figure 4-13


Select Window Options Window 

120. 21.


Click 

Next

121. 22.


The Compression, Cache and Sound window allows you to configure your 

ICA session depending on the speed of your connection  (see Figure 4 -14). 

Содержание TeleCLIENT TC7370

Страница 1: ... 1 1 69 69 ATTACHMENT E USER S MANUAL ...

Страница 2: ... 2 2 69 69 ...

Страница 3: ...roubleshooting 11 2 5 PowerSaver 11 Software 12 3 Software Configuration 12 3 1 Using the TeleCLIENT Setup Wizard 12 3 2 Setting TeleCLIENT TC7370 Properties 18 3 2 1 Resetting the TeleCLIENT TC7370 to Factory Defaults 19 3 2 2 Setting Keyboard Characteristics 19 3 2 3 Setting Display Characteristics 20 3 2 4 Changing Network Settings 21 3 2 5 Printer Settings 22 3 2 6 Changing System Settings 23 ...

Страница 4: ...nal Audience This manual is intended for both authorized system administrators and users who have experience with networking products and Windows based terminals It is assumed that the personnel using this document have the appropriate background and knowledge to use the TeleCLIENT How To Use This Manual This manual is designed to help you locate information quickly and easily Each chapter contain...

Страница 5: ... CONDITIONS Grant You may use the TeleCLIENT Connection Manager in conjunction with the TeleCLIENT as provided You may transfer ownership of the Equipment including the right to transfer the Software to another party so long as that party agrees to accept these terms and conditions YOU MAY NOT COPY MODIFY TRANSLATE OR TRANSFER THE SOFTWARE OR MODIFICATION THEREOF IN WHOLE OR IN PART EXCEPT AS EXPR...

Страница 6: ...ion under this warranty will be limited to repairing or replacing at TeleVideo s option the parts of the products which prove defective in material or workmanship provided that Buyer gives TeleVideo prompt notice of any defect and satisfactory proof thereof Exclusions This limited warranty does not cover losses or damages which occur in shipment to or from Buyer nor due to 1 improper installation ...

Страница 7: ... for later use 3 1 1 1 Safety Notices Danger Notices A danger notice indicates a hazard that could possibly cause death or serious personal injury Please note the following danger notices before using this product DANGER This product uses electrical power and contains sensitive components It is not designed for consumer servicing If your TeleCLIENT requires repair or you wish to add components tha...

Страница 8: ...g label to operate this product Consult your dealer or local power company if you are unsure of the type of power available 8 8 Use only the proper type of power supply cord set provided in your accessory box for this unit Use a detachable type UL listed CSA certified type SVT SJT rated as 10A 125V minimum VDE approved or its equivalent 9 9 Do not allow anything to rest on the power cord 10 10 If ...

Страница 9: ...IENT can be configured for communication directly via TCP IP Transmission Control Protocol Internet Protocol or PPP Point to Point Protocol 6 1 2 1 Features The TeleCLIENT offers the following features 17 Ease of Installation and Administration The Microsoft Windows CE Operating System is embedded on a 8MB local flash disk The software can be upgraded and re programmed locally or remotely via Ethe...

Страница 10: ...s compatible 23 Two button mouse Standard 24 Inline power supply Universal power supply standard 25 Power Line cord 26 CD ROM version of TeleCLIENT User s Manual Hardware 8 2 Hardware Installation This chapter explains how to install connect and set up the TeleCLIENT TC7370 hardware It includes the following sections 27 Connecting to I O Ports 28 Powering on the TeleCLIENT TC7370 29 Front Panel Co...

Страница 11: ...e 4 1 Figure 2 1 I O Ports 1 DC in 2 PS 2 Keyboard 3 PS 2 Mouse 4 Ethernet LAN 5 External VGA SVGA 6 Printer Parallel Port 7 USB Ports 8 Earphone 9 Microphone 10 Serial Port Peripheral Port Pinouts Pin Function 1 STROBE ...

Страница 12: ... 25 GND 11 2 1 2 Connecting the TeleCLIENT TC7370 1 1 Remove the TeleCLIENT TC7370 line cord and accessories from the carton and set the unit on a flat work surface 14 2 Connect the keyboard to the keyboard connector 15 3 Connect the mouse to the mouse connector 16 4 Depending on your configuration needs connect a printer to the parallel port ...

Страница 13: ...ake sure the connector is placed correctly in the socket 2 2 2 Powering on the TeleCLIENT TC7370 When connecting the TeleCLIENT TC7370 to AC outlets please note the following 3 1 To turn on your TC7370 simply press the power button on the front panel This will power on both the TeleCLIENT TC7370 terminal and the monitor If the monitor displays an image installation is complete WARNING To prevent r...

Страница 14: ...he phone number on the warranty section There is no screen image Check to see that the computer is plugged in and turned on The screen image is too light or too dark Adjust the brightness settings 8 2 5 PowerSaver This monitor has a built in power management system called PowerSaver This system saves energy by switching your monitor into a low power mode when it has not been used for a certain amo...

Страница 15: ...NT Setup Wizard 34 Resetting TeleCLIENT TC7370 properties 35 TeleCLIENT Software Update Procedure 10 3 1 Using the TeleCLIENT Setup Wizard At initial start up the TeleCLIENT Setup Wizard TeleCLIENT Setup Wizard welcome window will appear to guide you in setting up your network c onfiguration Figure 3 1 Figure 3 1 TeleCLIENT Setup Wizard Welcome Window To use the TeleCLIENT Setup Wizard TeleCLIENT ...

Страница 16: ...1 1 Click Next in the welcome window 19 2 Review the End User License Agreement EULA Figure 3 2 If you agree to the terms of the EULA click Accept Figure 3 2 TeleCLIENT Setup Wizard EULA Window 20 3 The IP Address window appears Figure 3 3 ...

Страница 17: ...lect Yes to use the IP information provided by DHCP Note At initial start up the TeleCLIENT will wait for the DHCP response If you don t have DHCP server on your network click Cancel and proceed with the set up 37 If you wish to enter static IP information select No NOTE If your network uses DHCP skip Steps 5 through 10 22 5 If you selected No the Specifying an IP Address window appears Figure 3 4...

Страница 18: ...izard Static IP Configuration Window 23 6 Type in your TeleCLIENT TC7370 s IP address Subnet Mask and Gateway 24 7 Assign a terminal name or leave as the default name Do Not leave it blank 25 8 Click Next The DNS WINS window appears Figure 3 5 ...

Страница 19: ... requires DNS settings select Enable DNS Enter the Default Domain Name Primary Server IP and Secondary Server IP 27 10 If your network requires WINS settings select Enable WINS Enter the Primary Server IP and Secondary Server IP 28 11 Click Next 29 12 The Display Properties window appears Figure 3 6 ...

Страница 20: ...n Note This only tests the selected setting but does not change the setting After completing this test the user will be brought back to the welcome screen User should simply follow steps from step 1 again When you get to the display setting for the second time the resolution and frequency setting should have gone back to the default setting user should pick the desired setting again before pressin...

Страница 21: ...appears Figure 3 7 37 20 If a local printer is connected to the parallel printer port select Yes then click Next Otherwise select No and click Next then go to step 27 Figure 3 7 Local Printer Setup 38 21 Select the printer port then click Next Figure 3 8 ...

Страница 22: ... 22 22 69 69 Figure 3 8 Select Printer Port 39 22 Select the printer manufacturer and the model number Figure 3 9 Figure 3 9 Select the Printer Model 40 23 Name the printer and click Next Figure 3 10 ...

Страница 23: ...23 23 69 69 Figure 3 10 Printer Name 41 24 Select if this printer will be used as the default printer Figure 3 11 Figure 3 11 Set Default 42 25 Select if you want to configure another printer Figure 3 12 ...

Страница 24: ...24 69 69 Figure 3 12 Additional Printer Configuration 43 26 If you clicked Yes go back to step 20 Otherwise proceed to step 27 44 27 Click Next The TeleCLIENT Setup Wizard Finish window appears Figure 3 13 ...

Страница 25: ... Refer to Chapter 4 Chapter 4 TeleCLIENT TC7370 Operation TeleCLIENT TC7370 Operation for instructions 12 3 2 Setting TeleCLIENT TC7370 Properties You can reset the TeleCLIENT TC7370 properties by starting the TeleCLIENT Terminal Properties TeleCLIENT Terminal Properties window NOTE When making changes in the TeleCLIENT Terminal Properties window click OK to set the new values Click X at any time ...

Страница 26: ...LIENT Management Software configure SNMP agent and control audio output 45 NetInfo Used to display the network settings To start the TeleC TeleC LIENT Terminal Properties LIENT Terminal Properties while the TeleCLIENT Connection Manager TeleCLIENT Connection Manager is displayed Press F2 F2 on the TeleCLIENT TC7370 keyboard The TeleCLIENT Terminal Properties TeleCLIENT Terminal Properties window w...

Страница 27: ...age used by the keyboard 47 Character Repeat The repeat delay of a keyboard character i e length of time elapsed before a character is repeated when a key is pressed 48 Repeat Rate The rate at which the keyboard repeats characters To change these keyboard characteristics complete the following steps 16 1 Select the Input tab in the TeleCLIENT Terminal Properties window Figure3 16 Figure 3 16 TeleC...

Страница 28: ...h Frequency To change display settings complete the following steps 18 1 Select the Display tab in the TeleCLIENT Terminal Properties window Figure 3 17 Figure 3 17 TeleCLIENT Terminal Properties Display Tab 54 2 The Desktop Area and Refresh Frequency field displays the current TeleCLIENT TC7370 display resolution To change the resolution click the down arrow and select a setting from the list of ...

Страница 29: ...de 59 2 To set the time TeleCLIENT TC7370 waits before activating the screen saver enter the new value in the Wait field or use the up and down arrows The default wait value is 12 minutes 60 3 Click OK 20 3 2 4 Changing Network Settings In addition to changing the network settings by resetting the factory defaults and using the setup wizard again you can also use the TeleCLIENT Terminal Proper Tel...

Страница 30: ...re 3 19 TeleCLIENT Terminal Properties Advanced Network Settings 52 If your network requires DNS settings select Enable DNS Enter the Default Domain Name Primary Server IP and Secondary Server IP 53 If your network requires WINS settings select Enable WINS Enter the Primary Server IP and Secondary Server IP 64 5 Click OK 22 3 2 5 Printer Settings The Printer Printer tab provides the option to choo...

Страница 31: ...T Terminal Properties window Figure3 20 Figure 3 20 TeleCLIENT Terminal Properties Printers Settings 65 2 Select the port and click Add 66 3 On the Printer Properties window type in the desired name for the printer then select the manufacturer of the printer and the model using the scroll bar Figure 3 21 ...

Страница 32: ...window type in the desired name for the printer then select the manufacturer of the printer and the model using the scroll bar Click OK 71 4 Verify that the name type and the default status are correct and then click OK To delete a printer complete the following steps 25 1 Select the Printers tab in the TeleCLIENT Terminal Properties window 72 2 Click Delete 73 3 Click Yes when prompt 74 4 Click O...

Страница 33: ... click on the System tab in the TeleCLIENT Terminal Properties Figure 3 22 Figure 3 22 TeleCLIENT Terminal Properties System Tab To change the ICA client configuration 27 1 Click Configure in the ICA Client Configuration field to set global settings Default hot keys Preferences Server Location for TeleCLIENT TC7370 ICA only Figure 3 23 ...

Страница 34: ... 34 34 69 69 Figure 3 23 ICA Client Configuration To configure LPD Line Printer Daemon settings 28 1 Click LPD Setup Figure 3 24 Figure 3 24 LPD Configuration ...

Страница 35: ...ng is not necessary Changing the Energy Star Configuration Settings To change the energy conservation settings complete the following steps Note To enable the conservation settings the screen saver must be enabled first 30 1 To enable the screen saver feature select the Display tab and check the Enable Screen Saver box Note Both features are enabled at default setting 79 2 To set the time TeleCLIE...

Страница 36: ...perties 62 Disable enable Configure tab in Connection Manager 63 Set Auto Fail Recovery option 64 Set SNMP settings To update the client software 32 1 Refer to section 3 3 TeleCLIENT Software Update To change management settings 33 1 Select the Management tab in the TeleCLIENT Terminal Properties window Figure 3 25 Figure 3 25 TeleCLIENT Terminal Properties Management Tab To adjust the Mouse Speed...

Страница 37: ...rd Input Dialog Box 84 2 Type in the new password 85 3 Confirm the new password 86 4 Click OK To disable the Connection Manager Configure tab This feature disables users from changing connection settings 37 1 Select Disable Configure Tab box To have the client check for an update on every power on 38 1 Type in the URL of the server to check from 87 2 Check the Check for WBT updates at every power ...

Страница 38: ...ed to the name given under the Network tab only 90 3 Enter the contact for the terminal usually the user of the terminal and the location 91 4 Community section refers to the SNMP group definition Enter the group name 92 5 Enter all the necessary and appropriate server names in each category 93 6 Click OK 41 3 2 8 Viewing the Network Information Using the NetInfo tab you can view and test the netw...

Страница 39: ... Figure 3 28 TeleCLIENT Terminal Properties Network Information Tab To test the network connection 43 1 Click Ping Figure 3 28 94 2 Enter the server IP address you are trying to connect then click Ping Figure 3 29 ...

Страница 40: ...ware currently running on TeleCLIENT 67 Rebooting with the new OS A TeleCLIENT operating system includes the CE operating system and TeleCLIENT applications as a whole A software update can be performed manually at TeleCLIENT or automatically every time TeleCLIENT is power cycled A software update performs the following three steps 46 1 A software update package file is downloaded by TeleCLIENT Th...

Страница 41: ...to set TeleCLIENT so that it checks the URL for a software update every time TeleCLIE NT is power cycled A Standard Upgrade of the Operating System The following is the update package XML file This example upgrades the Windows CE image on the boot partition of the DOC The XML code directs the update software package to load a Windows CE image into the DiskOnChip boot partition This update example ...

Страница 42: ... Server_name NOTE Use the bintodoc r 100 command to process the nk bin Destination The location on the CE device where the temporary image will be stored Reboot Forces a reboot of TeleCLIENT Formatting the DiskOnChip and Upgrading the Operating System When the partition size is not large enough to contain the Windows CE image and the persistent registry the DOC will need to be reformatted before i...

Страница 43: ...T 1 2 Adds a unique ID to the update The ID string is read by the client and checked against an ID stored locally If the ID s match the update is skipped If the ID s do not match the update is attempted If the ID is left blank Package the update always attempted CopyFile Copies a file to TeleCLIENT Execute Yes Executes the file copied WaitForExit Yes Wait for the program to exit before executing t...

Страница 44: ...ing Source Location of ceimage rom This file must be located in the directory specified by the source path Server_name NOTE Use the bintodoc r 100 command to process the nk bin 48 3 3 3 Verifying Package File Contents The content of any software update package file can be validated prior to deployment by using the SoftwareUpdate dtd file an XML Notepad and IE 5 0 from Microsoft http msdn microsoft...

Страница 45: ... ON OFF switch located on the front panel refer to Chapter 2 Hardware Installation Use this switch to power the TeleCLIENT TC7370 on and off To power off the TeleCLIENT TC7370 press the ON OFF switch To re start press the ON OFF switch briefly WARNING Follow the instructions above carefully to avoid accidental power shut off to the TeleCLIENT TC7370 51 4 2 Using the TeleCLIENT Connection Manager T...

Страница 46: ...rk connections You can also set the default or auto start network connection 52 4 3 Configuring Network Connections Each connection uniquely identifies a host server and the client terminal used to make the connection based on the type of connection used You can create edit and delete network connections in the TeleCLIENT Connection Manager window To begin 53 1 Select the Configure tab in the Tele...

Страница 47: ...e 4 3 New Connection Window 100 2 Choose one of the following connection protocols for the new connection 78 Citrix Independent Computing Architecture protocol ICA 79 Microsoft Remote Desktop Protocol RDP 80 Terminal Emulation Client 3 Click OK OK To return to the previous window click Cancel Cancel Once a connection is created it will also be listed in the Connection Name list In Figure 4 4 the a...

Страница 48: ...ure depends upon the type of connection used as explained below Adding an ICA Client Connection To add an ICA client connection complete the following steps 56 1 Select Citrix ICA Client in the New Connection window The Specify Connection Type window appears see Figure 4 3 Figure 4 5 Specify Connection Type Window ...

Страница 49: ...k Connection skip to step 12 103 4 If Dial In Connection enter the area code phone number country and check the box if you need to dial the area code for the connection see figure 4 6 Figure 4 6 Dial In Device Setting 104 5 Select the hardware connection from the drop down box 105 6 Click Configure 106 7 Under the Port Settings tab set Manual dialing option and the terminal screen options see figu...

Страница 50: ...k on Call Options tab see figure 4 8 Figure 4 8 Calling Options 109 10 Set the calling options then click OK 110 11 Click Next 111 12 The software will now search for and identify all of the available Citrix servers or published applications Follow the prompts to select the server or application you wish to use see Figure 4 9 ...

Страница 51: ...for the ICA Connection window You can change the title at this time see Figure 4 10 Figure 4 10 Select a Title for the ICA Connection Window 114 15 Click Next 115 16 You can configure your TC7370 to run the same application from the selected server Type in the Command Line and Working Directory or leave blank to run the Windows NT desktop see Figure 4 11 ...

Страница 52: ...er or application see Figure 4 12 Figure 4 12 Specify Logon Information Window 118 19 Click Next Note You may leave this screen blank 119 20 The Select Window Options window allows you to specify 16 or 256 colors for the ICA session see Figure 4 13 Figure 4 13 Select Window Options Window 120 21 Click Next 121 22 The Compression Cache and Sound window allows you to configure your ICA session depen...

Страница 53: ...aseT Enabling sound over a modem dial up or a WAN will cause problems due to an increased consumption of bandwidth 122 23 Click Next or click Finish if you do not have to set up the firewall settings and skip the following procedure You are ready for the connection 123 24 Once you have finished the ICA connection setup you are now ready to connect to the server Adding an RDP Client Connection 57 1...

Страница 54: ... computer you wish to connect to in the Server field 126 4 If you have a connection to the Server through a low bandwidth line WAN or serial line check Low Speed Connection 127 5 Click Next 128 6 You can enter your username password and domain to log on to the server This saves you from logging on each and every time to the server or application see Figure 4 16 ...

Страница 55: ...xt Note You may leave this screen blank 130 8 You can configure your TC7370 to run a selected application instead of the desktop Choose the Application File Name Type in the Command Line and Working Directory or leave blank to run the Windows NT desktop see Figure 4 17 ...

Страница 56: ...56 56 69 69 Figure 4 17 WTS Connection Wizard Window 131 9 Click Next Note You may leave this screen blank 132 10 Congratulations You have successfully created a connection to the server see Figure 4 18 ...

Страница 57: ...onnect to the server Adding a Terminal Emulation Client Connection Note For more information please refer to Terminal Emulation User s Guide 58 1 Select Terminal Emulation Client in the New Connection window The TeleCLIENT Terminal Emulation Connection Properties window appears see Figure 4 19 Figure 4 19 Terminal Emulation Connection Properties Window 134 2 Enter a name in the Connection Name fie...

Страница 58: ...now ready to connect to the server 59 4 3 2 Editing Connections The procedure for editing a connection varies depending on the kind of network connection you use Editing an ICA Connection To edit an ICA connection complete the following steps 60 1 Select the Configure tab in the TeleCLIENT Connection Manager window see Figure 4 20 Figure 4 20 Configure Tab 137 2 Select the connection you wish to e...

Страница 59: ...3 Click Edit The Properties window appears see Figure 4 21 Figure 4 21 Properties Window Notice that the Properties window contains two tabs 88 Net Connections Used to edit a connection and enable an automatic logon see Figure 4 18 89 Application Used to specify and automatically go to the filename and working directory path whenever you start a session see Figure 4 22 ...

Страница 60: ...ure tab in the TeleCLIENT Connection Manager window 145 2 Select the connection you wish to delete by clicking on connection name 146 3 Click Delete 147 4 Click Yes to confirm the deletion 64 4 3 4 Setting Start up Connections The TeleCLIENT TC7370 can be set to automatically connect to a server whenever a session begins instead of using the default server To set automatic start up connections com...

Страница 61: ...ically start the selected connection at startup Enables the TeleCLIENT TC7370 to automatically connect to your selection in the TeleCLIENT Connection Manager each time a user starts up TeleCLIENT TC7370 150 4 Click OK to save your changes 66 4 4 Connecting to a Network Server The TeleCLIENT Connection Manager TeleCLIENT Connection Manager lists all of your system s available network connections To...

Страница 62: ...utomatically logged on 152 3 If the logon is not automatic the Windows Logon Information window displays Follow the Windows prompts to complete the logon 68 4 5 Using the TeleCLIENT TC7370 Hot Keys The TeleCLIENT TC7370 hot keys simplify the process of switching between active sessions Instead of using the TeleCLIENT Connection Manager you can use the hot keys on your TeleCLIENT TC7370 keyboard to...

Страница 63: ...onnection Manager 153 2 Select the Connection Name Click Connect To switch between running connections complete the following steps 71 1 Press CTRL ALT END on the keyboard to access the TeleCLIENT Connection Manager 154 2 Select a Connection Name Click Connect 155 3 OR on the keyboard press CTRL ALT UP with the up arrow or CTRL ALT DOWN with the down arrow to cycle through the list of active conne...

Страница 64: ...LT END on the keyboard to access the TeleCLIENT Connection Manager 159 2 Select the Configure tab 160 3 Select the auto start Connection Name and click Startup The TeleCLIENT Connection Startup window appears 161 4 Click on the Make the selected connection your Default connection Click OK 162 5 Select the connection and click End ...

Страница 65: ...ardware Specifications Hardware Hardware Description Description CPU National Semiconductor Geode GX1 300MHz processor RAM Memory 32MB RAM standard Expandable to 128MB Flash Memory 8MB flash disk Flash upgrade utility via Ethernet Graphics Subsystem National Semiconductor XpressGRAPHICS Cx5530 Video Memory Graphics utilizes system RAM Audio Support National Semiconductor XpressAUDIO Full 16 bit st...

Страница 66: ...io Ports Audio out Microphone in Keyboard and Mouse Ports Keyboard and mouse ports PS 2 keyboard and mouse included Table A 3 provides the TeleCLIENT TC7370 software specifications Figure 3 3 Table A 3 Software Specifications Feature Feature Description Description Operating System Microsoft Windows CE TeleManager Management Software compatible Set up and Configuration TeleCLIENT Setup Wizard for ...

Страница 67: ...act TeleVideo directly for further information Table A 4 provides the environmental specifications Figure 3 4 Table A 4 Environmental Specifications Feature Feature Description Description Environmental Specifications Operating temperature 32º to 104ºF 0º to 40ºC Storage temperature 14º to 140ºF 25º to 60ºC State of the art fanless convection cooling design Humidity 10 to 85 non condensing Operati...

Страница 68: ...igure 3 6 Table A 6 Physical Specifications Feature Feature Description Description Weight 10 5 lbs Height 15 1 inches Depth 7 2 inches Width 15 7 inches Warranty Information The TeleCLIENT TC7370 is supported by a one year warranty service Please contact your TeleVideo Inc representative for more information ...

Отзывы: