background image

190

 GPON ONT

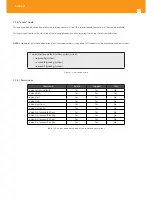
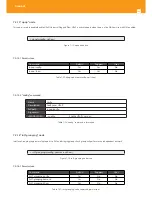
7.2.17.5.2 “new-users” sub-node

This sub-node allows the creation and removal of new users. It also allows viewing new users already configured.

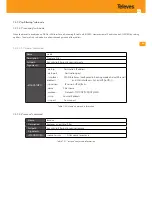
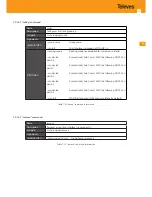
7.2.17.5.2.1 “create” command

Name

create

Description

Creates a new user

Full path

/management/access-control/new-users/create

Arguments

<MANDATORY

>

--password                     Password

--permissions-level          Permissions level <admin|support|user>

 --username                    User name

Table 7-65: “create” command information

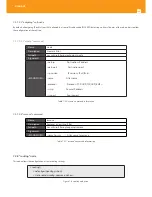
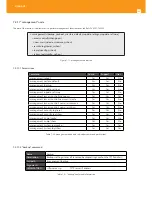
7.2.17.5.2.2 “remove” command

Name

remove

Description

Removes existing users

Full path

/management/access-control/new-users/remove

Arguments
<MANDATORY>

--user-to-rmv                     List of usernames to remove <name1[,name2,...]>

Table 7-66: “remove” command information

Содержание 769501

Страница 1: ...GPON ONT OFFICE GPON ONT HOME EN Ref 769501 User s Manual w w w t e l e v e s c o m Ref 769502...

Страница 2: ......

Страница 3: ...2 8 Ethernet 16 2 9 IPTV 16 2 10 RF Video Overlay 16 2 11 Voice 17 2 12 WI FI 17 2 12 1 Operational description 17 2 12 2 Block Diagram 18 2 12 3 Refs 769501 769502 WI FI Antennas 19 2 13 Multiple QoS...

Страница 4: ...3 How to Setup Refs 769501 769502 33 4 4 Interface connection 35 4 4 1 Optical cable connection 35 4 4 2 General Overview of Refs 769501 769502 Connections 35 5 Configuration 37 5 1 Refs 769501 769502...

Страница 5: ...Tunnel 120 5 6 15 Power Management 124 5 6 16 Multicast 124 5 7 Wireless 126 5 7 1 Basic 126 5 7 2 Security 128 5 7 3 MAC Filter 131 5 7 4 Advanced 132 5 7 5 Station Info 133 5 8 Voice 133 5 8 1 SIP B...

Страница 6: ...n node 163 7 2 3 nat node 166 7 2 4 dns node 170 7 2 5 qos node 172 7 2 6 voice node 176 7 2 7 security node 178 7 2 8 routing node 180 7 2 9 multicast node 182 7 2 10 diagnostics node 183 7 2 11 arp...

Страница 7: ...tomer Premises Equipment CRC Cyclic Redundancy Check DC Direct Current DDNS Dynamic DNS DHCP Dynamic Host Configuration Protocol DNS Domain Name System DSCP Differentiated Services Code Point DSL Digi...

Страница 8: ...t System OLT Optical Line Terminal OMCI ONT Management Control Interface ONT Optical Network Terminal OPEX Operational Expenditure OSI Open Systems Interconnection PC Personal Computer PON Passive Opt...

Страница 9: ...UDP User Datagram Protocol URL Uniform Resource Locator USB Universal Serial Bus UTP Unshielded Twisted Pair VAD Voice Activity Detection VAP Virtual Access Point VID VLAN Identifier VLAN Virtual Loca...

Страница 10: ...an optical network splitting ratio of up to 1 64 in a single fiber and a distance range of up to 60 km make the GPON technology and the Refs 769501 769502 the most efficient option for passive optical...

Страница 11: ...rvice pack Broadband service applications are commonly referred as below High speed internet HSI Voice VoIP services SIP MEGACO H 248 TV whether IPTV or analog RF video overlay WI FI The multiplay env...

Страница 12: ...Layer Configuration and Management IP based services configuration and management is achieved by means of the TR 069 protocol as defined by Broadband Forum This procedure takes for granted that previ...

Страница 13: ...eneral Features GPON is a point to multipoint passive optical network in which unpowered optical splitters are used to enable a single optical fiber to serve multiple premises typically 1 64 A PON con...

Страница 14: ...ts to provide VoIP services Two Wi Fi antennas which can connect to Wi Fi terminals wirelessly to provide a secure and reliable high speed wireless network Two USB ports which can be connected to a US...

Страница 15: ...a framework for the remote configuration and management of IP based services over PON Passive Optical Network and fiber access technology TR 142 framework uses TR 069 which is the protocol of choice f...

Страница 16: ...OSI reference system Ethernet is at the Data Link layer In the Refs 769501 769502 equipment both WAN and LAN type of physical interfaces are 10 100 1000BASE T AUTO MIX Ethernet type over RJ45 conector...

Страница 17: ...versa within a previously defined voice VLAN Refs 769501 769502 respects the defined priority and implements the traffic encapsulation from its own Ethernet interface into a specific T CONT GEM Port...

Страница 18: ...ators in the device and its frequencies Figure 9 Intentional radiators in the circuit and radio signal path between circuit blocks are also shown SoC GPON MAC ETH MAC DDR3 FMI Flash SC AP O E CDR CaTV...

Страница 19: ...the scheduler type Strict Priority or Weighted Fair Queuing and the minimum and maximum bandwidth of each queue In the downstream direction the ingress traffic first passes by a policer configured to...

Страница 20: ...aximum Bandwidth Best Effort Type 5 Fixed Assured Maximum Band T CONT Type 1 Type 2 Type 3 Type 4 Type 5 Units Fixed BW RF RF1 0 0 0 RF5 b s Assured BW RA 0 RA2 RA3 0 RA5 b s Max Bw RM RM1 RF1 RM2 RA2...

Страница 21: ...tion by service client 2 14 4 Upstream QoS scenarios 8 priority queues Strict priority Upstream Scheduling Strict Priority currently supported Strict Priority rate controller currently supported Stric...

Страница 22: ...xtinction ratio dB 8 2 8 2 Tolerance to the Tx incident light power dB 15 15 SLM Laser MAX 20 dB width nm 1 1 SLM Laser MIN SMSR dB 30 30 ONT Rx ONT Rx Receiving bit rate Mbps 2488 32 2488 32 Receivin...

Страница 23: ...easurement is 3dBm maximum 3 1 2 Ethernet Ethernet is the wired LAN technology and is revised in the IEEE 802 3 standard At the OSI reference system Ethernet is at the Data Link layer In the ONT7 RGW...

Страница 24: ...26mA VOC 48V VAS 3V bshv 5V Ringer voltage V DC offset 48V AC voltage 75Vrms 0 5 Frequency 25Hz 3 Ringing signal normal ringing 1 sec ring 5 sec pause interval 6 sec Hook flash on hook register recall...

Страница 25: ...d in 802 11 2007 WPA WPA2 AES encryption de encryption coupled to TKIP as de fined in 802 11 2007 and 802 1X Short Guard In terval SGI support Space Time Block Coding STBC support Transmit Power Up to...

Страница 26: ...er of GEM ports 256 Number of T CONT 32 Primary Power Connection VDC 12 15 Primary Power Connection VAC 230V AC 50Hz 2Hz 110V AC 60Hz 2Hz Power Supply W 2 19 MTBF h 404660 Size mm 210x210x40 Temperatu...

Страница 27: ...eractive services Video On Demand IPTV streams forwarding simultaneous 128 IPTV prioritization using Quality of Service QoS using 802 1p VoIP T 38 Fax Relay Fax Data Bypass Echo Canceller Echo Cancell...

Страница 28: ...combines the downstream signal 1490 nm 1555 nm and 1577 nm isolating the 1310 nm and 1270 nm upstream signal with the video signal Also the wavelength of 1650 nm used for fiber monitoring has to be ha...

Страница 29: ...e ITU T G 984 4 and G 988 including a safe dual firmware updates image system and the ability of back up allowing the SINGLE PORT Refs 769501 769502 start in case the software download fails to enable...

Страница 30: ...emperature EN300019 Relative humidity maximum EN300019 Environmental Standards Acoustic noise ISO 3743 45dBa Power and Grounding ETSI EN 300 132 2 V2 1 1 2003 01 ETSI ETS 300 253 January 1995 Energy C...

Страница 31: ...outdoor setup Please place it in a convenient indoor cabinet environment Use only the provided power kit The use of a third party power adapter may not guarantee its proper operation To avoid any haza...

Страница 32: ...eo 1 Video RF Connector F type 1 6 RST Configurations RESET button 7 USB 1 2 2x USB 2 0 ports 8 ECO Energy saving button In order to verify the status of all LEDS press the button If not pressed only...

Страница 33: ...protection cap of one of optical SC APC connector of optical patchcord Clean the optical SC APC connector face with an appropriate optical connector cleaning material Plug the patchcord cleaned SC APC...

Страница 34: ...d SC APC optical connector on the Refs 769501 769502 SC APC adaptor observing the alignment mechanism Figure 4 4 c You will hear a click when the connector is secure into place Pass the optical patchc...

Страница 35: ...769501 769502 Connections Figure 4 6 below shows the connections to be made between the Refs 769501 769502 and the home network devices Please refer to Figure 4 1 and 4 1 for the Refs 769501 769502 co...

Страница 36: ...C3 Ethernet Cable UTP CAT56 cable direct or crossover C4 Single mode Optical Cable with SC APC Connector GPON C5 1 Cable with F type Connectors Coaxial 75 Ohm W1 WI FI NOTES 1 Optional Dependent on th...

Страница 37: ...download and activate a software image Each state is defined according to the states of the variables of both images The OLT controls the Refs 769501 769502 state through a series of commands Start d...

Страница 38: ...ure 5 1 Refs 769501 769502 Network Setup 5 4 Refs 769501 769502 General Management Configuration To configure the Refs 769501 769502 enter the URL address http 192 168 1 1 address in an internet brows...

Страница 39: ...user configure these categories by clicking the folder icons in the Control Menu pane Device Info Advanced Setup Wireless Voice Diagnostics Management 5 5 Device Info Selecting Device Info menu item...

Страница 40: ...indow parameters can be found in Table 5 1 Figure 5 5 Device Info details initial configuration Parameter Description Serial Number ONT serial number Symmetric CPU Threads Number of ONT Symmetric CPU...

Страница 41: ...icating order of interface creation starting in 1 Description WAN service description String that can be entered by the user default values indicates type of WAN service pppoe ipoe gre br used layer 2...

Страница 42: ...administra tively enabled Table 5 3 GRE Tunnels Status Table parameters 5 5 3 Statistics When selected the Device Info sub menu item Statistics expands into a statistics sub menu composed of the foll...

Страница 43: ...Received transmitted Packets Errs Total number of Received transmitted Errors Drops Total number of Received transmitted Drops Multicast Received transmitted Number of received transmitted Multicast B...

Страница 44: ...er at the Wan service creation default values indicates type of WAN service pppoe ipoe gre br used layer 2 in terface eg veip0 eth1 interface and used vlan id eg 11 Total Received transmitted Total va...

Страница 45: ...the destination address is the address of the Refs 769501 769502 bridge br0 Interface and the route status is up Route Table parameter description can be found in Table 5 6 Figure 5 10 Device Route In...

Страница 46: ...complete since the IP address was successfully resolved to the Laptop MAC address The logical device the laptop is connected is the Refs 769501 769502 bridge br0 This is the ARP table for this device...

Страница 47: ...nfo sub menu VOICE item compresses the open Device Info sub menu if expanded eg Statistics and shows in the main window the Device Voice Status information Figure 5 13 Device Voice Status information...

Страница 48: ...ast case the Refs 769501 769502 is configured simply as a conventional RGW Selection of Advanced Setup sub menu item Layer2 Interface expands Layer2 Interface submenu items than allow the configuratio...

Страница 49: ...ervice will display in the main window two configuration tables Figure 5 20 Wan service setup GRE tunnels setup Table parameters description can be found in tables Table 5 12 and Table 5 13 In this wi...

Страница 50: ...ndicates if MLD source is enabled to use for multicast configura tion in the case of IPv6 Remove If selected the WAN Service can be removed with Remove button Edit Flag enable disable indicates if IPv...

Страница 51: ...ed by the type of Service followed by underscore and the WAN in terface name e g pppoe_veip0 Next fields of the WAN service configuration are related to VLAN tagging configuration 802 1P priority defi...

Страница 52: ...mbo box Figure 5 23 0x8100 TPID default value if selected a single tagged service is configured 0x88A8 or 0x9100 TPID used for the outer VLAN S VLAN for double tagged services if selected a double VLA...

Страница 53: ...EN 53 7 Figure 5 26 WAN service setup type of service selection and service configuration finalize type of service configuration...

Страница 54: ...onnection establishment configuration Figure 5 27 allows the configuration of the PPoE connection establish ment parameters as explained bellow 4 2 3 1 5 6 7 9 8 10 Figure 5 27 WAN Service Setup Conne...

Страница 55: ...pair so that any packets from the internal address port pair will be sent through the external address port pair and any external host can send packets to the internal Address Port pair by sending pa...

Страница 56: ...of the connected WAN interfaces in this list WAN interface priority is based on its position on the list the first one of the list being the highest priority interface To change WAN interface priorit...

Страница 57: ...DNS servers primary and secondary IP addresses must be entered 5 6 2 1 5 1 Selection of DNS Server Interfaces from Available WAN Iinterfaces The DNS Server Configuration window presents two lists Sele...

Страница 58: ...nd be selectable as Selected DNS Server interface according to its priority in the list 2 1 Figure 5 34 WAN Service setup DNS Server configuration window Once the DNS server configuration is done the...

Страница 59: ...y Selecting the Device Info sub menu item WAN Figure 5 37 Date and Hour are updated at the Device Info window Figure 5 38 Figure 5 37 Device Info WAN Service Current configuration and IP Address After...

Страница 60: ...60 GPON ONT Figure 5 39 Advanced Setup routing current routing table...

Страница 61: ...EN 61 Figure 5 40 Advanced Setup DNS current DNS server table...

Страница 62: ...e type STEP 2 At the Field Service Description enter a string for the service description the default service description is a string automatically filled in when the type o device is selected Step1 a...

Страница 63: ...ed in this context to identify in the DHCP server the IP Address pool to use by the configured service Option 61 IAID Identity Association Identifier value 8 hexadecimal digits IAID is a binding betwe...

Страница 64: ...elected a warning message on the disadvantages of its use is shown Figure 5 45 To use Firewall option Enable Firewall must be selected Figure 5 44 In this window is also possible to configure IGMP Mul...

Страница 65: ...ings configuration Figure 5 45 WAN Service setup window Network Address Translation Settings configuration Enable fullcone NAT warning message Figure 5 46 WAN Service setup window IGMP Multicast confi...

Страница 66: ...nfiguration Please refer to section 5 6 2 1 4 Routing Default Gateway Configuration for the explanation of the configuration Figure 5 48 WAN Service setup Routing Default Gateway configuration window...

Страница 67: ...window Figure 5 50 This table should reflect the configuration for the WAN service setup parameters than have been entered on the successive WAN service setup configuration windows Network Address Tra...

Страница 68: ...rs as well as obtained IP addresses by Selecting the Device Info sub menu item WAN Figure 5 52 Figure 5 52 Device Info WAN Service Current configuration and IP Addresses 5 6 2 3 GRE Type of Service Cr...

Страница 69: ...automatically filled in when the type o device is selected Step1 and composed by the type of Service followed by underscore and the WAN interface name e g gre_veip0 STEP 3 Use the Next button Figure...

Страница 70: ...er entering the required information use Next button to progress to the next window WAN Service setup window GRE Tunneling Settings GRE Summary Figure 5 57 This table should reflect the configuration...

Страница 71: ...ned IP addresses by Selecting the Device Info sub menu item WAN Figure 5 59 Figure 5 59 Device Info WAN service Current configuration 5 6 2 3 2 GRE Tunnel Setting Advanced Configuration Mode In the Ad...

Страница 72: ...Refs 769501 769502 of network B in the shown example Figure 5 53 TTL Time to Live value Table 5 14 GRE Tunneling Settings Advanced configuration mode parameters After entering the required information...

Страница 73: ...configured interfaces Figure 5 64 2 and Figure 5 67 To finalize the configuration use the Save Apply button Figure 5 65 6 The next displayed window is initial window the Advanced Setup Interface group...

Страница 74: ...74 GPON ONT 1 2 5 6 Figure 5 64 Advanced Setup interface grouping configuration window Figure 5 65 Wan interface used in the grouping selection combo box...

Страница 75: ...EN 75 3 4 Figure 5 66 Advanced Setup interface grouping configuration window Figure 5 67 Advanced Setup Interface grouping configuration initial Window Current interface grouping configuration...

Страница 76: ...d Service Description enter a string for the service description the default service description is a string automatically filled in when the type o device is selected Step1 and composed by the type o...

Страница 77: ...ble should eflect the configuration for the WAN service setup parameters than have been entered Please verify the presented configuration match the settings provided by the ISP for this service Figure...

Страница 78: ...or the description of the statistics window displayer parameters Figure 5 72 Device Info Statistics WAN WAN Services Statistics Information 5 6 3 LAN Selection of Advanced Setup submenu item LAN will...

Страница 79: ...4 2 In the case IGMP snooping is not selected multicast packets are send to all bridge ports If this option is selected an IGMP Snooping mode must be selected see step 4 and step 5 There are two modes...

Страница 80: ...the same static IP address each time they request an IP address from the Refs 769501 769502 DHCP server For the Refs 769501 769502 DHCP Server up to 32 Static IP leases can be configured STEP 10 To co...

Страница 81: ...ea Network LAN VLAN Setup window is displayed in the main window Figure 5 74 In order to create Lan VLANs a LAN port must be chosen at the Selection combo box Figure 5 76 To create a Lan VLAN use the...

Страница 82: ...up submenu LAN item will IPv6 Autoconfig an IPv6 VLAN Auto Configuration window is displayed in the main window Figure 5 78 A short on line help text is provided in the configuration window For a typi...

Страница 83: ...EN 83 1 2 3 4 5 6 Figure 5 78 Advanced Setup LAN IPv6 VLAN Auto Configuration window...

Страница 84: ...h a PC on the LAN side of the network for which ports were opened TheWAN interface used must have NAT enabled A short on line help text is provided in the configuration window To insert and configure...

Страница 85: ...EN 85 Figure 5 80 Advanced Setup NAT Virtual Servers Setup window 1 2 Figure 5 81 Advanced Setup NAT Virtual Servers Setup window Wan port Service and Server IP Address Configuration...

Страница 86: ...figuring port triggering for defined applications This redirects a network port from one network mode to another network mode This configuration allows opening ports of a PC in the LAN for a user on t...

Страница 87: ...figuration Figure 5 84 To finalize the configuration use the Apply Save button below the table Figure 85 2 The next displayed window is the initial window showing the current NAT Port Triggering confi...

Страница 88: ...he DMZ Host IP address A short on line help text is provided in the setup window A DMZ Host is a host exposed to the internet All incoming IP packets from the WAN network side if not belong to any Ser...

Страница 89: ...help text is provided in the configuration window 5 6 5 1 1 Outgoing Selection of Advanced Setup submenu Security submenu IP Filtering item Outgoing an Outgoing IP filtering Setup window is displayed...

Страница 90: ...ton The next displayed window is the initial window showing the current Outgoing IP Filter ing configuration Figure 5 91 Figure 5 89 Advanced Setup Security Outgoing IP filtering Setup window Figure 5...

Страница 91: ...ure the Incoming IP Filter Figure 5 93 STEP 1 Enter the Filter name STEP 2 Select the IP version to use from the IP version selection combo box Figure 5 94 STEP 3 Select the Protocol to use from the P...

Страница 92: ...ng IP filtering Setup Add Filter window Figure 5 94 Advanced Setup Security Incoming IP filtering Setup Add Filter window Protocol selection combo box Figure 5 95 Advanced Setup Security Incoming IP f...

Страница 93: ...ill change the value to the opposite value from forward to blocked and vice versa Figure 5 98 Changing from one policy to another of an interface will cause all defined rules for that interface to be...

Страница 94: ...94 GPON ONT Figure 5 97 Advanced Setup Security MAC filtering Setup window 1 2 Figure 5 98 Advanced Setup Security MAC filtering Setup window Change policy...

Страница 95: ...EN 95 Figure 5 99 Advanced Setup Security MAC filtering Add MAC Filter window Figure 5 100 Advanced Setup Security MAC f iltering Setup window Current Configuration...

Страница 96: ...ction configuration table Figure 5 102 A short on line help text is provided in the configuration window To insert and configure a new Access Time Restriction rule use the Add Button Figure 5 102 a ne...

Страница 97: ...ontrol Time Restriction Configuration window Figure 5 103 Advanced Setup Parental Control Time Restriction Add Time Restriction rule window Figure 5 104 Advanced Setup Parental Control Time Restrictio...

Страница 98: ...te a new entry in the URL filter list use the Add button Figure 123 an URL Filter Add window will be displayed Figure 5 106 In this window enter the URL address Default port number 80 will be used if...

Страница 99: ...IPoE with NAT and PPPoE services In the main window a QoS Queue Management Configuration window will be displayed Figure 5 109 QoS is disabled by default it must be enabled by selecting the Enable QoS...

Страница 100: ...ue Figure 5 113 STEP 1 Enter the QoS queue name STEP 2 Select Enable Disable from the Enable selection combo box a queue configured as disable can be later on enabled at the current QoS queue configur...

Страница 101: ...5 111 Advanced Setup Quality of Service QoS Queue Setup Figure 5 112 Advanced Setup Quality of Service QoS Queue Configuration Figure 5 113 Advanced Setup Quality of Service QoS Queue enable example...

Страница 102: ...classification rule Figure 5 113 not all the configuration fields are mandatory STEP 1 Enter the Traffic class name STEP 2 Select the rule order from the selection combo box STEP 3 Select the rule sta...

Страница 103: ...the initial window showing the current QoS Classification configuration Figure 5 117 Figure 5 115 Advanced Setup Quality of Service QoS Classification Setup window Figure 5 116 Advanced Setup Quality...

Страница 104: ...6 8 Routing Selection of Advanced Setup submenu item Routing will display a Routing submenu with six items Figure 5 119 Default Gateway Static Routing BGP Policy Routing RIP OSFP In the main window a...

Страница 105: ...ved by removing all from the Se lected Default Gateway Interfaces list and adding them back in the desired order Available Routed WAN Interfaces all defined available routed WAN interfaces are listed...

Страница 106: ...splayed Figure 5 122 A short on line help text is provided in the configuration window In order to configure the new static route Figure 5 121 STEP 1 Select the IP version from the selection combo box...

Страница 107: ...er Figure 5 124 STEP 1 Select the Enable BGP option STEP 2 Type in the Autonomous System Number STEP 3 Type in the Router ID optional To finalize the BGP Router configuration use the Apply Save button...

Страница 108: ...must have the following information on the Network parameters Network IP Address Network Mask In order to configure the Networks to announce the at the networks configuration table Figure 5 124 STEP 1...

Страница 109: ...EN 109 Figure 5 124 Advanced Setup Routing BGP Configuration window Figure 5 125 Device Info Route information window example of BGP routes announced...

Страница 110: ...is provided in the configuration window In order to configure the new Policy Routing rule Figure 5 127 STEP 1 Enter the policy name STEP 1 Select the Physical LAN port from the selection combo box ST...

Страница 111: ...rom the combo box If the selected interface has NAT enabled the only operation mode that can be configured is Passive STEP 3 At the column enabled select the Enabled checkbox To finalize the RIP confi...

Страница 112: ...guration In order to remove an OSPF configuration from the table STEP 1 For the OSPF configuration to remove select the checkbox under the remove column STEP 2 Use the Remove button the selected OSPF...

Страница 113: ...n example 5 6 9 DNS Selection of Advanced Setup submenu item DNS will display a DNS submenu with two items Figure 5 131 DNS Server Dynamic DNS In the main window a DNS Server Configuration window will...

Страница 114: ...ailable WAN Interfaces all defined available WAN interfaces are listed here these interfaces can be moved to the Selected DNS Server interfaces list Figure 5 132 provides a DNS Server Configuration ex...

Страница 115: ...rovided in the configuration window To insert and configure a new Dynamic DNS entry use the Add Button Figure 5 133 a new window is displayed Figure 5 134 A short on line help text is provided in the...

Страница 116: ...se the Apply Save button The next displayed window is the initial window showing the current Access Dynamic DNS configuration Figure 5 135 Figure 5 133 Advanced Setup DNS Dynamic DNS Configuration win...

Страница 117: ...with NAT enabled Figure 5 136 Advanced Setup UPnP Configuration Window 5 6 11 DNS Proxy Selection of Advanced Setup submenu item DNS Proxy will display a DNS proxy Configuration window Figure 5 137 To...

Страница 118: ...ace and desired LAN interfaces An on line help on interface grouping is available at the configuration window Figure 5 140 provides an interface grouping example In order to setup an interface groupin...

Страница 119: ...ow is initial window the Advanced Setup Interface grouping initial window showing the current configuration Figure 5 142 1 2 5 6 Figure 5 140 Advanced Setup interface grouping configuration window Set...

Страница 120: ...configuration 5 6 14 IP Tunnel Selection of Advanced Setup submenu item IP Tunnel item will display an IP Tunnel submenu with two items Figure 5 143 IPv6inIPv4 IPv4inIPv6 In the main window an IP Tunn...

Страница 121: ...the selection combo box Note Currently only 6RD configuration is supported STEP 3 Select the Associated WAN interface to use from the selection combo box STEP 4 Select the Associated LAN interface to...

Страница 122: ...ling 6in4 Tunnel Add Tunnel Conf iguration window Figure 5 146 Advanced Setup IP tunnel IP Tunneling 6in4 Tunnel Add Tunnel Configuration window example Figure 5 147 Advanced Setup IP tunnel IP Tunnel...

Страница 123: ...ntry Figure 5 149 STEP 1 Type in the Tunnel Name STEP 2 Select the Mechanism to use from the selection combo box Note Currently only DS Lite configuration is supported STEP 3 Select the Associated WAN...

Страница 124: ...d button The Apply button will finalize the power management configuration Refresh button allows the updating of module power consumption status that can be consulted by selecting the module respectiv...

Страница 125: ...cast dafault configuration values just go to the bottom of the window and use the Apply Save to finalize the configuration Otherwise if other than default values should be used for the multicast confi...

Страница 126: ...ation window In order to configure Wireless LAN interface basic features STEP 1 To Enable the Wireless LAN interface select the Enable Wireless checkbox STEP 2 To Enable the Wireless Hotspot 2 0 e sel...

Страница 127: ...STEP 11 At the wireless guest virtual Access Points configuration table use the checkboxes to configure Virtual access points To finalize the configuration use the Apply Save button at the bottom of...

Страница 128: ...cation Method from the selection combo box Figure 5 156 STEP 4 At the WEP encryption selection combo box select Disabled Figure 5 155 to disableWEP encryption in this case configuration is complete us...

Страница 129: ...EP 1 Select Enabled from the WPS selection combo box STEP 2 To use Add Client feature available only for WPA PSK WPS1 Select the desired option use STA PIN use AP PIN by selecting the corresponding ch...

Страница 130: ...configuration use the Apply Save button at the bottom of the window Figure 5 158 Wireless Security configuration window WPS Setup configuration Figure 5 159 Wireless Security configuration window WPS...

Страница 131: ...corresponding checkbox STEP 3 If disabled selected the configuration is finalized STEP 4 If allow or deny selected MAC addresses to be filtered must be entered at the MAC address table Note If Allow o...

Страница 132: ...d set the fragmenta tion threshold set the RTS threshold set the wake up interval for clients in power save mode set the beacon interval for the access point set the Xpress mode and set whether short...

Страница 133: ...less Authentication Stations configuration window 5 8 Voice Configuration of Voice on the Refs 769501 769502 requires an IPoE service on the WAN interface to be used for VoIP To create an IPoE service...

Страница 134: ...m the selection combo box To finalize the configuration use the Apply button at the bottom of the window Using the Start SIP client button will unregister the SIP accounts as can be seen by consulting...

Страница 135: ...lect the corresponding checkbox STEP 6 If Use SIP Outbound Proxy selected configure SIP Outbound Proxy to use by entering SIP Outbound Proxy SIP Outbound Proxy Port STEP 7 To Use SIP Registrar select...

Страница 136: ...om the respective selection combo boxes To finalize the configuration use the Apply button at the bottom of the window To make effective the configuration just done use the Start SIP client button Fig...

Страница 137: ...the respective Checkbox Activation instructions for the enabled feature are provided at the column Activation Instructions STEP 2 Type in the Registration Expire Timeout Note Changing this parameter f...

Страница 138: ...sic Server IP address Note Changing this parameter for one service provider affects all other service providers In order to configure a Music Server STEP 12 Type in the Music Server Port Note Changing...

Страница 139: ...EN 139 Figure 5 169 Voice SIP Advanced Settings Service Provider configuration window 1 Figure 5 170 Voice SIP Advanced Settings Service Provider configuration window 2...

Страница 140: ...ers STEP 2 Type in the SIP log server port Note Changing this parameter for one service provider affects all other service providers Configure line debug option at the Line table STEP 3 To enable VAD...

Страница 141: ...e failed test Rerun diagnostic tests button allows running the tests and for confirmation of the persistence of the fail result The window will be updated with the results of the Diagnostics tests rer...

Страница 142: ...5 173 Management Submenu 5 10 1 Settings Selection of Management Submenu item Settings will display a Settings submenu Figure 5 174 with four items Backup Update Restore Default In the main window a...

Страница 143: ...5 175 Management Settings Backup window 5 10 1 2 Update Selection of Management Settings submenu item Update will display a Tools Update Settings window Figure 5 176 A short on line help text is prov...

Страница 144: ...ault Settings button Figure 5 177 Management Settings Tools Restore Default Settings window 5 10 2 System Log Selection of Management menu item System Log will display a System Log window Figure 5 179...

Страница 145: ...vided in the window In order to configure System Log options STEP 1 To enable System Log select the Log Enable checkbox Figure 5 180 STEP 2 Select the Log Level from the respective selection combo box...

Страница 146: ...146 GPON ONT Figure 5 181 Management System Log Configuration window Display level options Figure 5 182 Management System Log Configuration window Mode level options...

Страница 147: ...184 A short on line help text is provided in the window This window allows viewing and resetting Security Log In order to view Security Log use the View button Figure 5 184 A window will display show...

Страница 148: ...t configuration example In order to Configure TR 069 Client Figure 5 187 STEP 1 Configure Inform Option to be Disabled or Enabled by selecting the respective Checkboxes STEP 2 Type in Inform Interval...

Страница 149: ...TEP 9 Type in the Connection Request User Name STEP 10 Type in Connection Request Password STEP 11 Type in Connection Request URL This URL is the selected WAN interface URL with port and serial number...

Страница 150: ...Configure Internet Time Settings Figure 5 189 STEP 1 Configure Automatically Synchronize with Internet Time Servers by selecting the respective Checkbox STEP 2 Select First NTP Time Server Option from...

Страница 151: ...EN 151 Figure 5 189 Management Internet Time Time settings window Figure 5 190 Management Internet Time Time settings window NTP server options...

Страница 152: ...ons 5 10 6 Access Control Selection of Management Submenu item Access Control will display an Access Control submenu Figure 5 192 with one item Passwords In the main window an Access Control Passwords...

Страница 153: ...ount for maintenance and diagnostics purposes User account to view Refs 769501 769502 configurations and statistics and update Refs 769501 769502 software NOTE Only an admin user can view set up user...

Страница 154: ...he window To Reboot the Refs 769501 769502 use the button Reboot Figure 5 195 Management Reboot window 5 11 Logout Selection of menu item Logout Figure 5 196 will allows ending the user account sessio...

Страница 155: ...ply OFF A2 to A5 2 ETHERNET ON With Ethernet connection green OFF No Ethernet connection Flashing Ethernet IN OUT activity green A6 A7 2 VOIP ON Service configured and authenti cated green OFF Service...

Страница 156: ...and AUTH A11 LEDS reflects the various states that the Refs 769501 769502 is in during the process of configuration and communication with the OLT Optical Line Terminal Refs 769501 769502 Status LED S...

Страница 157: ...way s WAN port and not for example to a LAN port Change the ETHERNET cable GPON LINK A10 OFF Anomaly in the optical fibre signal Check that the optical cable is correctly inserted in both the Refs 769...

Страница 158: ...he avail able interfaces that can be used Note that when there is more than one mandatory argument all of those arguments must be fulfilled even if the user wants to type in one of them The show comma...

Страница 159: ...command permissions 7 2 1 2 bridge sub node 7 2 1 2 1 create command Name create Description Creates a new bridging service Full path wan bridge create Arguments MANDATORY interface WAN L2 Interface O...

Страница 160: ...L 0 255 tunnel ip Tunnel IP tunnel mask Tunnel mask Table 7 4 create command information 7 2 1 3 2 remove command Name remove Description Removes an existing GRE service Full path wan gre remove Argum...

Страница 161: ...ork Protocol ipv4 ipv6 dual IPv4 by default mld MLD Multicat Proxy enable disable disable by default mld mcast src MLD Multicast Source enable disable disable by default nat NAT enable disable disable...

Страница 162: ...enable disable disable by default igmp IGMP Multicat Proxy enable disable disable by default igmp mcast src IGMP Multicast Source enable disable disable by de fault ipv4 add Static IPv4 Address ipv6 a...

Страница 163: ...iguration of the available Ethernet LAN ports lan config show interfaces config show static lease create remove show vlan create remove show Figure 7 2 lan node tree 7 2 2 1 Permissions Command Admin...

Страница 164: ...t igmp snoop IGMP Snooping enable disable enable by default ip add IP address 192 168 1 1 by default lan to lanMcast IGMP LAN to LAN Multicast enable disable disable by default lan2 Secondary Server f...

Страница 165: ...le 7 12 config command information 7 2 2 4 static lease sub node 7 2 2 4 1 create command Name create Description Creates a new entry on the static IP lease list Full path lan static lease create Argu...

Страница 166: ...mation 7 2 2 5 2 remove command Name remove Description Removes an existing entry on the LAN VLAN list Full path lan vlan remove Arguments MANDATORY interface LAN interface OPTIONAL id Table Entry ID...

Страница 167: ...Yes Yes lan virtual servers show Yes Yes Yes Table 7 17 nat node and sub node tree command permissions 7 2 3 2 dmz host sub node The Refs 769501 769502 will forward IP packets from theWAN that do not...

Страница 168: ...in the Router s firewall be opened for access by the remote parties PortTrigger dynamically opens up the Open Ports in the firewall when an application on the LAN initiates a TCP UDP connection to a r...

Страница 169: ...identified by Protocol and External port to the Internal server with private IP address on the LAN side The Internal port is required only if the external port needs to be converted to a different po...

Страница 170: ...ernal Port End Table 7 24 remove command information 7 2 4 dns node This node allows a user to configure the DNS Domain Name Server server as well as the the DNS proxy and the dynamic DNS service prov...

Страница 171: ...dns server config Arguments OPTIONAL dns primary Primary DNS server dns secondary Secondary DNS server dns server DNS server interfaces list intf1 intfN dnsv6 primary Primary IPv6 DNS server dnsv6 sec...

Страница 172: ...DNS provider DynDNS org TZO username Username Table 7 28 create command information 7 2 4 4 2 remove command Name remove Description Removes an existing entry Full path dns dynamic remove Arguments MA...

Страница 173: ...show Yes Yes No qos queue create Yes Yes No qos queue remove Yes Yes No qos queue show Yes Yes No Table 7 30 qos node and sub node tree command permissions 7 2 5 2 config command Name config Descripti...

Страница 174: ...l or 3 name Name OPTIONAL conform action Conforming Action Null DSCP Null by default dscp DSCP Mark excess burst size Excess Burst Size bytes non conform action Nonconforming Action Null Drop DSCP Nul...

Страница 175: ...dence Queue Precedence lower value higher priority 1 8 sched alg Scheduler Algorithm Strict Priority SP Weighted Round Robin WRR OPTIONAL min rate Minimum Rate 1 100000 Kbps 1 indicates no shaping 1 b...

Страница 176: ...rt must be available in the next versions voice restore default show start stop sip config show account0 config show account1 config show Figure 7 6 voice node tree 7 2 6 1 Permissions Command Admin S...

Страница 177: ...by default proxy port SIP Proxy Port 5060 by default registrar SIP Registrar hostname IP 0 0 0 0 by default registrar port SIP Registrar Port 5060 by default Table 7 37 config command information 7 2...

Страница 178: ...ree 7 2 7 1 Permissions Command Admin Support User security ip filtering incoming create Yes No No security ip filtering incoming remove Yes No No security ip filtering incoming show Yes No No securit...

Страница 179: ...ing create Arguments MANDATORY dest ip Destination IP address dest port Destination port interfaces WAN Interfaces configured in Routing mode and with firewall enabled and LAN interfaces ALL or intf1...

Страница 180: ...ess dest port Destination port ip version IP version IPv4 IPv6 name Filter name protocol Protocol TCP UDP TCP UDP ICMP src ip Source IP address src port Source port Table 7 42 create command informati...

Страница 181: ...s system default gateways but only one will be used according to the priority with the first being the highest and the last one the lowest priority if the WAN interface is connected 7 2 8 2 1 config c...

Страница 182: ...ic Metric Table 7 46 config command information 7 2 8 3 2 remove command Name remove Description Removes an existing static route Full path routing static route remove Arguments MANDATORY dest ip Dest...

Страница 183: ...on 1 2 3 2 by default mld fast leave MLD Fast Leave enable disable enable by default mld last member query int MLD Last Member Query Interval 10 by default mld max groups MLD Maximum Multicast Groups...

Страница 184: ...e 7 11 arp node tree 7 2 11 1 Permissions Command Admin Support User arp show Yes Yes Yes Table 7 51 arp node command permissions 7 2 12 device info node This node displays general info about the devi...

Страница 185: ...n Support User statistics lan reset Yes Yes Yes statistics lan show Yes Yes Yes statistics optical reset Yes Yes Yes statistics optical show Yes Yes Yes statistics wan reset Yes Yes Yes statistics wan...

Страница 186: ...g command Name config Description Configures UPnP Full path upnp config Arguments MANDATORY enable Enable UPnP yes no Table 7 56 config command information 7 2 16 intf grouping node Interface Grouping...

Страница 187: ...ts With the following DHCP Ven dor ID 1 vendor id2 Automatically Add Clients With the following DHCP Ven dor ID 2 vendor id3 Automatically Add Clients With the following DHCP Ven dor ID 3 vendor id4 A...

Страница 188: ...oftware Yes Yes No management access control change pw Yes Yes Yes management access control new users create Yes Yes No management access control new users remove Yes Yes No management access control...

Страница 189: ...e software Description Updates software Full path management update software Arguments MANDATORY sw image Software image name tftp server ip TFTP server IP address Table 7 63 update software command i...

Страница 190: ...h management access control new users create Arguments MANDATORY password Password permissions level Permissions level admin support user username User name Table 7 65 create command information 7 2 1...

Страница 191: ...uthentication Mode MD5 SHA MD5 by default auth passphrase SNMPv3 Authentication Passphrase password by default auth trap SNMPv3 Authentication Trap Enable Disable Disable by default permissions SNMPv3...

Страница 192: ...face veip0 vlan 11 pbit 0 tpid 0x8100 nat enable nat masquerade enable dhcp client enable cli routing defaultgw config default mode WAN default list veip0 2 STEP 2 To view the current interface config...

Страница 193: ...oice on the Refs 769501 769502 you must be logged in as admin or support user STEP 1 Voice basic settings configuration example sequence cli voice sip config outbound proxy 192 168 126 50 outbound pro...

Страница 194: ...0 Transport UDP RegExpires 0 RegRetryInterval 20 DSCPMark 46 Registrar Addr 192 168 126 50 Registrar Port 5060 Proxy Addr 192 168 126 50 Proxy Port 5060 OutBoundProxy Addr 192 168 126 50 OutBoundProxy...

Страница 195: ...ng on CFWDNum CallFwdAll off CallFwdBusy off CallFwdNoans off AnonymousOutgoingCall on AnonymousCallRcvBlock off DoNotDisturb off CallCompOnBusy off SpeedDial off WarmLine off WarmLineNum CallBarring...

Страница 196: ......

Отзывы: