


2019 © Copyright, Televés S.A.
Quick configuration
Technical specifications
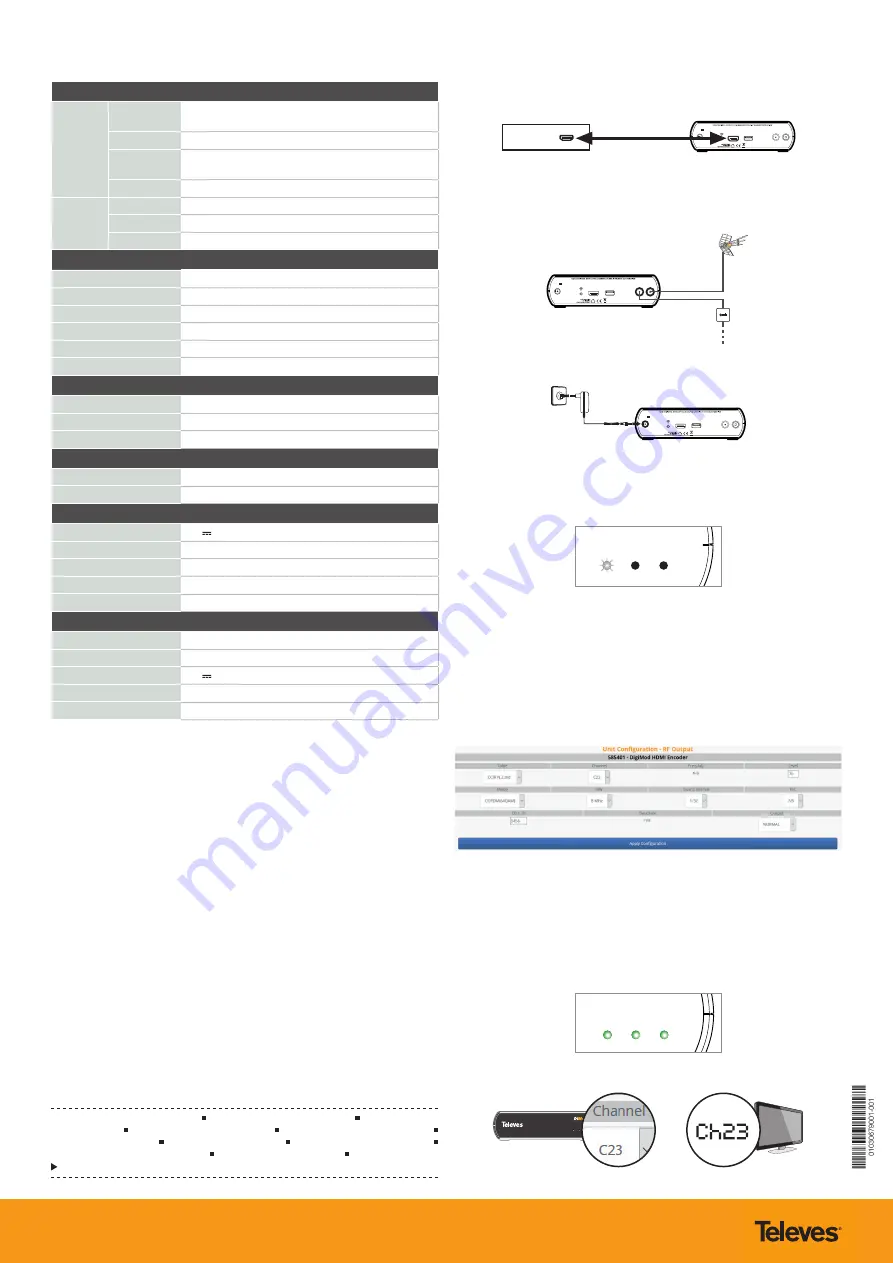
1.
Connect the HDMI video source (STB) to the unit HDMI input.
USB IN
FW UPDATE
RF OUT
RF IN
OFF/ON
Ref. 585401
HDMI
Fuse:
T 2A L 250V
Power
DC-In 12V
Imax = 800 mA
STB
HDMI
2.
Connect the unit RF output to the distribution network. Use loop if necessary
to combine the unit output with other signals in the distribution network.
Connect a load in the loop input if not used.
USB IN
FW UPDATE
RF OUT
RF IN
OFF/ON
Ref. 585401
HDMI
Fuse:
T 2A L 250V
Power
DC-In 12V
Imax = 800 mA
3.
Connect power source to the unit and mains.
USB IN
FW UPDATE
RF OUT
RF IN
OFF/ON
Ref. 585401
HDMI
Fuse:
T 2A L 250V
Power
DC-In 12V
Imax = 800 mA
4.
Turn video source on (STB).
5.
Check the wifi network is on (flashing “Power” LED). If not, press “wifi” button.
Switches off after 30 minutes inactive.
Input
Output
Power
6.
Connect with a PC/tablet/mobile to the unit wifi network (“DiMod_XXXXXX”).
The network name is printed on the unit label with the serial number. The
wifi network password is “TelevesDiMod”.
7.
Once connected to the network, open a browser and go to the URL
“http://172.31.0.1”, or “dimod.local” or “dimod”, to log into the encoder
configuration web interface (login: “encoder”, password: “encoder”). Users
canchange the password.
8.
Configure desired parameters.
IMPORTANT
: Select a free channel/frequency from the distribution network
for the unit RF output.
9.
APPLY CONFIGURATION
. There is no need to apply the configuration after
each change, you can apply it at the end from any section. The web will warn
you if data will be lost when you change section.
10.
Check that the three LEDs are green. If any are not, check configuration,
video source, etc.
Input
Output
Power
11.
Tune TVs to access the channel generated by the unit.
Input
Output
Power
HD Digital Encoder/Modulator
Input
Output
Power
HD Digital Encoder/Modulator
Input
Output
Power
HD Digital Encoder/Modulator
Encoder
Video
Coding
MPEG2, H264 Auto, H264-High, H264 4.2, H264 5.0 or
H264 5.1
Interface
1 x HDMI
Output
resolution
Auto (no rescale), 1080pHR (rescale 1080p50/60 to
1080p25/30), 1080i, 720p, 576p, 576i, 480p, 480i
Bit rate
2 ... 50 Mbps
Audio
Interface
1 x HDMI
Sample rate
44.1 or 48 kHz
Bit rate
96 ... 384 kbps
Modulator
Standard
DVB-T COFDM and DVB-C QAM
Modulation
COFDM/QAM A
Frequency steps
125KHz, 166KHz or 250KHz
Frequency range
46 ... 862MHz (1KHz steps)
RF output level
60 ... 80 dBµV
RF loop
5 ... 900 MHz
USB
File system
FAT 32 - High Speed 2.0 (*)
Recommended memory
32 GB (USB pen drive)
Video play
“video.ts” files only (in USB root)
System
Management
Wifi interface 802.11 b/g
FW update
USB
General
Power
12V 1.5A
Consumption
< 1.1A
Dimensions
165 x 129 x 45mm
Weight
500g
Operating temp.
0 ... 30 ºC
Network adapter
Input voltage
100-240V~ 50/60Hz
Input current
600mA
Output voltage
12V 1500mA
Dimensions
100 x 48 x 67mm
Weight
160 g
(*)
Televés does not guarantee full compatibility with all USB devices. Televés recommends using quality USB
devices.
DECLARACIÓN DE CONFORMIDAD DECLARATION OF CONFORMITY DECLARAÇÃO DE
CONFORMIDADE DECLARATION DE CONFORMITE DICHIARAZIONE DI CONFORMITÀ
DEKLARACJA ZGODNOŚCI
KONFORMITÄTSERKLÄRUNG
ΠΙΣΤΟΠΟΙΗΤΙΚΟ ΣΥΜΜΟΡΦΩΣΗΣ
FÖRSÄKRAN OM ÖVERENSSTÄMMELSE
ДЕКЛАРАЦИЯ СООТВЕТСТВИЯ
بيان المطابقة
https://doc.televes.com
Loop video play (USB):
1. Generate file named “video.ts” using the TScreator application. (Bit rate 2-50
Mbps).
2. Save file in USB pen drive root directory.
3. Insert USB in encoder.
4. The file will play automatically on the programmed channel. To stop playback,
remove pen drive or turn encoder off.
Updating equipment:
1. Download FW file from the Televés website.
2. Unzip and save file (“update.ufw”) in the USB pen drive root directory.
Note
: the file will be deleted after updating.
3. Insert USB in encoder.
4. Wait for the encoder to reset.
5. Check that the encoder has been updated correctly on the web interface.
Update fail:
Emergency mode
Equipment enters emergency mode to protect from an update fail. To show this,
the Power LED will be fixed green, and Input and Output will flash orange. To
restore equipment, return to step 1 above.


