background image

English

   - 60 -

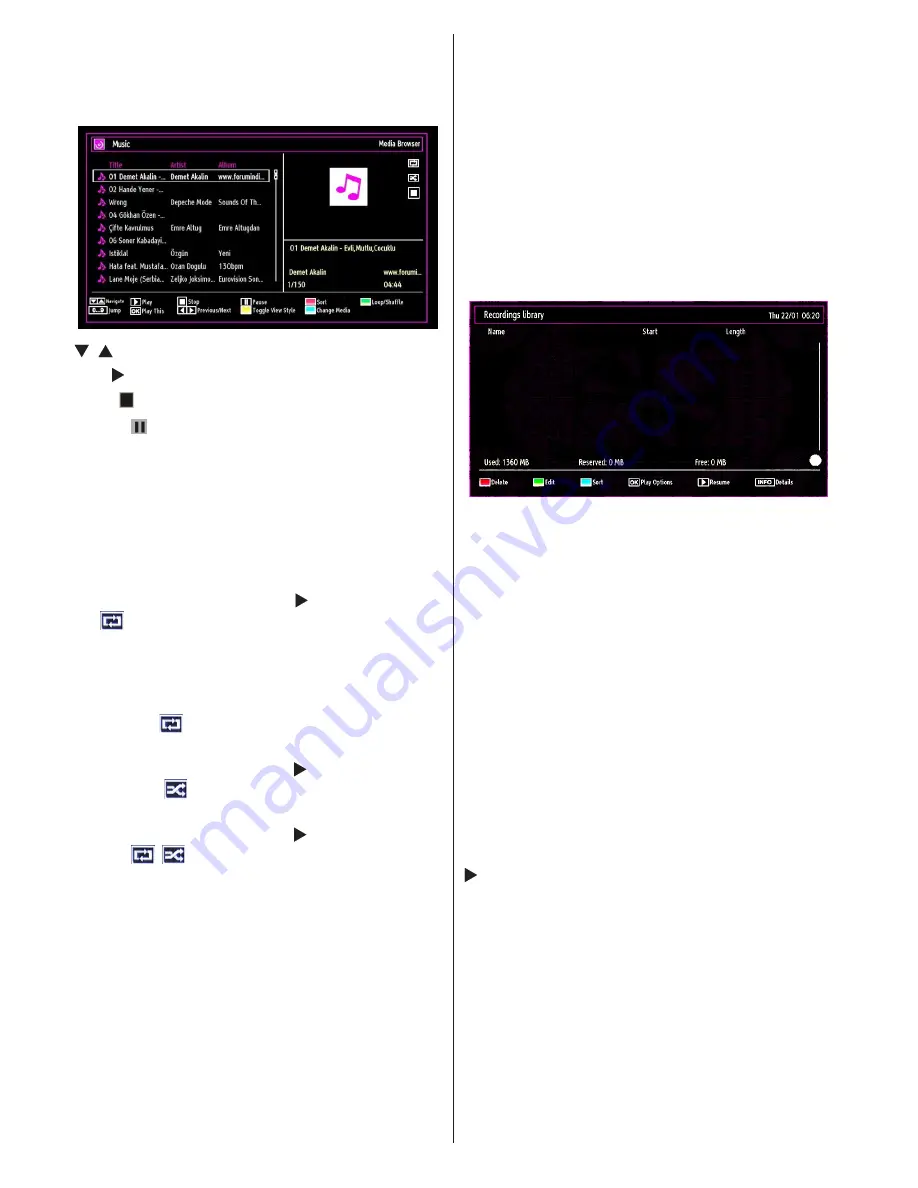
Playing Music via USB 

When  you  select  Music  from  the  main  options, 

available audio files will be filtered and listed on this 

screen.

/   : Navigate menu

Play   button): 

Starts the playback.

Stop (  button)

 : Stops playback.

Pause (  button)

 : Pauses the selected playback.

RED  

button: Sorts files by Title,Artist or Album.

Loop/Shuffle (GREEN button)

: Press once to disable 

Loop. Press again to disable both Loop and Shuffle. 

Press once more to enable only Shuffle. Press again 

to enable all. You can follow the disabled functions 

with the change of the icons.
Note:
If you start the playback with the   button and activate 
the 

 symbol, the TV will play the next music/video 

file. The playback will proceed accordingly and when 

the end of the list is reached, it will be played again 

from the beginning (loop function).
If  you  start  the  playback  with  the  OK  button  and 
activate the 

 symbol, the same music or video file 

will be played in a loop (repeat function).
If  you  start  the  playback  with    or  OK  button  and 
activate the 

 symbol, music or video file will be 

played in a shuffle.

If  you  start  the  playback  with    or  OK  button  and 
activate 

 symbols, music or video file playback 

will continue randomly and the random playback will 

continue.

0..9  (Numeric  buttons):

  The  TV  will  jump  to  the 

file starting with the letter you input via the numeric 

buttons on your remote control.

Play This (OK button)

 : Plays the selected file.

Previous/Next  (Left/Right  buttons)

  :  Jumps  to 

previous or next file to play.

Yellow 

Button: Change viewing style

BLUE:

 Changes media options.

Note:

 If the Viewing Style is set to Folder in Media 

Browser Settings, Music folder will be displayed as 

sorted  and  there  is  no  need  to  sort  files  again  by 

pressing FAV button.

INFO

: Changes filter options.

Recordings Library

IMPORTANT: To view recordings library, you should 

first connect a USB disk to your TV while the TV is 

switched  off. You  should  then  switch  on  the  TV  to 

enable recording feature. Otherwise, recording feature 

will not be available.

To  view  the  list  of  recordings,  select  “

Recordings 

Library

” and press the 

OK

 button. Recordings Library 

will then be displayed with available recordings.

All the recordings are kept in a list in the recordings 

library. 

RED  button  (Delete)

:Erases  the  selected 

recording.

GREEN  button  (Edit)

:  Makes  changes  on  the 

selected recording.

BLUE  button  (Sort)

:  Changes  the  order  of  the 

recordings.  You  can  select  from  a  wide  range  of 

sorting options.

OK button

: Activates play options menu:

•  Play  from  start:  Plays  the  recording  from  the 

beginning.

• Resume: Recommences the recordings.
• Play from offset: Specifies a playing point.

Note: Viewing main menu and menu items will not ve 

available during the playback.

 (Resume): Recommences the recordings.

INFO  (Details)

:  Displays  the  short  extended 

programmes in detail.

Содержание TFL2201MDV

Страница 1: ...22 Wide Screen LCD DIGI TV TFL2262B12 MODE D EMPLOI OPERATING INSTRUCTIONS TELEVISEUR COULEUR A TELECOMMANDE COLOUR TELEVISION WITH REMOTE CONTROL 22 22...

Страница 2: ...www vestel france fr...

Страница 3: ...matique de cha nes 17 R glage manuel 17 Recherche manuelle 17 Recherche manuelle analogique 17 R glage fin analogique 18 Effacer la liste des cha nes 18 Gestion des cha nes Liste des cha nes 18 Foncti...

Страница 4: ...tre intitul CONSIGNES DE SECURITE Veuillez conserver ce manuel pour une utilisation ult rieure Au moment de vendre ou de donner cet appareil quelqu un il est absolument important de l accompagner de c...

Страница 5: ...n que ce soit Chaleur et flammes L appareil ne doit pas tre plac c t de flammes nues ou de sources de chaleur l exemple d un radiateur Assurez vous qu aucune source de flamme vive telles que des bougi...

Страница 6: ...sque Une pression sonore excessive provenant des couteurs et du casque peut provoquer une perte auditive Installation Pour viter toute blessure cet appareil doit tre solidement fix au mur conform ment...

Страница 7: ...SWAP SOURCE C DISP SEARCH MODE INFO CH V T l commande T l viseur LED PILES NON INCLUSES Manuel d utilisation 1 X C ble de connexion Vid o Audio Remarque Vous devez v rifier les accessoires apr s avoir...

Страница 8: ...euillez mettre le t l viseur hors tension et le d brancher du secteur lorsque vous ne vous en servez pas Cette bonne pratique vous permet aussi d conomiser de l nergie D branchez l appareil du secteur...

Страница 9: ...e Liste en mode EPG 20 S lectionner D s lectionner tout dans la liste des Favoris Lecture Diaporama Dans le navigateur m dia S lection du mode image Change le mode 21 Image en mode vid o du Navigateur...

Страница 10: ...llustr ci dessous Entr e ou sortie P RITEL pour p riph riques externes Connecter le c ble P ritel entre la prise P ritel de la 3 TV et la prise P ritel de votre appareil externe comme un d codeur un m...

Страница 11: ...ible travers cette entr e USB Vous avez la possibilit de raccorder les lecteurs de disque dur cette entr e L entr e de branchement lat ral audio vid o sert connecter les signaux vid o et 3 audio de p...

Страница 12: ...en formater le contenu Reportez vous la section Formater le disque dans les pages ci apr s pour de plus amples informations relatives au formatage du disque Veuillez noter que TOUTES les donn es cont...

Страница 13: ...m moris s dans le disque USB Si vous le souhaitez vous pouvez sauvegarder copier les enregistrements sur un ordinateur toutefois ces fichiers ne seront pas disponibles pour lecture sur un PC Vous pouv...

Страница 14: ...ourni Une fois le branchement effectu passez en source YPbPr Voir la section S lection d entr e Pour activer une connexion audio utilisez le c ble VGA audio du composant Tout d abord branchez l unique...

Страница 15: ...viseur en utilisant indiff remment les boutons de la t l commande et ceux du t l viseur Utilisation des boutons du t l viseur R glage du volume Vous pouvez d placer le commutateur vers le haut ou ver...

Страница 16: ...formations de l EPG en fonction du programme lin aire ENREGISTRER le t l viseur commencera enregistrerleprogrammes lectionn Vouspouvezappuyer nouveau pour mettre un terme l enregistrement Parcourir To...

Страница 17: ...ors de l utilisation du mode Enregistrement D cal Remarque Le t l viseur doit tre teint lors du branchement du p riph rique USB Dans le cas contraire l option d enregistrement d cal ne sera pas dispon...

Страница 18: ...si r gler les options Pays Langue du t l texte et Balayage des cha nes crypt es En appuyant sur le bouton ou s lectionnez le pays de votre choix et appuyez sur le bouton pour mettre l option Langue t...

Страница 19: ...onn et confirm la recherche automatique de cha nes le processus d installation commencera et la barre de progression commencera voluer Appuyez sur la touche MENU pour annuler le processus En pareille...

Страница 20: ...e des cha nes Vous pouvez modifier cette liste de cha nes configurer les favoris ou les stations actives inclure dans la liste en utilisant les options Liste de cha nes Pressez le bouton MENU pour aff...

Страница 21: ...n Verrouiller Appuyez sur la touche OK pour continuer Vous serez invit saisir le code de contr le parental Le mot de passe par d faut est 0000 Saisissez le code PIN Remarque Si l option Pays est d fin...

Страница 22: ...faut est 0000 Enter PIN Saisir PIN appara tra sur l cran Remarque Si l option Pays est d finie sur France vous pouvez utiliser le code par d faut 4725 Lecture de medias via navigateur m dia Si la cl U...

Страница 23: ...ouche VERTE Passe l heure Utiliser les touches num riques pour saisir l heure souhait e et appuyer nouveau sur la touche VERT pour continuer Jaune Ouvre le menu de correction de l heure du sous titre...

Страница 24: ...fichier de musique ou vid o se poursuivra de mani re al atoire et la lecture al atoire se poursuivra 0 9 Touches num riques Le t l viseur passe au fichier commen ant par la lettre que vous s lectionn...

Страница 25: ...nregistrement D cal Remarque Let l viseurdoit tre teintlorsdubranchement du p riph rique USB Dans le cas contraire l option d enregistrement d cal ne sera pas disponible Appuyez sur la touche PAUSE pe...

Страница 26: ...e de basculer d une diffusion ou d une source diff rente et d afficher le navigateur m dia Regarder les programmes enregistr s Dans le menu principal utilisez les touches ou pour s lectionner le navig...

Страница 27: ...urces HDMI YPbPr et DTV 16 9 Ceci tend uniform ment les c t s gauche et droit d une image normale format d image 4 3 pour remplir l cran de t l vision grand format Pour les images de format 16 9 qui o...

Страница 28: ...eut tre r gl sur l une de ces options Faible Moyen Haut ou D sactiv Advanced Settings Temp rature de couleur R gle le ton de la couleur d sir e Le param trage sur l option Cool Froid donne aux couleur...

Страница 29: ...l ic ne Son gr ce la touche ou Appuyez sur OK pour afficher le menu Param tres du son Fonctionnement des l ments du menu R glages sonores Appuyez sur le bouton ou pour s lectionner un l ment du menu...

Страница 30: ...cessaire d avoir un module d acc s conditionnel CAM Ce module doit tre ins r dans la fente CI de votre t l viseur Vous obtiendrez le module d acc s conditionnel CAM ConditionalAccessModule etlacartede...

Страница 31: ...ur l une des options Danemark Su de Norv ge ou Finlande le Menu Param tres linguistiques fonctionnera comme suit Param tres linguistiques Dans le Menu Configuration configuration Menu mettez en surbri...

Страница 32: ...our afficher le menu Minuteries appuyez sur la touche MENU et s lectionnez l ic ne Param tres gr ce la touche ou Appuyez sur OK pour afficher le menu Settings Param tres Utilisez le bouton ou pour s l...

Страница 33: ...oter que TOUTES les donn es contenues dans le disque USB seront perdues et le format du disque sera converti FAT32 si vous activez cette option Si vous souhaitez supprimer tous les fichiers contenus d...

Страница 34: ...source s lectionn e Les modifications sont m moris es automatiquement Remarque Vous pouvez recourir au mode YPbPr uniquement lorsque vous raccordez un appareil dot d une sortie YPbPr travers l entr e...

Страница 35: ...on il existe deux alternatives la premi re consiste appuyer sur le bouton et la seconde revient augmenter le niveau de volume S lection du mode image En pressant le bouton PRESETS vous pouvez modifier...

Страница 36: ...l antenne En cas d incertitudes veuillez contacter votre fournisseur Aucune image No Picture signifie que votre t l viseur ne re oit aucune transmission Avez vous appuy sur les boutons appropri s de...

Страница 37: ...HzA 15 1400x1050 60 HzB 16 1400x1050 75Hz 85Hz 17 1400x900 65Hz 75Hz 18 1600x1200 60 Hz 19 1680x1050 60 Hz 20 1920x1080 60 HzA 21 1920x1080 60 HzB 22 1920x1200 60HzA 23 1920x1200 60Hz Annexe B Compat...

Страница 38: ...00 56Hz 60Hz 70Hz 72Hz 75Hz 4 832x624 75 Hz 5 1024x768 60Hz 66Hz 70Hz 72Hz 75Hz 6 1152x864 60Hz 70Hz 75Hz 7 1152x870 75Hz 8 1280x768 60 HzA 9 1280x768 60 HzB 10 1280x768 75Hz 11 1280x960 60Hz 75Hz 12...

Страница 39: ...e red marrage 2 Recherche 3 00 H et mode de mise jour Si l option Recherche automatique du menu Options de mise jour est active le t l viseur se met automatiquement en marche 3 heures du matin et lanc...

Страница 40: ...G1 2 4 EAC3 AC3 mp4 MPEG4 Xvid 1 00 Xvid 1 01 Xvid 1 02 Xvid 1 03 Xvid 1 10 beta1 2 H 264 PCM MP3 avi MPEG2 MPEG4 PCM MP3 MAX 1920x1080 30P 20Mbit sec Xvid 1 00 Xvid 1 01 Xvid 1 02 Xvid 1 03 Xvid 1 10...

Страница 41: ...PAL 4 3 16 9 Audio MPEG Layer I II 32 44 148kHz Sp cifications T L DIFFUSION PAL SECAM B G D K K I I L L R CEPTION DE CANAUX VHF BANDE I III UHF BANDE U HYPERBANDE NOMBRE DE CANAUX PR R GL S 1000 INDI...

Страница 42: ...alogue Manual Search 56 Analogue Fine Tune 56 Clear Service List 56 Managing Stations Channel List 56 Operating the Channel List 57 Moving a Channel 57 Deleting a Channel 57 Renaming a Channel 57 Lock...

Страница 43: ...it away absolutely give these direction for use Thank you for choosing this product This manual will guide you for the proper operation of your TV Before operating the TV please read this manual thoro...

Страница 44: ...ke sure that the service technician has used replacement parts which are specified by the manufacturer or have the same specifications as the original one Unauthorized substitutions may result in fire...

Страница 45: ...t always recognize properly the possible dangers Batteries accumulators can be life threatening when swallowed Store batteries unreachable for small children In case of swallowing a battery medical a...

Страница 46: ...REEN PRESETS LANG FAV EPG SWAP SOURCE C DISP SEARCH MODE INFO CH V Remote Control LED TV Instruction Book 1 X Video Audio Connection Cable Note You should check the accessories after purchasing Make s...

Страница 47: ...Save Mode When the TV is not in use please switch off or disconnect the TV from the mains plug This will also reduce energy consumption Disconnect power when going away for longer time Note that annua...

Страница 48: ...ser mode 17 Play in Media Browser mode 18 Red button Stop in Media Browser 19 Green button List Schedule in EPG Tag 20 Untag All in favourite list Play Slideshow in Media Browser Picture mode selecion...

Страница 49: ...CART cable between SCART socket on TV and SCART socket on your external device such as a decoder a VCR or a DVD player Note If an external device is connected via the SCART socket the TV will automati...

Страница 50: ...ing video and audio signals of external devices To make a video connection you must use the supplied AV connection cable for enabling connection First plug singular jack of the cable to the TV s Side...

Страница 51: ...lug your USB disk while the TV is switched off Note If you are going to connect a USB hard disk drive to the TV set USB connection cable used between the disk drive and the TV should have a USB logo a...

Страница 52: ...aster programme and recording time Timeshifting may be stopped according to USB device write speed If the USB device speed is not enough for video stream bitrate timeshifting may be stopped and record...

Страница 53: ...g single jack of the cable to the TV Afterwards insert your DVD player s audio cable s connectors into the plural part of the VGA Component audio connection cable see illustration below Colours of the...

Страница 54: ...tion with the Buttons on the TV Volume Setting You can move the control switch upward or downward for changing the volume To increase volume please move the switch upward Move the switch downward to d...

Страница 55: ...Prev Day Displays the programmes of previous day Blue button Next day Displays the programmes of the next day TXT button Filter Views filtering options Numeric buttons Jump Jumps to the preferred cha...

Страница 56: ...ct Set Timer on Event option and press OK button You can set a timer for future programmes To cancel an already set reminder highlight that programme and press the OK button Then select Delete Timer o...

Страница 57: ...will search for both digital and analogue TV broadcasts Note You can press MENU button to cancel End of the search process Choose Region osd will be displayed on the screen if any multiple region vari...

Страница 58: ...h type as analogue you can use button to highlight an item and then press or button to set an option Enter the channel number or frequency using the numeric buttons You can then press OK button to sea...

Страница 59: ...e current character i e b character becomes a by and c by Pressing the numeric buttons 0 9 replaces the highlighted character with the characters printed above the button one by one as the button is p...

Страница 60: ...set to France you can use 4725 as the default code Media Playback Using Media Browser If the USB stick is not recognized after power off on or First Time Installation first plug the USB device out and...

Страница 61: ...ress OK to confim Press BLUE button for clear Press SWAP Exit button to switch back to previous menu Viewing Photos via USB When you select Photos from the main options available image files will be f...

Страница 62: ...e letter you input via the numeric buttons on your remote control Play This OK button Plays the selected file Previous Next Left Right buttons Jumps to previous or next file to play Yellow Button Chan...

Страница 63: ...k When the timeshift is reached timeshifting mode will be quitted and you will switch back to watching normal broadcast Press STOP button to quit timeshifting mode Similtaneous timeshifting recording...

Страница 64: ...be available You can use button to slow forward Pressing button consecutively will change slow forwarding speed Changing Image Size Picture Formats You can change the aspect ratio image size of the TV...

Страница 65: ...n to set an item Press MENU button to exit Picture Settings Menu Items Mode For your viewing requirements you can set the related mode option Picture mode can be set to one of these options Cinema Gam...

Страница 66: ...n Picture menu appears on the screen Contrast Brightness Colour Colour Temp and Picture Zoom settings in this menu are identical to settings defined in TV picture menu under Main Menu System Sound Set...

Страница 67: ...be louder than programmes Dynamic Bass Dynamic Bass is used to increase bass effect of the TV set Digital Out Sets digital out audio type Configuring Your TV s Settings Detailed settings can be config...

Страница 68: ...nge depending on the service provider Press MENU button and select the icon by using or button Press OK button to view Settings menu Use or button to highlight Conditional Access and press OK to view...

Страница 69: ...t an item by using or button Use or button to set an item Press OK button to view more options Menu Lock optional Menu lock setting enables or disables the menu access You can disable access to the in...

Страница 70: ...onfigure recording settings The following menu is displayed for recording configuration The following options are available for adjustments Start Early You set recording timer s starting time to start...

Страница 71: ...d Select Sources in the Settings menu and press OK button Press or buttons to select a source Use or button to enable or disable the selected source Changes are automatically stored Note YPbPr mode ca...

Страница 72: ...change Standby Search to Off this function will be unavailable To use Standby search please make sure that you select Standby Search as On If the Standby Search is set to On when the TV is in standby...

Страница 73: ...n power cable and connection to the mains socket outlet Poor Picture Have you selected the correct TV system Is yourTV set or house aerial located too close to a non earthed audio equipment or neon li...

Страница 74: ...HzB 16 1400x1050 75Hz 85Hz 17 1400x900 65Hz 75Hz 18 1600x1200 60 Hz 19 1680x1050 60 Hz 20 1920x1080 60 HzA 21 1920x1080 60 HzB 22 1920x1200 60HzA 23 1920x1200 60Hz Appendix B AV and HDMI Signal Compa...

Страница 75: ...oftware Upgrade item and press OK button to open Upgrade Options menu In Upgrade Options menu select Scan for upgrade and press OK button If a new upgrade is found it starts to download the upgrade A...

Страница 76: ...EAC3 AC3 mp4 MPEG4 Xvid 1 00 Xvid 1 01 Xvid 1 02 Xvid 1 03 Xvid 1 10 beta1 2 H 264 PCM MP3 avi MPEG2 MPEG4 PCM MP3 MAX 1920x1080 30P 20Mbit sec Xvid 1 00 Xvid 1 01 Xvid 1 02 Xvid 1 03 Xvid 1 10 beta1...

Страница 77: ...Video MP ML PAL 4 3 16 9 Audio MPEG Layer I II 32 44 148kHz Specifications TV BROADCASTING PAL SECAM B G D K K I I L L RECEIVING CHANNELS VHF BAND I III UHF BAND U HYPERBAND NUMBER OF PRESET CHANNELS...

Страница 78: ...50194045...

Отзывы: