background image

Operation

7

7

Operation

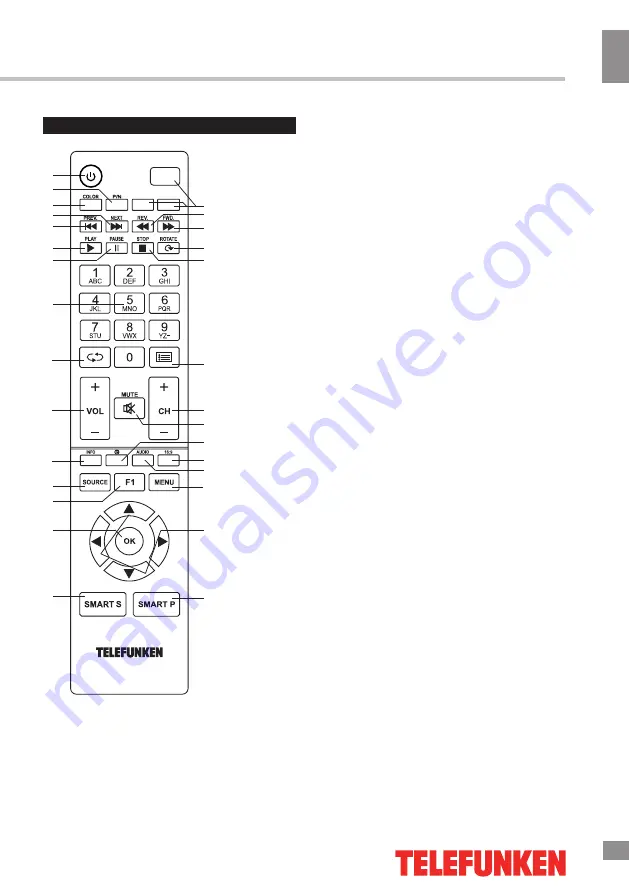
Remote controller (RC)

1. POWER button
2. P/N button
3. COLOR button
4. NEXT button
5. PREV. button

6. PLAY button
7. PAUSE button
8. Number buttons (Alphabetic function is 
unavailable for this model)
9. RETURN button
10. VOL+/VOL- buttons
11. INFO button
12. SOURCE button
13. F1 button
14. OK button
15. SMART S. button
16. SMART P. button 
17. Cursor (UP/DOWN/LEFT/RIGHT) buttons
18. MENU button
19. AUDIO button (option) 
20. 16:9 button
21. TIME button
22. MUTE button
23. CH+/CH- buttons
24. PROGRAM LIST button
25. STOP button
26. ROTATE button
27. FWD. button
28. REV. button
29. Buttons not operable

Changing the battery

1.  Remove the battery compartment cover 

on the back of the RC.

2.  Insert two AAA batteries into the battery 

compartment making sure that the correct 
polarity is observed.

3.  Install the cover back.
•  The RC should be pointed at remote 

sensor within 8 meters and within 30 degrees 
at the left or the right side.

•  Take the battery out of the RC if it is not 

used for a long time.

•  Do not mix new and used batteries or 

different types of batteries. Weak batteries can 
leak and severely damage the RC.

•  Do not expose the RC to shock, liquids, 

and do not place it in an area with high 
humidity.

1
2
3

4
5

6
7

8

9

10

11

12
13

14

15

16

17

18

19

20

21

22

23

24

25

26

27

28

29

Содержание TF-LED32S4

Страница 1: ...Table of contents 3 LED TV c TF LED32S4 Instruction manual...

Страница 2: ...Utilization of the product Important safeguards Connection Installation Stand installation Wall mounting Operation Control elements Front panel Back panel Remote controller RC Changing the battery Ge...

Страница 3: ...he input ports when the unit is unused for long periods of time When unplugging the plug always hold the wide slot do not touch the metal part and do not destroy refit twist pull or roast the power co...

Страница 4: ...onnected If you move this product with the power cord or the connection cable connected the damaged power cord connection cable or connection terminal may cause the fire the electric shock or breakdow...

Страница 5: ...hole centre Fasten the screw Wall mounting For wall mounting the back panel of this unit is equipped with 4 screw holes 4 mm diameter 200 mm horizontal spread distance x 100 mm vertical spread distanc...

Страница 6: ...ons 6 MENU button 7 STANDBY button 8 USB 1 port 9 USB 2 port 10 Antenna jack 11 SPDIF digital output 12 HDMI input 13 Headphone output 14 VGA input 15 Audio stereo input for Component video and for Co...

Страница 7: ...tton 27 FWD button 28 REV button 29 Buttons not operable Changing the battery 1 Remove the battery compartment cover on the back of the RC 2 Insert two AAA batteries into the battery compartment makin...

Страница 8: ...s SMART S button repeatedly to cycle through the available sound modes from the following types Standard Music Movie User Press INFO button to display the preset TV channel play information Press P N...

Страница 9: ...t output between left and right speakers Auto volume set the auto volume correction on off OSD setting OSD language OSD duration OSD transparency Blue screen Sleep time Recall Adjust Select Menu Exit...

Страница 10: ...tons Press 3 number button to set this channel for skipping USB operation Insert a USB into the USB jack Select USB source and press OK button The screen will show a USB playback window in which you c...

Страница 11: ...files Select next file All files Stop plabyack and return to previous menu All files Select repat playback mode All files Play music in background mode when photo or text file is being browsed you sh...

Страница 12: ...ound No audio signal or the signal cord is improperly not connected Connect the audio signal cord properly Set the sound system properly The RC does not work Batteries are improperly installed or exha...

Страница 13: ...SD Progressive scan 3D Digital comb filter Sleep timer Quantity of channels 199 Electric shock protection class I Nominal voltage range of the LED TV 100 240 V 50 60 Hz Power consumption of the LED TV...

Страница 14: ...14 14 USB 14 15 15 15 17 17 17 17 18 18 18 18 19 19 20 20 20 21 21 21 22 23 23 25 25 25 26 27...

Страница 15: ...15 15 220...

Страница 16: ...16 16 LCD 10 18 2...

Страница 17: ...17 17 RCA HDMI HDMI HDMI VGA VGA VGA 4 4 100 200...

Страница 18: ...18 18 1 1 1 SOURCE 2 CH CH 3 4 5 VOL VOL 6 MENU 7 STANDBY 8 USB 1 9 USB 2 10 11 SPDIF 12 HDMI 13 14 VGA 15 2 16 PC 17 Y 2 18 Pb Cb Pr Cr 19 20 1 2 4 6 3 5 8 9 10 11 12 13 14 15 16 17 18 19 20 7...

Страница 19: ...OL 11 INFO 12 SOURCE 13 F1 14 OK 15 SMART S 16 SMART P 17 UP DOWN LEFT RIGHT 18 MENU 19 AUDIO 20 16 9 21 TIME 22 MUTE 23 CH CH 24 PROGRAM LIST 25 STOP 26 ROTATE 27 FWD 28 REV 29 1 2 AAA 1 5V 3 c 8 30...

Страница 20: ...VOL TIME 0 240 RETURN 16 9 4 3 MUTE TV CH CH 0 9 SMART P SMART S INFO P N PAL NTSC SECAM COLOR F1 PROGRAM LIST AUDIO TV Nicam SOURCE CH CH TV AV1 AV2 YPbPr PC HDMI USB1 USB2 OK MENU 1 MENU 2 VOL VOL...

Страница 21: ...21 21 NTSC 4 3 15 60 0 240...

Страница 22: ...22 22 PAL SECAM NTSC I D K B G VOL MENU VOL VOL VOL VOL VOL MENU 1 4 7 2 5 8 3 6 9 1 2 3 OK Menu 1 MENU 2 MENU 3...

Страница 23: ...23 c USB USB USB USB OK USB OK USB USB 2 0 500 FAT16 FAT32 NTFS USB ASF AVI MKV MPG M2TS MP4 TS DIVX H264 MPEG 4 MPEGII MPEGI XVID AAC WMA MP3 USB 1 1 2 0 USB 500 USB USB USB USB BIN OK OK OK PLAY INF...

Страница 24: ...24 24 OK OK PAUSE STOP ROTATE REV FWD PREV NEXT...

Страница 25: ...25 25 VGA...

Страница 26: ...26 26 1 1 2 1 3 1 4 1 5 1 6 1 7 1...

Страница 27: ...27 27 32 81 9 1366 x 768 16 9 PAL SECAM B G DK I NICAM 2 x 8 YPbPr RCA x2 VGA HDMI SPDIF 3D 199 I 100 240 50 60 75 738 x 492 x 47 8 5 10 TF LED32S4_IM_03...

Отзывы: