Installation
5
5
Installation
Wall mounting
For wall mounting the back panel of this
unit is equipped with 4 screw holes. A VESA
wall-mount bracket should be used for wall
mounting (the bracket is not included and
should be acquired separately). Manufacturer
is not responsible for improper mounting
resulting in damage of the unit.
Due to construction peculiarities, it is not
recommended to mount TVs on walls using
swinging and tilting brackets. Such a mounting
may not be steady
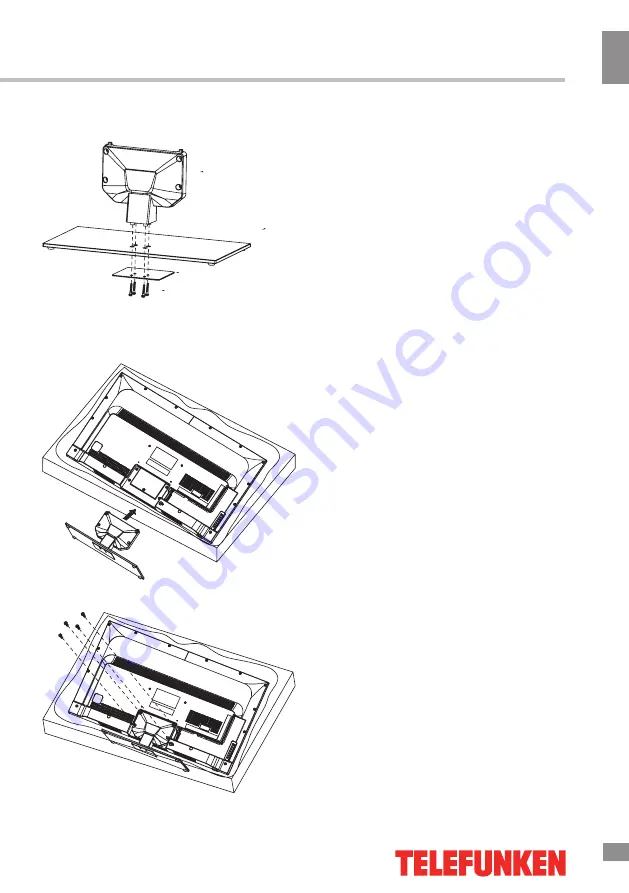
Base instalation (TF-LED40S13):
Connect the base and the stand with four
4x30 screws.
Next, align this assembly with the holes on
the back of the unit.
Fix with four M4x10 screws.
Содержание TF-LED32S13
Страница 1: ...Table of contents 3 LED TV c TF LED32S13 TF LED40S13 Instruction manual...
Страница 7: ...Installation 7 Installation...
Страница 17: ...17 15 USB 17 18 18 18 20 20 20 21 21 21 22 22 22 22 23 23 24 24 24 25 25 25 26 26 26 27 27 27 28 29 29 29 30 30...
Страница 18: ...18 16 220...
Страница 19: ...19 17 LCD 10 18 2...
Страница 20: ...20 18 TF LED32S13 4x16 4x30 M3 5X16 4x10 TF LED40S13 4 VESA...
Страница 26: ...26 24 DTV ATV DTV ATV DTV PVR PVR PVR Personal Video Record USB 10 20 30 60 90 120 180 240 4 6 8...
Страница 28: ...28 26 USB USB BIN OK OK OK INFO OK REPEAT EXIT...
Страница 29: ...29 27 VGA...


