background image

Français

   - 82 -

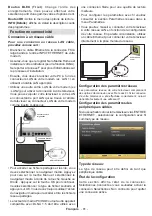
Connexion à un réseau sans fil (facultatif)

• You can also play content from your smartphone/

tablet device, located in your home network, using 

the DLNA/DMR feature of your television.

• 

Pour cela, votre téléphone cellulaire doit avoir un 

logiciel de partage approprié.

• 

If the connection is established correctly, you should 

now access the shared files of your device.

• Entrez dans le menu du navigateur média l’OSD 

de sélection de lecture du périphérique s’affichera. 

Sélectionnez l’identité de votre téléphone portable 

et appuyez sur OK pour continuer.

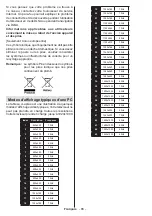
Remarque Cette fonction peut ne pas être prise en charge 

par certains téléphones portables.

Depannage du Connectivité

Utilisation du service du réseau DLNA

La norme DLNA (Digital Living Network Alliance) est 

un standard qui facilite le processus d’affichage des 

produits électroniques numériques et les rend plus 

pratiques à l’utilisation sur un réseau local. Pour de 

plus amples informations, rendez-vous sur le site 

www.dlna.org.
La norme DLNA vous permet d’afficher et de lire les 

photos, la musique et les vidéos mémorisées sur le 

serveur multimédia DLNA connecté à votre réseau 

domestique.

Etape 1: Installation de Nero Media Home

La fonction DLNA ne peut être utilisée si le programme 

du serveur n’est pas installé sur votre PC. Veuillez 

préparer votre PC avec le programme Nero Media 

Home fourni. Pour plus d’informations relatives à 

l’installation, veuillez vous reporter à l’appendice .

Etape 2: Connexion à un réseau câblé

Voir le chapitre Paramètres réseau pour des 

informations détaillées sur la configuration.  

Etape 3: Lecture de fichiers partagés à travers 

le navigateur média

Sélectionnez le navigateur multimédia en utilisant le 

bouton Gauche ou Droit du menu principal et appuyez 

sur le bouton OK. Le navigateur multimédia s’affiche. 
Le support DLNA est disponible uniquement avec le 

mode Dossier du navigateur multimédia. Pour activer 

le mode Dossier, allez dans l’onglet Paramètres de 

l’écran du navigateur multimédia principal et appuyez 

sur OK. Dans les options Settings, sélectionnez l’option 

Afficher le style et passez à Folder  en utilisant le bouton 

Gauche ou Droit . 

Veuillez  sélectionner  le  type  de  média  souhaité  et 

appuyer sur 

OK

.

Si  les  configurations  de  partage  sont  définies 

correctement, le message OSD suivant s’affiche après 

la sélection du type de support souhaité. Sélectionnez 

OK pour afficher le réseau choisi ou le contenu de la 

mémoire USB. Si vous souhaitez rafraîchir la liste 

des appareils, appuyez sur la touche 

VERTE

. Vous 

pouvez appuyer sur 

MENU

 pour quitter. 

Si des réseaux disponibles sont retrouvés, ils 

s’afficheront sur cet écran. Sélectionnez le serveur 

multimédia ou le réseau que vous souhaitez connecter 

en utilisant les boutons“ ” ou  “ ” et appuyez sur la 

touche 

OK

.

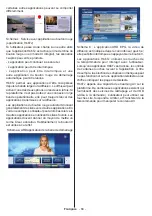
Si vous sélectionnez l’option Vidéo comme type de 

média et choisissez un appareil à partir du menu 

de sélection, un nouvel écran de menu apparaîtra 

comme ci-dessous :


Sélectionnez des vidéos à partir de cet écran pour 

afficher tous les fichiers vidéos disponibles à partir 

du réseau sélectionné.

Содержание L26H135U3

Страница 1: ...LCD TV BEDIENUNGSANLEITUNG INSTRUCTION MANUAL MODE D EMPLOI L26H135U3 R ...

Страница 2: ...messenen Luftzirkulation rund um das Fernsehgerät einen Freiraum von mindestens 10 cm ein Verwenden Sie dieses Gerät nur in gemäßigtem Klima Inhalt Einleitung 1 Bestimmungsgemäßer Betrieb 1 Vorbereitung 1 Symbole in dieser Bedienungsanleitung 2 Wichtige Sicherheitshinweise 2 Außer Betrieb nehmen und lagern 4 Umweltinformationen 4 TV Eigenschaften 5 Anzeigen des TV 5 TV Bedien taste Betrieb 6 Zubeh...

Страница 3: ...ögliche Gefahren nicht richtig erkennen Das Verschlucken von Batterien oder Akkus kann lebensgefährlich sein Bewahren Sie Batterien stets für kleine Kinder unerreichbar auf Wird eine Batterie verschluckt müssen Sie sofort ärztliche Hilfe suchen Bewahren Sie auch Verpackungsfolien für Kinder unerreichbar auf Es besteht Erstickungsgefahr Netzkabel Stellen Sie keine Gegenstände auf das Netzkabel wede...

Страница 4: ...nQuellenintensiverHitzestrahlung wie elektrischen Radiatoren ausgesetzt werden Kerzen und andere offene Flammen müssen zu jeder Zeit von diesem Produkt ferngehalten werden um das Ausbreiten von Feuer zu verhindern Batterien dürfen niemals zu großer Hitze wie direkter Sonneneinstrahlung Feuer o ä ausgesetzt werden Belüftung Die Schlitze und Öffnungen des Empfängers dienen der Belüftung und sollen e...

Страница 5: ...edienung und packen Sie die Fernbedienung zum TV Gerät HINWEIS Das TV Gerät sollte in einem trockenen und staubfreien Raum gelagert werden Umweltinformationen Dieses TV Gerät wurde so konstruiert dass es die Umwelt schützt und weniger Energie verbraucht Sie können helfen die Umwelt zu schonen und gleichzeitig Geld sparen indem Sie die Energiesparfunktion des TV Geräts verwenden Um den Energieverbr...

Страница 6: ...nuelle Sendersuche vorwärts und rückwärts Automatische Abschaltung nach bis zu sechs Stunden Ausschalttimer Kindersicherung Automatische Stummschaltung wenn keine Übertragung stattfindet NTSC Wiedergabe AVL Automatische Tonbegrenzung PLL Frequenzsuche Plug Play für Windows 98 ME 2000 XP Vista Windows 7 Spielemodus Bild Aus Funktion Programm Aufnahme Programmm Timeshift Konnektivität Ethernet LAN f...

Страница 7: ...ldschirm wird eine Lautstärkeskala Schieberegler eingeblendet Programmauswahl Drücken Sie zuerst den Steuerschalter einmal um den Kanal zu wechseln Bewegen Sie nun den Schalter nach oben um das nächste Programm auszuwählen oder nach unten um das vorhergehende Programm auszuwählen Ansicht des Hauptmenüs Der Menübildschirm kann nicht über den Steuerschalter aufgerufen werden AV Modus Drücken Sie den...

Страница 8: ...uellenauswahl Verwendung von My Button 2 Die Hauptfunktion dieser Taste ist das Umschalten zwischen DVB T DVB C und DVB S Sendungen Wenn Sie jedoch MY BUTTON 2 für fünf Sekunden drücken können Sie es mit einer Funktion verbinden wie in My Button 1 beschrieben Beachten Sie dass wenn Sie eine Erstinstallation durchführen MY BUTTON 2 auf seine Standard Funktion zurückgesetzt wird Verwendung von My bu...

Страница 9: ...r der Montage an der Wand alle Ihre Kabel an die Rückseite des Fernsehers anschließen Sie dürfen nur dann das CI Modul einsetzen oder herausnehmen wenn das TV Gerät ABGESCHALTET ist Weitere Informationen über die Einstellungen finden Sie in der Bedienungsanleitung des Moduls Stecken Sie das CAM Modul und die SmartCard in den Steckplatz der sich im Anschlussfach auf der Rückseite des TV Geräts befi...

Страница 10: ...hren kann 4 Schalten Sie das TV Gerät wieder an und warten Sie einen Moment bis die Karte erkannt wird Sobald die Karte erkannt wurde startet die Authentifizierung des CA Moduls inkl Karte 5 Wenn kein Modul eingesetzt ist erscheint der Hinweis Es konnte kein Common Interface Modul gefunden werden Weitere Informationen zur Nutzung Ihres Moduls finden Sie in der Bedienungsanleitung des Moduls CAM mo...

Страница 11: ...en Standby Modus geschaltet wird kann die LED blinken um anzuzeigen dass bestimmte Funktionen wie die Standby Suche Download über Antenne oder ein Timer aktiv sind Die LED kann auch blinken wenn Sie das TV Gerät aus dem Standby Modus einschalten Erste Installation Nach dem ersten Anschalten erscheint das Sprachauswahl Menü Es erscheint die Mitteilung Willkommen Bitte wählen Sie Ihre Sprache aus di...

Страница 12: ...n Quelle zu speichern Antenneninstallation Wenn Sie die Option ANTENNE aus dem Bildschirm Suchtyp auswählen sucht das DTV nach digitalen terrestrischen TV Sendern HINWEIS Sie können die Taste MENU drücken um abzubrechen Wenn alle Kanäle gespeichert sind wird die Kanalliste auf dem Bildschirm angezeigt Wenn Sie die Kanäle nach LCN sortieren wollen wählen Sie Ja und drücken Sie dann OK Drücken Sie d...

Страница 13: ...suchen DiSEqC Schalter Wählen Sie diesen Antennentyp wenn Sie mehrere Satellitenantennen und einen DiSEqC Schalter verwenden Nach Auswahl von DiSEqC wird ein weiterer Menübildschirm angezeigt Sie können vier DiSEqC Optionen sofern verfügbar einstellen Drücken Sie die GRÜNE Taste um alle Satelliten zu durchsuchen oder drücken Sie auf die GELBE Taste um nur nach dem gekennzeichneten Satelliten zu su...

Страница 14: ...dazu wie folgt vor Schließen Sie eine USB Festplatte an den USB Eingang seitlich am TV Gerät an Sie können zwei USB Geräte an Ihr TV Gerät anstecken Wenn beide USB Geräte Musik Bilder und Videos enthalten wird der OSD Auswahlbildschirm angezeigt Das erste an das TV Gerät angeschlossene USB Gerät wird dabei als USB Laufwerk 1 bezeichnet Wählen Sie mit den Tasten oder und OK ein Gerät aus und drücke...

Страница 15: ...Bildzoom Stellt den Bildzoom auf Auto 16 9 Untertitel 14 9 14 9 Zoom 4 3 oder Kino nur im Scart Modus mit SCART PIN8 Hochspannungs Niederspannungsschaltung verfügbar HDMI True Black optional Wenn Sie von der HDMI Quelle aus fernseh schauen ist diese Funktion im Bild Einstellungs Menü verfügbar Sie können diese Funktion verwenden um das Schwarz der Bilder zu verstärken Filmmodus optional Filme werd...

Страница 16: ...ernseher anschließen wählen Sie die Option Lineout Wenn Sie Kopfhörer an den Fernseher anschließen wählen Sie die Option Kopfhörer Dynamischer Bass Aktiviert oder deaktiviert den Dynamic Bass Surround Sound optional Der Surround Modus kann auf Ein oder Aus gestellt werden Digitaler Ausgang Stellt den Audiotyp für den Digitalausgang ein Inhalt Menü Einstellungen Conditional Access Hier nehmen Sie E...

Страница 17: ...ndbysuche auf Ein eingestellt werden verfügbare Sender gesucht wenn das Gerät im Stand by Modus ist Wenn das Gerät neue oder noch nicht vorhandene Sender findet wird ein Menü einge blendet in dem Sie die Änderungen annehmen oder verwerfen können Die Kanalliste wird aktualisiert und nach diesem Prozess verändert Bitte aktivieren Sie die Standby Suche Einstellung um Ihren Fernseher die automatische ...

Страница 18: ...hert digitale und analoge DVB S2 Sender Satellit Manuelle Kanalsuche Diese Funktion wird zur direkten Eingabe von Sendern verwendet Netzwerk Kanalsuche Sucht nach den verknüpften Kanälen des Rundfunksystems Analoge Feineinstellung Verwenden Sie diese Einstellung für die Feineinstellung von analogen Kanälen aus Diese Funktion ist nicht verfügbar wenn keine analogen Kanäle gespeichert sind Erste Ins...

Страница 19: ...e können einen Timer für zukünftige Programme einstellen Um eine bereits eingestellte Timer abzubrechen markieren Sie das Programm und drücken Sie die Taste OK Wählen Sie dann die Option Timer löschen Der Timer wird gelöscht Hinweis Sie können nicht zwei Timer oder Aufnahmen für zwei gleichzeitige Sendungen programmieren Aufzeichnen eines Programms WICHTIG Wenn Sie ein neues USB Festplattenlaufwer...

Страница 20: ...n DrückenSiedieTaste AUFNAHME um die Sofortaufnahme zu stoppen Während der Aufnahme können Sie nicht den Sender oder die Quelle wechseln oder den Medienbrowser aufrufen Aufgenommene Programme ansehen Benutzen Sie im Hauptmenü die Tasten oder um den Medienbrowser auszuwählen Markieren Sie im Aufnahmebibliothek mit den Tasten oder die Option Aufnahmebibliothek und drücken Sie OK um sie aufzurufen Di...

Страница 21: ...ie immer den Medienbrowser Bildschirm benutzen Modemausgang an der Wand Rückseite des TV Geräts Konfiguration der Netzwerk Einstellungen Die Netzwerk Einstellungen Ihres Fernsehers beinhaltet die Option Drahtgebundene Verbindung Haben Sie Ihr TV richtig angeschlossen wird das TV Gerät eine IP Adresse beziehen können Konfiguration der kabelgebundenen Geräte Einstellungen Wenn Sie den Fernseher über...

Страница 22: ... Verbindung korrekt hergestellt ist Für den ordnungsgemäßen Betrieb des Internet Portals müssen Sie bei der Erstinstallation die Daten über das Land und die Sprache korrekt einstellen Drücken Sie die Taste um das Internetportal aufzurufen Dieses wird Ihnen wie unten dargestellt angezeigt Bitte beachten Sie das sich je nach Anbieter die Inhalte unterscheiden können Navigieren Home Select OK BACK EX...

Страница 23: ...echenden Farbtaste ausgewählt werden Drücken Sie eine Farbtaste je nach Wunsch Wenn eine TOPText Übertragung vorhanden ist werden farbige Textteile eingeblendet deren Farbe jeweils einer Farbtaste entsprechen Durch Drücken der Tasten oder wird die jeweils nächste oder vorhergehende Seite angefordert Verwendung der SatcoDX Funktion SatcoDX optional Durch Benutzen der Satelliteneinstellungen können ...

Страница 24: ...ät die letzten Initialisierung durch Dabei wird das Panel abgeschaltet und die Front LED zeigt die Aktivität durch Blinken an Nach etwa 5 Minuten schaltet sich das Gerät selbstständig mit der neu aktivierten Softwareversion ein Wenn das TV Gerät nach 10 Minuten noch immer nicht gestartet hat ziehen Sie den Netzstecker warten Sie 10 Minuten und stecken Sie ihn wieder ein Das TV Gerät sollte nun mit...

Страница 25: ...en überprüfen Sie die AV Kabel und deren Anschluss Aufnahme nicht verfügbar Um ein Programm aufzunehmen sollten Sie zuerst eine USB Festplatte an das TV Gerät anschließen wenn dieses ausgeschaltet ist Schalten Sie dann das TV Gerät ein um dieAufnahmefunktion zu aktivieren Andernfalls ist die Aufnahmefunktion nicht verfügbar Wenn dieAufnahme nicht funktioniert versuchen Sie das TV Gerät abzuschalte...

Страница 26: ...enen Auflösungen Ihr Gerät unterstützt bis zu 1920x1200 Inhalts verzeichnis Auflöung Frequenz 1 640x400 70Hz 2 640x350 85Hz 3 640x400 85Hz 4 640x480 60Hz 5 640x480 66Hz 6 640x480 72Hz 7 640x480 75Hz 8 640x480 85Hz 9 800x600 56Hz 10 800x600 60Hz 11 800x600 70Hz 12 800x600 72Hz 13 800x600 75Hz 14 800x600 85Hz 15 832x624 75Hz 16 1024x768 60Hz 17 1024x768 66Hz 18 1024x768 70Hz 19 1024x768 72Hz 20 1024...

Страница 27: ...O AUSGANGSLEISTUNG WRMS 10 THD 2 x 6 LEISTUNGSAUFNAHME W 65 W max PANEL 16 9 ABMESSUNGEN mm Breite x Höhe x Tiefe Mit Standfuß 628 x 423 x 185 Gewicht Kg 5 00 Breite x Höhe x Tiefe Ohne Standfuß 628 x 384 x 37 Gewicht kg 4 50 Lizenzinformationen Hergestellt unter Lizenz der Dolby Laboratories INHABER DER MARKENZEICHEN und das Doppel D Symbol sind Warenzeichen der Dolby Laboratories DLNA das DLNA L...

Страница 28: ...ek mp4 mov MPEG1 2 Layer 3 AAC HEAAC AC3 EAC3 LPCM ADPCM H 264 1080Px2 25fps1080P 50fps Andere 1080P 30fps 50Mbit Sek avi MPEG1 2 4 Xvid H 264 VC1 WMV3 Sorenson H 263 Motion JPEG MPEG1 2 Layer 1 2 3 AAC HEAAC AC3 EAC3 LPCM ADPCM WMA H 264 1080Px2 25fps 1080P 50fps Andere 1080P 30fps 50Mbit Sek flv H 264 Sorenson H 263 MPEG1 2 Layer 3 AAC HEAAC LPCM ADPCM H 264 1080Px2 25fps 1080P 50fps Andere 1080...

Страница 29: ...äts anschließen können Sie sich an die folgenden Auflösungsinformationen halten 56Hz 60Hz 66Hz 70Hz 72Hz 75Hz 640x400 þ 640x480 þ þ þ þ 800x600 þ þ þ þ þ 832x624 þ 1024x768 þ þ þ þ þ 1152x864 þ þ þ 1152x870 þ 1280x768 þ 1360x768 þ þ 1280x960 þ þ 1280x1024 þ þ 1400x1050 þ þ 1440x900 þ þ 1600x1200 þ 1680x1050 þ 1920x1080 þ 1920x1200 þ ...

Страница 30: ...ationsassistent wird eingeblendet Ändern Sie gegebenenfalls die Installationssprache aus dem Menü Sprachauswahl bevor Sie fortfahren 3 Klicken Sie auf die Taste Weiter Die integrierte Seriennummer wird angezeigt Bitte ändern Sie die Seriennummer nicht 4 Klicken Sie auf die Taste Weiter Die Lizenzbedingungen EULA werden angezeigt 5 Bitte lesen Sie die Lizenzvereinbarung sorgfältig durch und wählen ...

Страница 31: ...e auf die Taste Weiter Der Ready to Start Installation Prozess Bildschirm wird angezeigt die Installation beginnt und endet automatisch Ein Fortschrittsbalken informiert Sie über den Fortschritt des Installationsprozesses 10 Die Installation wird beendet Das Helfen Sie uns Enhance Nero Software Bildschirm wird angezeigt Um einen besseren Service zu bieten sammelt Nero anonyme Daten um festzustelle...

Страница 32: ...rücken des Verknüpfungssymbols Klicken Sie auf das Symbol HINZUFÜGEN von LOKALEN ORDNERN um den Ordner welches Sie im Netz teilen möchten hinzuzufügen Wählen Sie den Ordner den Sie freigeben möchten und klicken Sie auf START SERVER 15 Sie können alle Arten von Medien aus der Bibliothek anzeigen Klicken Sie auf das Symbol Aktualisieren um zu aktualisieren Klicken Sie auf STOP SERVER Symbol um Serve...

Страница 33: ...logen Audioanschluss zwischen Geräten verwendet HbbTV Hybrid broadcast broadband TV ist eine paneuropäische Initiative die unter Verwendung offener Standards Fernsehprogramme und Mehrwertangebote aus dem Internet verbindet HDMI High Definition Multimedia Interface DieserAnschluss liefert ein unkomprimiertes digitales Video und Audiosignal hoher Qualität Dabei werden Audio und Videosignale über ein...

Страница 34: ...ion Keep the packaging films out of reach of children Risk of suffocation Power source The TV should be operated only from a 220 240 V AC 50 Hz outlet Warning Do not leave your TV in standby or operating mode when you leave your house Positioning the TV For ventilation please leave a clear space of at least 10cm all around the TV Do not block the ventilation openings Do not place the TV on sloping...

Страница 35: ...h liquids such as flower vases on top of the TV Avoid from dripping or splashing If any solid object or liquid falls into the cabinet unplug the TV and have it checked by qualified personnel before operating it any further Ventilation The slots and openings on the TV set are intended for ventilation and to ensure reliable operation To prevent overheating these openings must not be blocked or cover...

Страница 36: ...ke the following steps You can use Power Save Mode setting located in the Picture Settings menu If you set Power Save Mode as Eco the TV will switch to energy saving mode and luminance level of TV set will be decreased to optimum level Note that some picture settings will be unavailable to be changed when the TV is in Power Save Mode If Picture Off is selected Screen will be off in 15 seconds mess...

Страница 37: ...ton twice the source list will appear on screen Scroll through the available sources by pushing the button up or down To turn the TV off Press the middle of the button down and hold it down for a few seconds the TV will turn into standby mode NOTE You can move the switch upward or downward to change the volume If you want to change the channel press the middle of the switch once Position 3 and the...

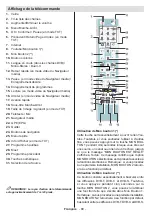
Страница 38: ...ode 13 Pause in media browser mode Timeshift recording 14 Programme recording 15 Play in media browser mode 16 Stop in media browser mode 17 Rapid advance 18 Subtitle on off 19 Image size Expand in TXT mode 20 Teletext Mix 21 Media Browser 22 EPG 23 Exit 24 Navigation buttons 25 Quick Menu 26 Info Reveal in TXT mode 27 Programme up down 28 Mute 29 Previous programme 30 Numeric buttons 31 Source se...

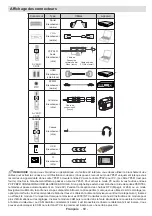
Страница 39: ...into the back of the TV before mounting on the wall Insert or remove the CI module only when the TV is SWITCHED OFF You should refer to the module instruction manual for details of the settings Insert the CAM and then the viewing card to the slot that is located in the terminal cover at the rear side of the TV The module should be correctly inserted it is impossible to insert fully if reversed The...

Страница 40: ...rcefully inserted 4 Connect the TV to the mains supply switch on and then wait for few moments until the card is activated 5 When no module is inserted No Common Interface module detected message appears on the screen You can refer to the module instruction manual for details of the settings CAM module Standby Notifications If the TV does not receive any input signal e g From an aerial or HDMI sou...

Страница 41: ... When the TV is switched to standby mode standby LED can blink to indicate that features such as Standby Search Over Air Download or Timer is active The LED can also blink when you switch on the TV from standby mode First Time Installation When turned on for the first time the language selection menu appears The message Welcome please select your language is displayed in all language options liste...

Страница 42: ...zes available broadcasts in accordance with a recognizable channel sequence Cable Installation If you select CABLE option and press OK button on the remote control to continue the following message will be displayed on the screen To continue please select YES and press OK To cancel operation select NO and press OK You can select frequency ranges from this screen For highlighting lines you see use ...

Страница 43: ...an experience problems with the formatting process Quickly plugging and unplugging USB devices is a very hazardous operation Do not repeatedly quickly plug and unplug the drive This may cause physical damage to the USB player and USB device itself Do not pull out USB module while playing a file Media Browser Menu You can play photo music and movie files stored on a USB disk by connecting it to you...

Страница 44: ...ct a function on Channel List menu Use P P buttons to move page up or down Press MENU button to exit Sorting Channel List You can select broadcasts to be listed in the channel list To display specific types of broadcast you should use Active channel list setting Select Active channel list from the Channel list menu by using or button Press OK button to continue You can select a network type option...

Страница 45: ...m 4 3 or Cinema Auto Only available in Scart mode with SCART PIN8 high voltage low voltage switching HDMI True Black optional While watching from HDMI source this feature will be visible in the Picture Settings menu You can use this feature to enhance blackness in the picture Film Mode optional Films are recorded at a different number of frames per second to normal television programmes Turn this ...

Страница 46: ...ound mode can be changed as On or Off Digital Out Sets digital out audio type Install and Retune Menu Contents Automatic Channel Scan Retune Displays automatic tuning options Digital Aerial Searches and stores aerial DVB stations Digital Cable Searches and stores cable DVB stations Analogue Searches and stores analogue stations Digital Aerial Analogue Searches and stores aerial DVB and analogue st...

Страница 47: ... for menu screens Scan Encrypted When this setting is on search process will locate the encrypted channels as well If it is set as Off encrypted channels will not be located in automatic search or manual search Blue Background Activates or deactivates blue background system when the signal is weak or absent Software Upgrade To ensure that your TV always has the most update information you can use ...

Страница 48: ... sharing software for more information DLNA renderer mode will not be available with internet portal feature Power Up Mode Thissettingconfiguresthepowerupmodepreference AlwaysOn TheTValwaysswitches on when main on off button is pressed Standby The TV always powers up in Standby mode Last State The TV always switches on with the last selected channel source Biss Key Biss is a satellite signal scram...

Страница 49: ...elled Note It is not possible to record or set timer for two or more individual events at the same time interval Recording a Programme IMPORTANT When using a new USB hard disk drive it is recommended that you first format the disk using your TV s Format Disk option To record a programme you should first connect a USB disk to your TV while the TV is switched off You should then switch on the TV to ...

Страница 50: ... Library item by using or button and press OK button to enter Recordings Library will then be displayed Select a recorded item from the list if previously recorded by using button Press OK button to view Play Options Select an option by using or OK buttons Available playback options Play from start Plays the recording from the beginning Resume Recommences the recordings Play from offset Specifies ...

Страница 51: ...back quality To configure wired settings please refer Network Settings section in Settings menu You might be able to connect your TV to your LAN network depending on your network s configuration In such a case use an ethernet cable to connect your TV directly to the network wall outlet The modem port on the wall Rear of TV Connecting to a Wireless Network IMPORTANT Veezy 200 USB dongle is required...

Страница 52: ... Wi Fi dongle you should use Wired Connection type If you try to connect via Wireless Connection when your TV does not have a USB Wi Fi dongle a warning screen will appear and the TV will not get an IPaddress Try connecting the LAN cable after this and then the TV will be able to get an IP address Configuring Wired Device Settings If you are connecting the TV via ETHERNET INPUT select Network Type...

Страница 53: ...n Status Displays wi fi status as connected or not connected IP Address Displays the current IP address Network Name Connected networks name will be displayed Press GREEN button to switch to advanced mode and then press OK button to edit settings Delete Saved Wifi Profiles Saved profiles will be deleted if you press red button while wireless device selection osd is on the screen Connecting to your...

Страница 54: ...hotos music and videos stored in the DLNA media server connected to your home network Step 1 Nero Media Home Installation DLNA function cannot be used if the server program is not install to your PC Please prepare your PC with the provided Nero Media Home programme For more information about the installation please refer to appendix Step2 ConnecttoaWiredorWirelessNetwork See the chapter Network Se...

Страница 55: ...confirm your selection Press BACK to go to the previous screen Press EXIT to quit internet portal mode Note Possible application dependent problems may be caused by the content service provider Not Virtual remote controller application could be available to be downloaded from your smartphone application provider Not all smartphones are supported by this application Teletext Teletext Mix Activates ...

Страница 56: ... 4 Check if you have entered the correct frequency 5 Please retune the channels You can download or upload satcoDX data In order to perform these functions supported for satcodx feature a USBdevicemustbeconnectedtotheTVinthefirstplace You will be able to upload current services and related satellites transponders in TV to a USB device In addition to the uploading feature you will be able to downlo...

Страница 57: ...ing try restarting the recording If you still get the same error it is possible that your USB disk does not meet the speed requirements Try connecting another USB disk Internet Connection Not Available DLNA Mode Not Operating If the MAC address a unique identifier number of your PC or modem has been permanently registered it is possible that your TV might not connect to the internet In such a case...

Страница 58: ...30 1280x768 85Hz 31 1280x960 60Hz 32 1280x960 75Hz 33 1280x960 85Hz 34 1280x1024 60Hz 35 1280x1024 75Hz 36 1280x1024 85Hz 37 1400x1050 60Hz 38 1400x1050 75Hz 39 1400x1050 85Hz 40 1440x900 60Hz 41 1440x900 75Hz 42 1600x1200 60Hz 43 1680x1050 60Hz 44 1920x1080 60Hz 45 1920x1200 60Hz Specifications TV BROADCASTING PAL SECAM B G D K K I I L L DIGITAL RECEPTION DVB T MPEG2 DVB T MPEG4 HD DVB T MHEG 5 E...

Страница 59: ...and the double D symbol are trademarks of Dolby Laboratories DLNA the DLNA Logo and DLNA CERTIFIED are trademarks service marks or certification marks of the Digital Living Network Alliance HDMI the HDMI logo and High Definition Multimedia Interface are trademarks or registered trademarks of HDMI Licensing LLC ...

Страница 60: ...4 mov MPEG1 2 Layer 3 AAC HEAAC AC3 EAC3 LPCM ADPCM H 264 1080Px2 25fps 1080P 50fps Other 1080P 30fps 50Mbit sec avi MPEG1 2 4 Xvid H 264 VC1 WMV3 Sorenson H 263 Motion JPEG MPEG1 2 Layer 1 2 3 AAC HEAAC AC3 EAC3 LPCM ADPCM WMA H 264 1080Px2 25fps 1080P 50fps Other 1080P 30fps 50Mbit sec flv H 264 Sorenson H 263 MPEG1 2 Layer 3 AAC HEAAC LPCM ADPCM H 264 1080Px2 25fps 1080P 50fps Other 1080P 30fps...

Страница 61: ...t supplied you can refer to the following resolution information 56Hz 60Hz 66Hz 70Hz 72Hz 75Hz 640x400 þ 640x480 þ þ þ þ 800x600 þ þ þ þ þ 832x624 þ 1024x768 þ þ þ þ þ 1152x864 þ þ þ 1152x870 þ 1280x768 þ 1360x768 þ þ 1280x960 þ þ 1280x1024 þ þ 1400x1050 þ þ 1440x900 þ þ 1600x1200 þ 1680x1050 þ 1920x1080 þ 1920x1200 þ ...

Страница 62: ...t the installation process The Nero MediaHome installation wizard is displayed If necessary change installation language from the language selection menu before continuing 3 Click the Next button The integrated serial is displayed Please do not change displayed serial 4 Click the Next button The License Conditions EULA screen is displayed 5 Please read the license agreement carefully and select th...

Страница 63: ...k the Next button The Ready to Start Installation Process screen is displayed installation begins and finishes automatically A progress bar informs you of the progress of the installation process 10 Installation finishes The Help us to Enhance Nero Software screen is displayed In order to offer a better service Nero is collecting anonymous data to determine which features are used and what problem...

Страница 64: ...ome 4 on your PC 14 Run Nero MediaHome by pressing shortcut icon Click ADD icon from LOCAL FOLDERS to add the folder you want to share with the network Select the folder that you want to share and click START SERVER 15 You can display all media types from the library Click Refresh icon to refresh Click STOP SERVER icon to stop server ...

Страница 65: ...lées Toujours tenir les piles hors de portée des enfants Consultez immédiatement un médecin au cas où une personne avale une pile Tenir les films d emballage hors de portée des enfants Risque de suffocation Source D alimentation Ce téléviseur ne doit être raccordé qu à une prise de 220 240 V AC 50 Hz Avertissement Ne laissez pas votre téléviseur en veille ou en fonctionnement lorsque vous quittez ...

Страница 66: ...r par un personnel qualifié avant de continuer à l utiliser Ventilation Les fentes et les orifices du téléviseur sont prévus pour la ventilation et pour assurer un fonctionnement fiable Pour éviter la surchauffe ces orifices ne doivent pas être obstrués ni couverts de quelque façon que ce soit Une source de chaleur et flammes N exposez pas le téléviseur directement à la lumière solaire ou à des so...

Страница 67: ... option Image désactivée est sélectionnée le message l écran s éteignera dans 15 secondes s affichera à l écran Sélectionnez l option POURSUIVRE et appuyez sur OK pour continuer L écran sera désactivé dans 15 secondes Si vous désactiver le mode Économie d énergie le mode d affichage sera automatiquement défini sur Dynamique Veuillez mettre le téléviseur hors tension et le débrancher du secteur lor...

Страница 68: ...tre à l écran la liste de sources Parcourrez les sources disponibles en appuyant sur le bouton Haut ou Bas Pour éteindre le téléviseur Appuyez au milieu du bouton Bas et maintenez le enfoncé pendant quelques secondes jusqu à ce que le téléviseur passe en mode Veille REMARQUE Vous pouvez déplacer le contacteur vers le haut ou vers le bas pour modifier le volume Si vous souhaitez changer de chaîne a...

Страница 69: ...on de la Source REMARQUE Le rayon d action de la télécommande est approximativement de 7 m 23 pieds Utilisation de Mon bouton 1 Cette touche sert essentiellement à ouvrir le lien You tube Toutefois si vous souhaitez l utiliser à d autres fins vous pouvez appuyer sur la touche MON BOU TON 1 pendant cinq secondes lorsque vous êtes sur une source un canal ou un lien de votre choix jusqu à ce que le m...

Страница 70: ...sez le kit de montage en option mural fourni Il est recommandé de brancher tous vos câbles à l arrière du téléviseur avant tout montage mural Insérez ou effacez le module CI uniquement lorsque le téléviseur est ETEINT Consultez le manuel d instructions du module pour plus d informations sur les réglages Insérez le module CAM puis la carte dans la fente située dans le couvercle du terminal à l arri...

Страница 71: ... le premier est inséré avec une certaine pression 4 Branchez le téléviseur à la prise de courant allumez la et attendez un moment jusqu à ce que la carte soit activée 5 Lorsqu aucun module n est inséré le message Aucun module d interface commun détecté apparaît à l écran Consultez le manuel d utilisation du module pour les détails relatifs aux réglages CAM module Notifications de veille Lorsque le...

Страница 72: ...eille Pour éteindre complètement le téléviseur débranchez le cordon d alimentation de la prise secteur Remarque Lorsque le téléviseur est en mode de veille le voyant lumineux du mode veille clignote pour signifier que des options comme Recherche en mode veille téléchargement automatique ou Minuterie sont actives La LED peut également clignoter lorsque vous allumez le téléviseur à partir du mode de...

Страница 73: ...ssions de la source souhaitée Installation de l antenne Si vous sélectionnez l option ANTENNE à partir de l écran Type de recherche la télévision numérique recherchera les diffusions terrestres numériques REMARQUE Vous pouvez appuyer sur la touche MENU pour annuler Une fois toutes les stations disponibles enregistrées la liste des chaînes s affichera à l écran Si les chaînes retrouvées vous intére...

Страница 74: ...ouche OK Utilisation de la liste de chaînes Le téléviseur trie toutes les stations mémorisées dans la liste des chaînes Vous pouvez modifier cette liste de chaînes configurer les favoris ou les stations actives à inclure dans la liste en utilisant les options Liste de chaînes Pressez le bouton MENU pour afficher le menu Principal Sélectionnez la rubrique Liste des chaînes en utilisant le bouton Ga...

Страница 75: ...ne des entrées USB située sur le côté du téléviseur Vous pouvez brancher jusqu à deux périphériques USB à votre téléviseur Si les deux périphériques contiennent des fichiers de musiques de photos ou de vidéos l OSD de sélection de l USB s affichera à l écran Le premier périphérique USB connecté au téléviseur sera le lecteur USB 1 Sélectionnez un périphérique à l aide de la touche ou et appuyez sur...

Страница 76: ... titre 14 9 14 9 Zoom 4 3 ou Cinéma Auto Disponible uniquement en mode Péritel avec commutation a haute faible tension pour PERITEL 8 BROCHES HDMI True Black en option Lorsque vous regardez le téléviseur à partir de la source HDMI cette option est visible dans le menu Paramètres de l image Vous pouvez utiliser cette option pour renforcer la noirceur de l image Mode Film en option Les films sont en...

Страница 77: ...ver le mode Son Surround Sortie Digitale Règle le type de sortie audio numérique Installation et Réglage Le Contenu du Menu Balayage de chaîne automatique Nouveau réglage Affiche les options de réglage automatique Antenne numérique Recherche et enregistre les chaînes DVB Câble numérique Recherche et enregistre les chaînes câblées DVB Analogique Recherche et mémorise les stations analogiques Antenn...

Страница 78: ...ast then to the user preference and lastly to the teletext time information Sources Active ou désactive les options sources sélectionnées Paramètres du satellite Affiche les paramètres Réglages du réseau en option Affiche les Paramètres réseau en option Autres réglages Affiche les autres options de réglage du téléviseur Temporisation du menu Change la durée de temporisation des écrans de menu Bala...

Страница 79: ...ctiver ce mode Lorsque le mode Magasin est activé certains éléments du menu TV peuvent ne pas être disponibles pour réglage Convertisseur DLNA L option Convertisseur DLNAvous permet de partager les fichiers mémorisés sur votre smartphone Si vous avez un smartphone compatible avec le convertisseur DLNA et un logiciel installé vous pouvez partager lire des photos sur votre TV Pour plus d information...

Страница 80: ...egistrement sera annulé Régler la minuterie Supprimer la minuterie Après avoir sélectionné un programme dans le menu EPG appuyez sur la touche OK pour afficher l écran Options Sélectionnez l option Régler la minuterie sur Événement et appuyez sur la touche OK Vous avez la possibilité de définir une minuterie pour les programmes à venir Pour annuler une minuterie existante sélectionnez le programme...

Страница 81: ...lancer l enregistrement instantané d un programme pendant que vous le regardez Vous pouvez appuyer à nouveau sur la touche R E C O R D E N R E G I S T R E M E N T d e l a télécommande pour enregistrer l émission suivante sur l EPG Dans ce cas l écran affichera les émissions programmées pour l enregistrement Appuyez sur la touche STOP pour annuler l enregistrement instantané Au cours de l enregistr...

Страница 82: ...de de la touche Gauche ou Droite Appuyez sur la touche OK pour continuer Veuillez sélectionner le type de fichier souhaité et appuyer sur OK Vous devez toujours utiliser l écran du navigateur média pour accéder et lire les fichiers réseau partagés Le lecteur de média PC HDD ou tout autre appareil compatible avec DLNA 1 5 doit être utilisé avec une connexion filaire pour une qualité de lecture meil...

Страница 83: ...porter à l appendice Etape 2 Connexion à un réseau câblé Voir le chapitre Paramètres réseau pour des informations détaillées sur la configuration Etape 3 Lecture de fichiers partagés à travers le navigateur média Sélectionnez le navigateur multimédia en utilisant le bouton Gauche ou Droit du menu principal et appuyez sur le bouton OK Le navigateur multimédia s affiche Le support DLNA est disponibl...

Страница 84: ...nez un lien ou une application en vous servant des touches Gauche et Droite ou Précédent ou Suivant et appuyez sur la touche OK pour activer Utilisez les touches Précédent Suivant et Gauche Droite pour passer d un élément de l écran du portail à un autre Appuyez sur la touche OK pour confirmer votre sélection Appuyez sur RETOUR pour revenir à l écran précédent Appuyez sur QUITTER pour quitter le m...

Страница 85: ...s d autres applications En voici un exemple L utilisateur peut alors basculer vers d autres applications en utilisant les liens fournis Les applications doivent donner un moyen de mettre un terme à leur exécution Habituellement le bouton 0 est utilisé à cet effet Schéma a ARD application de la barre de démarrage Schéma b L application ARD EPG la vidéo de diffusion est indiquée dans le coin inférie...

Страница 86: ...tons colorés utiliser lorsque la transmission TOP text est présente Les touches ou solliciteront la page suivante et précédente respectivement en utilisant Feature SatcoDX SatcoDX en option Vous pouvez effectuer des opérations SatcoDX en utilisant les paramètres par satellite Le menu SatcoDX contient deux options relatives à la fonction SatcoDX présentées ci après Vous pouvez télécharger ou envoye...

Страница 87: ...herche de chaînes de diffusion pour la mise à jour du nouveau logiciel Si un nouveau logiciel est trouvé et téléchargé avec succès le téléviseur commence à fonctionner avec la nouvelle version du logiciel au prochain démarrage Remarque relative au redémarrage Le redémarrage est la dernière étape du processus de mise à jour d un logiciel lorsque le téléchargement de celui a été effectué avec succès...

Страница 88: ...xtrémité d une direction Consultez le menu Son Télécommande ne fonctionne pas Votre téléviseur ne répond pas à la télécommande Il est possible que les piles soient déchargées vous pouvez sinon utiliser les boutons situés sur le téléviseur Cette option n est possible que lorsque le contrôle parental n est pas activé Les sources d entrée ne peuvent pas être sélectionnés 1 Si vous ne pouvez sélection...

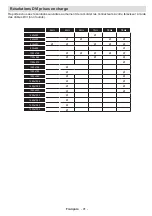
Страница 89: ...eau ci après est une illustration de quelques modes d affichage vidéo typiques Votre téléviseur ne peut pas prendre en charge toutes les résolutions Votre téléviseur prend en charge jusqu à 1920x1080 Index Résolution Fréquence 1 640x400 70Hz 2 640x350 85Hz 3 640x400 85Hz 4 640x480 60Hz 5 640x480 66Hz 6 640x480 72Hz 7 640x480 75Hz 8 640x480 85Hz 9 800x600 56Hz 10 800x600 60Hz 11 800x600 70Hz 12 800...

Страница 90: ...DE SORTIE WRMS 10 THD 2 x 6 CONSOMMATION ÉLECTRIQUE W 65 W max PANNEAU 16 9 DIMENSIONS mm PxLxH Avec pied 185 x 628 x 423 Poids Kg 5 00 PxLxH Sans pied 37 x 628 x 384 Poids Kg 4 50 Notification de licence Fabriqué sous licence de Dolby Laboratories RECONNAISSANCE DE MARQUE COMMERCIALE et le symbole du double D sont des marques commerciales de Dolby Laboratoires DLNA le logo DLNA et DLNA CERTIFIED ...

Страница 91: ...4 mov MPEG1 2 Layer 1 2 3 AAC HEAAC AC3 EAC3 LPCM ADPCM H 264 1080Px2 25fps1080P 50fps Autres 1080P 30fps 50Mbit sec avi MPEG1 2 4 Xvid H 264 VC1 WMV3 Sorenson H 263 Motion JPEG MPEG1 2 Layer 1 2 3 AAC HEAAC AC3 EAC3 LPCM ADPCM H 264 1080Px2 25fps 1080P 50fps Other 1080P 30fps 50Mbit sec flv H 264 Sorenson H 263 MPEG1 2 Layer 1 2 3 AAC HEAAC AC3 EAC3 LPCM ADPCM H 264 1080Px2 25fps 1080P 50fps Othe...

Страница 92: ...ecteurs à votre téléviseur à l aide des câbles DVI non fournis 56Hz 60Hz 66Hz 70Hz 72Hz 75Hz 640x400 þ 640x480 þ þ þ þ 800x600 þ þ þ þ þ 832x624 þ 1024x768 þ þ þ þ þ 1152x864 þ þ þ 1152x870 þ 1280x768 þ 1360x768 þ þ 1280x960 þ þ 1280x1024 þ þ 1400x1050 þ þ 1440x900 þ þ 1600x1200 þ 1680x1050 þ 1920x1080 þ 1920x1200 þ ...

Страница 93: ...lancer le processus d installation L assistant d installation de Nero MediaHome s affiche Si nécessaire changez la langue d installation dans le menu de sélection approprié avant de poursuivre 3 Cliquez sur le bouton Next Suivant La série intégrée s affiche Veuillez ne pas la changer 4 Cliquez sur le bouton Next Suivant L écran Conditions de licence EULA s affiche 5 Veuillez lire attentivement l a...

Страница 94: ...Fin de l installation L écran Help us to Enhance Nero Software Aidez nous à améliorer le logiciel Nero s affiche Pour améliorer la qualité de nos services Nero recueille des données anonymes afin de déterminer les options utilisées et le cas échéant les problèmes rencontrés 11 Si vous souhaitez nous aider en participant à cette collecte anonyme de données sélectionnez la case à cocher et cliquez s...

Страница 95: ...Français 94 15 Vous pouvez afficher tous les types de média à partir de la bibliothèque Cliquez sur l icône Refresh pour rafraîchir la page Cliquez sur l icône STOP SERVER pour arrêter le serveur ...

Страница 96: ...r nach unserer Wahl 4 die Instandsetzung Ihres Gerätes oder den Austausch gegen ein gleichwertiges Gerät die bei uns anfallenden Arbeitslöhne Materialkosten und die Transportkos ten des Gerätes innerhalb Österreich wenn die Ware an uns in der Originalver packung versendet wird Nicht von der Garantieleistung umfasst sind die Kosten einer anderenfalls notwendig werdenden Ersatzverpackung Die durch e...

Страница 97: ... Gewalt Wasser Blitzschlag Überspannung zurückzuführen sind bei übermäßiger Nutzung insbesondere bei anderer als privater Nutzung bei Missachtung der Bedienungsanleitung wenn das Gerät keinen technischen Defekt aufweist bei Pixelfehlern die innerhalb der in der ISO Norm 9241 307 Pixelfehlerklasse II festgelegten Toleranzen liegen Die Garantie umfasst keine weitergehende Haftung unsererseits insbes...

Страница 98: ...GmbH Vertrieb Vestel Germany GmbH D 85748 Garching bei München 1 Die Marke TELEFUNKEN ist eine eingetragene Marke der TELEFUNKEN Licenses GmbH 1 TELEFUNKEN licensed by TELEFUNKEN Licenses GmbH Imported by Vestel Germany GmbH D 85748 Garching Munich ...

Отзывы: