Tele System TS6281 Скачать руководство пользователя страница 5

Italiano 

TS6281 

3


2  Descrizione prodotto e collegamenti 

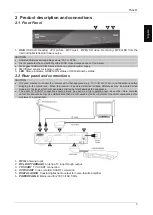
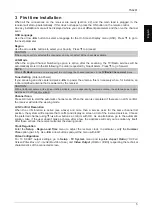
2.1 Pannello frontale 


1. 

USB

  Porta USB per lettura foto .JPG, audio .MP3, video SD .MPEG  e per registrazione in formato SD 

.MPEG da sintonizzatore digitale terrestre interno. 

AVVERTENZE 

x


Compatibile con dispositivi di memoria USB formattati con file system FAT e NTSC. 

x


Non può essere garantita la piena compatibilità con tutti i dispositivi di memoria USB presenti sul mercato. 

x

  Alcuni dischi-rigidi USB potrebbero richiedere alimentazione ausiliaria. Si consiglia l’utilizzo di dischi con 

alimentazione esterna. 

2. 

IR

  Sensore a raggi infrarossi per telecomando. 

3. 

LED

  Indicatore di stato: VERDE acceso, ROSSO stand-by. 

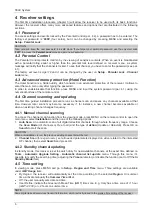
2.2  Pannello posteriore e connessioni 

ATTENZIONE 

x


E’ buona regola effettuare le connessioni del dispositivo con altri apparecchi (TV, VCR, HI-FI, etc.) e l’antenna prima 
di collegarlo all’alimentazione. Con il ricevitore in tensione è possibile infatti che, durante l’inserimento dei connettori, 
si creino differenze di potenziale elettrico in grado di generare correnti che possono danneggiare gli apparati. 

x


La connessione SCART diretta del dispositivo al TV dovrebbe sempre essere fatta come primo test funzionale, in 
quanto schemi di collegamento più complessi potrebbero portare a malfunzionamenti non riconducibili a guasti e/o 
difetti dei singoli apparecchi ma a problemi di incompatibilità fra gli stessi. 


1. 

RF IN

  Ingresso segnale d’antenna. 

2. 

RF LOOP THROUGH

  Uscita passante segnale d’antenna verso il TV. 

3. 

TV SCART

  Presa SCART d’uscita verso il TV. 

4. 

VCR SCART

  Presa SCART per la videoregistrazione. 

5. 

DIGITAL AUDIO

  Uscita Audio Digitale Coassiale per amplificatori home-theatre. 

6. 

CAVO ALIMENTAZIONE

  Cavo di alimentazione integrato per il collegamento alla presa elettrica 230 

Volt ~, 50Hz

Содержание TS6281

Страница 1: ......

Страница 2: ......

Страница 3: ...zioni avanzate 6 4 1 Password 6 4 2 Controllo Parentale Protezione minori 6 4 3 Protezione avanzata Funzione Hotel 6 4 4 Ricerca ed Aggiornamento Canali 6 4 4 1 Scansione canali manuale 6 4 4 2 Aggiornamento canali in stand by 6 4 5 Regolazione orario 6 4 6 Aggiornamento Software 7 4 6 1 Via USB 7 4 6 2 Via etere OTA 7 4 7 Risparmio energetico Spegnimento Automatico 7 4 8 Reset di fabbrica 7 5 USB...

Страница 4: ...no dell apparecchio attraverso le fessure per la ventilazione può causare seri danni PULIZIA x Prima di procedere ad operazioni di pulizia staccate il dispositivo dalla presa di corrente x Per pulire l esterno del ricevitore usare un panno morbido e asciutto o leggermente inumidito d acqua Evitare l uso di prodotti chimici o solventi VENTILAZIONE x Assicurarsi che nel luogo di installazione dell a...

Страница 5: ...on altri apparecchi TV VCR HI FI etc e l antenna prima di collegarlo all alimentazione Con il ricevitore in tensione è possibile infatti che durante l inserimento dei connettori si creino differenze di potenziale elettrico in grado di generare correnti che possono danneggiare gli apparati x La connessione SCART diretta del dispositivo al TV dovrebbe sempre essere fatta come primo test funzionale i...

Страница 6: ...l ricevitore tra i programmi TV a quelli Radio 4 MUTE Inibisce l audio del ricevitore 5 VOL VOL Aumenta diminuisce il livello del volume audio 6 EPG Guida Elettronica ai Programmi 7 MENU Accede al menu del ricevitore 8 CH CH Cambio canale successivo precedente 9 AUDIO Scelta traccia e modalità audio 10 SUB Abilita i sottotitoli Standard DVB o Televideo indicizzati 11 FRECCIA Navigazione tra voci e...

Страница 7: ...tenna solo se si utilizza un antenna attiva da alimentare tramite il connettore antenna RF IN del ricevitore Accendere spegnere l alimentazione col tasto freccia Spostarsi sulla voce Ricerca premendo il tasto freccia ATTENZIONE Se si utilizza un antenna classica da tetto o un antenna già alimentata l alimentazione antenna deve inevitabilmente rimanere spenta rischio di sovraccarico Scansione Autom...

Страница 8: ...ione Per attivare disattivare questa protezione accedere al menu principale premendo MENU e tramite i tasti numerici del telecomando inserire la password di sistema par 4 1 4 4 Ricerca ed Aggiornamento Canali Durante la prima installazione viene eseguita la ricerca automatica dei canali disponibili Periodicamente in occasione dell attivazione di nuovi servizi televisivi radiofonici o modifiche è n...

Страница 9: ...o aggiornamento software tramite la quale il ricevitore eseguirà a scelta dell utente una scansione su tutte le frequenze consigliata o puntuale per esperti Automatico Il menu Strumenti Aggiornamenti Automatici Aggiornamento SW è invece dedicato alla personalizzazione della ricerca aggiornamento software automatica In particolare si distinguono due casi a seconda del valore del parametro Modo Oper...

Страница 10: ...penga comunque in standby Registrazione istantanea Dopo aver collegato la memoria USB per avviare la registrazione manualmente sintonizzarsi sul programma interessato e premere il tasto REC del telecomando Essa ha una durata predefinita di due ore ma se si preme nuovamente il tasto REC si potrà modificarla immettendo ore e minuti Per terminare la registrazione in anticipo premere invece il tasto S...

Страница 11: ...che realizzare presentazioni di immagini e Play List musicali Premere il tasto INFO all interno del Lettore Multimediale per ottenere informazioni sull utilizzo del menu 6 Struttura del menu Il menu del ricevitore è così strutturato Menu Principale Canali Installazione Configura Strumenti Gestione USB Lista Canali TV Lista Canali Radio Lista CH TV Rimossi Lista CH Radio Rimossi Cancella Tutti i Fa...

Страница 12: ... puntato correttamente verso il sensore infrarossi del ricevitore Le batterie sono scariche Le batterie sono cariche ma non inserite nel verso corretto Il telecomando vi è caduto e i componenti interni si sono danneggiati Premere il pulsante ON ST BY sul pannello frontale per verificare il buon funzionamento del ricevitore Verificare che non vi siano ostacoli davanti al pannello frontale Sostituir...

Страница 13: ...IF Uscita SCART TV Out Video RGB CVBS audio L R Presa SCART VCR Out In Video CVBS audio L R Connettori RCA Audio Stereo Connettore RCA Video Porta dati seriale RS232 Porta USB Frontale USB 2 0 5V 500mA MAX memoria USB massimo 1TB Lettura file multimediali via USB Foto JPG Musica MP3 Video SD MPEG Registrazione via USB Da sintonizzatore TV interno in formato MPG originale Aggiornamento software Via...

Страница 14: ......

Страница 15: ...First time installation 5 4 Receiver settings 6 4 1 Password 6 4 2 Parental Control 6 4 3 Advanced menu protection Hotel Function 6 4 4 Channel scanning and updating 6 4 4 1 Manual channel scanning 6 4 4 2 Standby channel updating 6 4 5 Time setting 6 4 6 Software Upgrading 7 4 6 1 Via USB 7 4 6 2 Over The Air OTA 7 4 7 Energy saving Auto Standby 7 4 8 Factory Reset 7 5 USB Recording and playback ...

Страница 16: ...onnected SMALL OBJECTS x Keep the receiver away from coins or other small objects Objects which fall into the appliance via the ventilation gaps could cause serious damage CLEANING x Before cleaning disconnect the device from the power supply x To clean the outside of the receiver use a soft and dry or slightly damp cloth Avoid using products which contain chemicals or solvents VENTILATION x Make ...

Страница 17: ...ect the receiver with other appliances e g TV VCR HI FI etc and the antenna before plugging in the mains lead When the receiver is powered electrical voltage differences may be created when plugging in the jacks which may generate currents that could damage the appliances x The direct TV SCART connection should always be used as a first operating test since other more complex connection sequences ...

Страница 18: ...related functions 1 STANDBY ON Stand by 2 AV Disable TV SCART 3 TV RADIO Swaps between TV radio program receiver modes 4 MUTE Mute 5 VOL VOL Audio volume up down 6 EPG Electronic Program Guide 7 MENU Main menu 8 CH CH Next Previous channel 9 AUDIO Set audio mode or select audio track 10 SUB Subtitles either Standard DVB or Teletext TTX 11 Navigate menu items options 12 Modify menu parameters optio...

Страница 19: ...door amplified antenna that is powered by the receiver CAUTION With a traditional antenna like typical rooftop models or an independently powered antenna the antenna power option must be set to off risk of overload Channel Scan Press OK item to start the automatic channel scan When the scan is completed if there are no LCN conflict the receiver will enter the viewing mode LCN Conflict Resolution W...

Страница 20: ... any channels available at that time However later scans may become necessary if for instance a new channel becomes available or when an existing channel changes frequency 4 4 1 Manual channel scanning To access the channel scan function from the viewing mode press MENU on the remote control to open the main menu select Installation and then one of the following options 1 Auto Scan an automatic sc...

Страница 21: ... daily for a new available software update at the defined Time in operate mode and if active even in Standby mode 4 7 Energy saving Auto Standby This receiver is equipped with an energy saving function after three hours in active mode without any action of the user it will be switched automatically into standby mode Also two minutes before the switching a notification message will appear on screen...

Страница 22: ...called from EPG by pressing the numeric button 1 NOTE x Before to reserve a recording check the disk space x Leave the USB storage device connected to the receiver Recorded Files Managing On Media Record Manage menu it s possible to rename delete and protect the recorded files stored on ALIDVR folder Choose the desired option following the dialog window of the menu 5 2 Timeshift Watching an event ...

Страница 23: ... Setting OSD Language TV System Region and Time Timer Setting OSD Setting Parental Lock Auto Standby Receiver Information Game Load Factory Default Software Upgrade Automatic Upgrade Setting Media Player Record Manage Removable Disk Information DVR Configuration Safely Remove Storage Device Disk Format CAUTION The menus are simple and easy to navigate Use the arrows OK and number buttons and alway...

Страница 24: ...ction The remote control has been dropped and its internal components have been damaged Press the STAND BY button on the front panel to check the receiver is working properly Make sure nothing is obstructing the front panel Change batteries Check the battery polarities Contact the local dealer and buy a new remote control 6 You have forgotten the Password The default password is 0 0 0 0 four zeros...

Страница 25: ...DIF Optical Digital Audio Output SPDIF TV SCART Output Out Video RGB CVBS audio L R VCR SCART Output Out In Video CVBS audio L R Stereo Audio Output RCA Video Output RCA RS232 Serial Data Port USB Port USB 2 0 5V 500mA MAX USB memory max size 1TB USB Media Player Foto JPG Musica MP3 Video SD MPEG USB Recording From internal tuner source TV original MPG format Software Upgrade Via USB Over The Air ...

Страница 26: ......

Страница 27: ......

Страница 28: ...e tecniche Tele System Electronic states that this product meets the basic European requirements of 2009 125 CE reg no 1275 2008 Energy related Products ErP 2004 108 EC Electromagnetic Compatibility EMC and 2006 95 EC Low Voltage Directive LVD following the technical standards x Compatibilità elettromagnetica Electromagnetic compatibility x EN 55013 2001 A1 2003 A2 2006 x EN 55020 2007 x EN 61000 ...

Отзывы: