13
USE
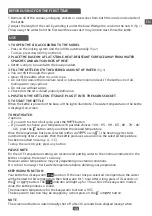
1. TO OPEN THE LID, ACCORDING TO THE MODEL
– Press on the locking system and the lid lifts automatically.
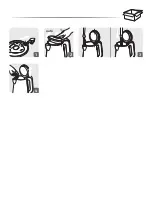
(fig 2)
To close, press down firmly on the lid.
2. PLACE THE BASE ON A FLAT, STABLE, HEAT-RESISTANT SURFACE AWAY FROM WATER
SPLASHES AND ANY SOURCES OF HEAT.
•
Kettle is only to be used with the base provided.
3. FILL THE KETTLE WITH THE DESIRED AMOUNT OF WATER.
(fig 3)
•
You can fill it through the spout.
•
Never fill the kettle when it is on its base.
•
Do not fill it above the maximum level, or below the minimum level. If the kettle is too full,
boiling water may spill out.
•
Do not use without water.
•
Check that the lid is closed properly before use.
4. POSITION THE KETTLE ON ITS BASE. PLUG IT INTO THE MAINS SOCKET.
5. TO START THE KETTLE
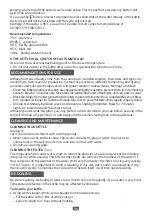
When the kettle is placed on the base, all the lights illuminate. The water temperature in the kettle
is displayed on-screen.
TO HEAT WATER:
2 options:
– If you wish to start a boil cycle, press the
button
– If you wish to choose your temperature (8 possible choices: 100° - 95° - 90° - 85° - 80° - 70° - 60°
- 40°), press the button until you obtain the desired temperature.
Once the temperature has been selected (either via
or via ), the heating cycle starts
automatically after 2 seconds, then the kettle produces a sound once the selected temperature
has been reached (ac/- 3°C).
To stop the current cycle, press any button.
PLEASE NOTE
For the 40°C temperature setting, we recommend putting water to the minimum indicated in the
kettle to improve the sensor’s accuracy.
However, water temperature may vary depending on external conditions.
It is critical to always check water temperature before drinking your preparation.
KEEP WARM FUNCTION
Your kettle has a keep warm
function. If the user has pre-selected a temperature, the water
will be heated to this temperature, then kept warm for 1 hour after a long press of 2 seconds on
the or
button. The
indicator will light up for 1 hour. Once the keep warm mode is
done, the kettle produces a sound.
The maximum temperature for the keep warm function is 95°C.
The keep warm function may be stopped by a short press on the or
button.
NOTE
The screen and buttons automatically shut off after 30 seconds have elapsed (except when
BEFORE USING FOR THE FIRST TIME
1. Remove all of the various packaging, stickers or accessories from both the inside and outside of
the kettle.
2. Adjust the length of the cord by winding it under the base. Wedge the cord into the notch.
(fig 1)
Throw away the water from the first two/three uses as it may contain dust. Rinse the kettle.
EN
Содержание Theia Control
Страница 1: ...EN Theia Control kettle www tefal com DE NL ES FR DA NO SV PT IT FI EL ZH KO TH MS TR AR FA VI...
Страница 2: ...1 4 2 3 1 auto...
Страница 80: ...80 8 8 40 60 70 80 85 90 95 100 1...
Страница 81: ...81 8 8 EL...
Страница 82: ...82 1000 m 1000...
Страница 83: ...83 1 2 2 3 3 4 5 2 8 100 95 90 85 80 70 60 40 2 3 C 40 C 1 2 1 95 C 1 2 1 EL...
Страница 84: ...84 4 10 15 camellia sinensis 3 5 oolong 7 Ceylon 30 90 C 40 60 C 70 C 80 C 85 C 70 C 80 85 C 90 C 95 C 100 C 6...
Страница 85: ...85 15 service service 1 25 g 15 5 6 EL...
Страница 86: ...86 2012 19 E WEEE E0 E1 E3 1...
Страница 101: ...101 8 8 8 ZH 8 40 60 70 80 85 90 95 100 1...
Страница 102: ...102 1000 1000...
Страница 103: ...103 1 2 1 1 2 2 3 3 4 5 2 8 100 95 90 85 80 70 60 40 2 3 40 2 1 1 95 60 ZH...
Страница 104: ...104 30 90 C 40 60 C 70 C 80 C 85 C 70 C 80 85 C 90 C 95 C 100 C 6 4 10 15 3 5 7 1 2 1 1 2 25 15...
Страница 105: ...105 5 6 ZH 15 WEEE 2012 19 EU E0 E1 E3 1...
Страница 106: ...106 8 8 40 60 70 80 85 90 95 100 100 C Keep Warm 1...
Страница 107: ...107 8 8 KO...
Страница 108: ...108 1 2 1 1000m 1000m...
Страница 109: ...109 1 2 2 3 3 4 5 100 8 100 95 90 85 80 70 60 40 2 3 C 40 C 2 1 1 95 C 30 90 C 40 60 C 70 C 80 C 85 C 2 3 KO...
Страница 110: ...110 4 10 15 1 80 85 C 2 4 2 100 C 2 3 2 90 C 5 7 1 1 2 25g 15 5 6 70 C 80 85 C 90 C 95 C 100 C 6...
Страница 111: ...111 15 AS KO...
Страница 112: ...112 Waste Electrical and Electronic Equipment WEEE European Directive 2012 19 EU E0 E1 E3 1...
Страница 113: ...113 8 TH 8 40 60 70 80 85 90 95 100 1...
Страница 114: ...114 8 8...
Страница 115: ...115 1000 1 000 TH...
Страница 116: ...116 1 2 2 3 3 4 5 2 8 100 95 90 85 80 70 60 40 2 3 C 40 1 2 1 95 C 1 2 1...
Страница 117: ...117 4 10 15 camellia sinensis 3 5 7 30 90 C 40 60 C 70 C 80 C 85 C 70 C 80 85 C 90 C 95 C 100 C 6 TH...
Страница 118: ...118 15 1 25 15 5 6...
Страница 119: ...119 2012 19 EU WEEE E0 E1 E3 1 TH...
Страница 120: ...120 WEEE 2012 19 EU E0 E1 E3...
Страница 121: ...121 15 15 25 6 5 AR...
Страница 122: ...122 4 10 15 3 5 7 85 80 70 60 40 90 70 85 80 90 95 100 6 6...
Страница 123: ...123 1 1 2 2 2 3 3 3 4 4 5 5 85 80 70 60 40 8 100 95 90 3 40 95 30 1 AR...
Страница 124: ...124 1000 1000...
Страница 125: ...125 8 8 AR...
Страница 126: ...126 8 60 40 8 100 95 90 85 80 70...
Страница 127: ...127 WEEE 2012 19 EU E0 E1 E3 FA...
Страница 128: ...128 15 TEFAL 15 25 6 5...
Страница 129: ...129 15 10 3 7 1 85 80 70 60 40 90 70 85 80 90 95 100 6 6 FA...
Страница 130: ...130 1 1 2 2 2 3 3 3 4 4 5 5 60 70 80 85 90 95 100 8 40 2 40 1 1 2 2 1...
Страница 131: ...131 1000 FA...
Страница 132: ...132...
Страница 133: ...133 FA 90 85 80 70 60 40 8 100 95...


