background image

3.Quick Review

(7)

4.

Panel Operation


4.1.Turn On/Off the Channel Output

Press the 

On/Off

 key to turn on/off the channel; 

4.2.Set the Output Voltage/Current

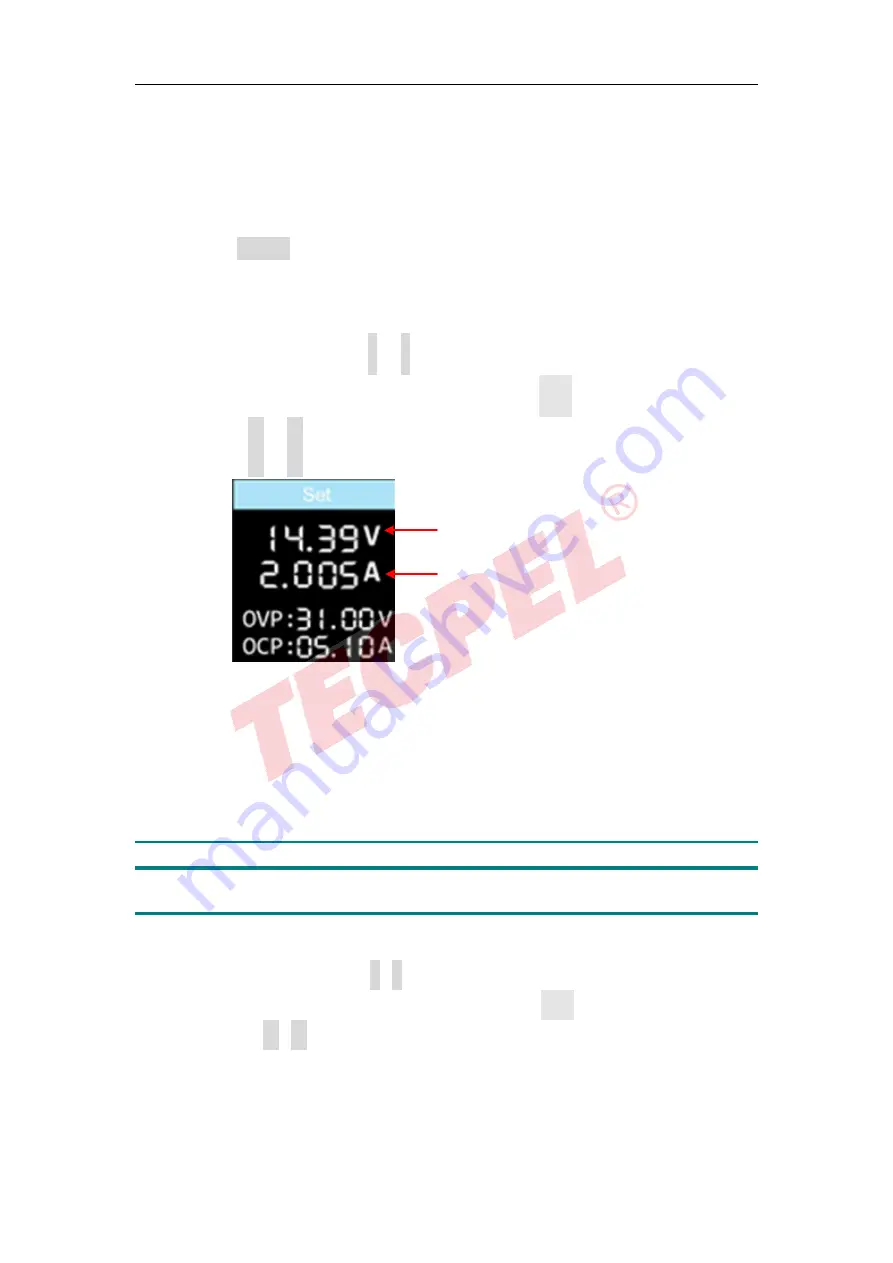
In the channel setting area, press the 

/

 keys to move the red cursor between parameters. 

After selecting the output voltage/current setting value, turn the 

knob

 to change the current cursor 

value, and press 

/

 key to move the cursor position. 


4.3.Over Voltage/Current Protection

Overvoltage protection (O.V.P) or overcurrent protection (O.C.P): after the output is turned on, 

once the output voltage/current reaches the set value of O.V.P/O.C.P, the instrument will cut off 

the output, a warning will show on the screen. 

Note:

When the instrument disables the output due to protection, after you make some 
adjustments, the channel must be restarted to output normally.

This function can keep the power output from exceeding the load rating to protect the load. 

In the channel setting area, press the 


 keys to move the red cursor between parameters. After 

selecting the overvoltage/overcurrent protection value, turn the 

Knob

 to change the current cursor 

value, and press the 


direction key to move the cursor position. 

Set values of voltage

Set values of current


8

Содержание TPS-1305R

Страница 1: ...Single Channel Output DC Power Supply User Manual TPS 1305R ...

Страница 2: ... obtain service under this warranty the customer must notify our company of the defect before the expiration of the warranty period Customer shall be responsible for packaging and shipping the defective product to the designated service centre a copy of the customers proof of purchase is also required This warranty shall not apply to any defect failure or damage caused by improper use or improper ...

Страница 3: ...tput 8 4 2 Set the Output Voltage Current 8 4 3 Over Voltage Current Protection 8 4 4 Memory key shortcut settings 9 4 4 1 Quick output 9 4 4 2 Edit 9 4 5 System Settings 10 4 5 1 Display Brightness 10 4 5 2 Language Setting 10 4 5 3 Buzzer 10 4 5 4 Display 10 4 6 Interface Setting 13 4 7 System Information 13 4 7 1 Review System Information 13 4 7 2 Restore Factory Settings 14 5 Troubleshooting 1...

Страница 4: ...he user manual for more information about ratings before connecting to the instrument Do not operate without covers Do not operate the instrument with covers or panels removed Use the Proper Fuse Use only the specified type and rating fuse for this instrument Avoid exposed circuit Be careful when working on exposed circuitry to avoid risk of electric shock or other injury Do not operate if any dam...

Страница 5: ...could result in damage to this product or other property Terms on the product The following terms may appear on this product Danger Indicates an immediate hazard or injury possibility Warning Indicates a possible hazard or injury Caution Indicates potential damage to the instrument or other property Safety Symbols Symbols on the product The following symbols may appear on the product Hazardous Vol...

Страница 6: ...t menu select parameters Edit the cursor OK Key 1 Enter the menu or confirm the entered parameters 2 Switch the display mode between Number and Curve Knob Select the main menu or change the value function equals to the confirmation key On Off Key Turn on off the channel Channel Output Terminal Output access of channel Power Button Turn on off the instrument 3 ...

Страница 7: ...n is displayed on the top of the screen When locked pressing any other key has no effect In the locked state press and hold this button for about 5 seconds When you hear a beep the panel is unlocked Memory Key 5 sets of channel parameters can be stored for quick output System Key System settings interface settings system information Power switch Switch between 110 V and 220 V AC Power Input Jack A...

Страница 8: ...st or damaged please get in touch with the distributor of our responsible for this service or the our local offices 3 Check the Complete Instrument If it is found that there is damage to the appearance of the instrument or the instrument can not work normally or fails in the performance test please get in touch with the our distributor responsible for this business or the our local offices If ther...

Страница 9: ... to the set voltage value and also that the actual current value displayed is nearly to zero 4 Check that if the output voltage can be adjusted from zero to the maximum rating When it is set to the maximum or minimum a beep is heard indicating that the limit has been reached 3 4 2 Current Output Inspection The following steps check basic current functions with a short across the power supply s out...

Страница 10: ...3 Quick Review 6 Turn off the channel output and remove the short circuit from the output terminals 7 ...

Страница 11: ...output is turned on once the output voltage current reaches the set value of O V P O C P the instrument will cut off the output a warning will show on the screen Note When the instrument disables the output due to protection after you make some adjustments the channel must be restarted to output normally This function can keep the power output from exceeding the load rating to protect the load In ...

Страница 12: ... select box Press to move the select box 3 After selecting the certain parameter press knob or OK on the panel to confirm the input value 4 4 2 Edit To edit the channel parameters of M1 to M5 follow these steps 1 Press the front panel Memory button the screen displays the quick setup interface 2 Press the arrow keys to display the editing interface 3 Press the keys to show a red cursor 4 Press the...

Страница 13: ...o select the Utility menu Press the arrow keys to choose buzzer submenu Press the arrow keys to toggle the beeper on off When the buzzer is on the status bar icon lights up When the system prompts it beeps such as when the output is cut due to overvoltage overcurrent protection 4 5 4 Display Press the System softkey and turn the knob to select the Utility menu Press the arrow keys to choose Displa...

Страница 14: ...he Curve display mode Curve Type You can set the type of the displayed curve to voltage curve or current curve 1 Voltage Curve Two methods to set the curve type to voltage curve 1st Method Press the System softkey and turn the knob to select the Utility menu Press the arrow keys to choose Display submenu Press the arrow keys or turn the knob to set the display mode to Curve Press the arrow keys to...

Страница 15: ...menu Press the arrow keys or turn the knob to set the display mode to Curve Press the arrow keys to choose CurveType submenu press the arrow keys or turn the knob to set the curve type to Curr 2nd Method In system main interface you can also press the OK key or press the knob to select the Curve display mode Press the arrow keys to select the Curr curve type The display mode of Curr curve is as be...

Страница 16: ...values for the baud rate are 2400 4800 9600 19200 38400 57600 115200 and the factory default setting is 115200 Make sure the instrument s baud rate setting matches the baud rate setting of the computer you are using 2 Press the arrow keys to select the check digit and press the arrow keys to toggle None Odd Even 3 Press the arrow keys to select the stop bit and press the arrow keys to toggle 1 or ...

Страница 17: ...w keys to select the Factory Reset submenu Press OK to restore the factory default settings See the factory setting detail table below Output Voltage Current 5 V 2 A Limit Voltage Current 31 00V 5 10A System Backlight 50 Buzzer On Port Port Setting Baud Rate 115200 Data Digit 8 Parity Check None Stop Digit 1 Display Number 14 ...

Страница 18: ... service 2 The output is abnormal Check if the output voltage is set to 0V If so set it to other value Check if the output current is set to 0A If so set it to other value When in programmable output status check if there is any voltage current value is set to 0 If so set it to other value If the problem still exists please contact our for our service 6 Appendix 6 1 Appendix A Accessories The acce...

Страница 19: ...exterior perform the following steps Wipe the dust from the instrument surface with a soft cloth Take care not to scratch the transparent LCD protection screen when cleaning Disconnect power before cleaning your instrument Clean the instrument with a damp soft cloth not dripping with water It is recommended to clean with soft detergent or fresh water To avoid damage to the instrument do not use an...

Отзывы: