


9
Common step
|
Étape commune
| Etapa común
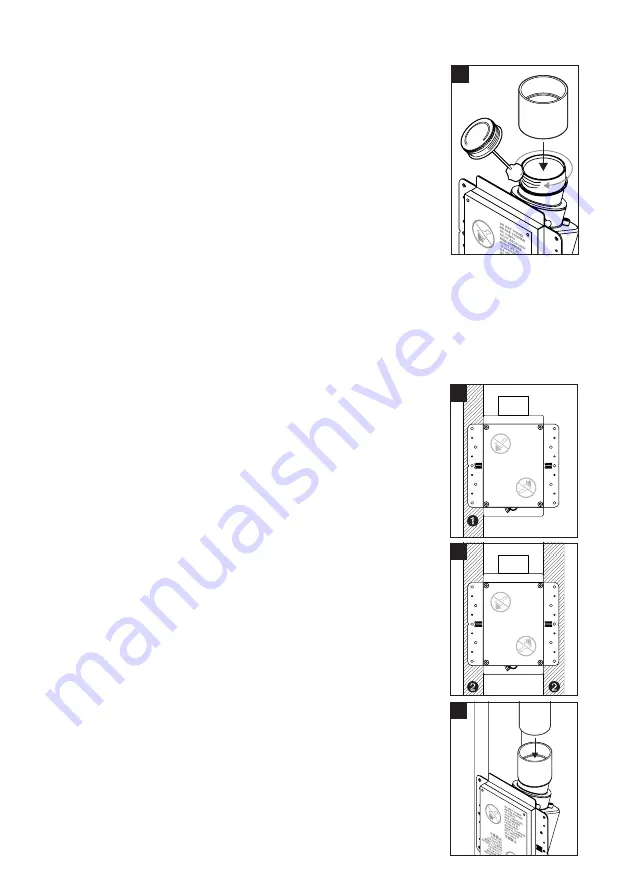
Install a grooved coupling, on the inlet's fi tting, using glue.
Apply glue on the inlet's fi tting only to prevent excess glue.
(fi gure 1)
IMPORTANT:
If the inlet is installed in an existing wall,
attach the grooved coupling to the PVC pipe rather than on
the inlet's fi tting.
Installer une bague à rainure sur le raccord de la prise avec de
la colle. Appliquer la colle sur le raccord de la prise seulement
afi n de prévenir les excédents.
(fi gure 1)
IMPORTANT :
Si la prise est installée dans un mur déjà
existant, coller la bague à rainure sur le tuyau de PVC plutôt
que sur le raccord de la prise.
Instalar un anillo con ranuras en la conexión de la toma con pegamento. Aplique el
pegamento sobre la conexión solamente con el fi n de evitar los excedentes.
(fi gura 1)
IMPORTANTE :
Si la toma está instalada en una pared existente, pegar el collar con
ranura en el tubo PVC más bien que en la toma.
Gyproc Installation
|
Installation placo-plâtre (gyproc)
Instalación pladur (gyproc)
Attach the frame of the inlet to the stud (2x4)
➊
. Make sure that
the inlet is leveled (fi gure 2) and that you leave 3" free behind
the inlet.
Fixer la prise au montant ou rail (2x4)
➊
. S’assurer la plaque soit
de niveau (fi gure 2) et qu'il y ait 3
"
de libre derrière la prise
.
Colocar la toma al montante de pared (2x4)
➊
. Asegurarse de que
esté bien alineada (fi gura 2) y que quede 3" (7.6 cm) de espacio libre
detrás de la toma.
We recommend to add another stud
➋
on the other side to
secure the inlet in place
(fi gure 3)
.
Nous recommandons d'ajouter un montant ou rail (2x4)
➋
de l'autre
côté pour bien fi xer la prise en place
(fi gure 3)
.
Recomendamos añadir un montante de pared
➋
del otro lado para
fi jar bien la toma en su sitio
(fi gura 3)
.
Install the pipe into the fi tting
(fi gure 4)
. Glue the pipe into the
fi tting, making sure it sits all the way to the ridge of the pipe
fi tting (see page 14).
Installer le conduit de PVC dans le raccord
(fi gure 4)
. Coller le
conduit dans le raccord et s’assurer qu’il est bien inséré au fond
de celui-ci (voir p.14).
Instalar el tubo de PVC dentro del “pipe fi tting”
(fi gura 4)
. Pegar el
tubo dentro del fi tting para asegurarse de que este bien puesto al
fondo del “pipe fi tting” (ver p.14).
DO NOT COVER
NE PAS COUVRIR
NO CUBRA
NICHT ABDECKEN
NON COPRIRE
ʺʥʱʫʬʠʬʠʰ
НЕ НАКРЫВАТЬ
MÅ IKKE TILDÆKKES
IKKE TILL-DEKK
NIE ZAKRYWA
Ć
NÃO TAPAR
不要盖上
DO N
OT
COVER
NE PA
S CO
UVRIR
NO
CU
BRA
NIC
HT ABDE
CKE
N
NO
N CO
PRIR
E
ʺʥʱ
ʫʬʠ
ʬʠ
ʰ
НЕН
АКРЫ
ВАТ
Ь
MÅ IKKE
TILD
ÆKKES
IKKE
TIL
L-D
EKK
NIE
ZAK
RYW
A
Ć
NÃO
TAP
AR
不要盖
上
DO NOT COVER
NE PAS COUVRIR
NO CUBRA
NICHT ABDECKEN
NON COPRIRE
ʺʥʱʫʬʠʬʠʰ
НЕ НАКРЫВАТЬ
MÅ IKKE TILDÆKKES
IKKE TILL-DEKK
NIE ZAKRYWA
Ć
NÃO TAPAR
不要盖上
DO N
OT
COVER
NE PA
S CO
UVRIR
NO
CU
BRA
NIC
HT ABDE
CKE
N
NO
N CO
PRIR
E
ʺʥʱ
ʫʬʠ
ʬʠʰ
НЕН
АКРЫВ
АТЬ
MÅ
IKKE TIL
DÆKKE
S
IKKET
IL
L-DEKK
NIEZ
AK
RY
WA
Ć
NÃO T
AP
AR
不要
盖上
2
1
3
4


