


English
7
BLAST CHILLER ISTRUCTION
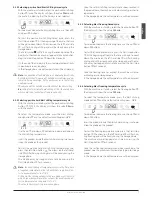
4.3.3 Selecting positive hard blast chilling timed cycle
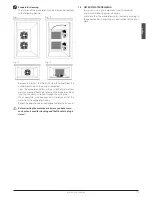
With the machine in standby, select the positive blast chilling
button
e
twice. The display will show the value
90 min
with
the prefix h, indicating that the hard cycle was selected.
To increase or decrease the blast chilling time, use the up
u
and down
y
buttons.
To start the positive blast chilling timed cycle, press the
Start/Stop button
q
. At the beginning of the cycle, the time
will begin to count down. The arrows on the left hand side
w
will flash during chilling and will be steady during the
storage phase.
The hard symbol
t
will flash during the second phase of the
hard cycle. The machine may be stopped at any time by hol-
ding the Start/Stop button
q
down for 3 seconds
On the end of the Hard cycle the system goes automatically
in positive preservetion phase.
In the storage phase the cell temperature will be displayed.
Note:
the duration of the hard phase is handled automatically
by the Blast chiller. The period of hard phase is determined au-
tomatically in percentage by the parameter set in the factory
under password.
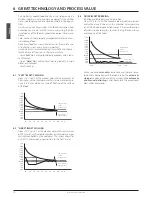
The duration of the hard phase will be 66% of the time setting.
Ex:
setting the total time of hard chilling at 100 ', the hard phase
will be hard to 66 ', while the soft phase will be 34'.
4.3.4 Selecting positive hard blast chilling temperature cycle
With the machine in standby, select the positive blast chilling
button
e
TWICE, the display will show the value
90 min
,
with the prefix h.
To select the temperature mode, press the blast chilling
mode button
t
and the default value will appear:
+3°C
Use the up
u
and down
y
buttons to increase or decrease
the blast chilling temperature.
Insert the product inside the blast chiller making sure to po-
sition the probe on the product.
To start the positive hard blast chilling temperature cycle,
press the Start/Stop button
q
. The arrows on the left hand
side
w
will flash during chilling and will be steady during the
storage phase.
The machine may be stopped at any time by pressing the
Start/Stop button
q
for 3 seconds
Note:
the hard chilling at temperature works in the first phase
at negative temperature in the cell, until the core probe will de-
tect a temperature at core of 15 ° C.
A this point the chilling will pass to the second phase of the cycle
with a higher temperature in the cell until the needle probe de-
tects a temperature in the product of +3 °C.
Then the chiller will pass to preservation phase
Once the set blast chilling temperature has been reached in
the product core, the machine will automatically go into sto-
rage mode.
In the storage phase the cell temperature will be displayed.
4.3.5 Selecting blast freezing timed cycle
With the machine in standby, select the freezing button
r
,
the display will show the value
240 min.
To increase or decrease the freezing time, use the up
u
and
down
y
buttons.
To start the freezing timed cycle, press the Start/Stop button
q
. At the beginning of the cycle, the time will begin to count
down. The arrows on the left hand side
w
will flash during
chilling and will be steady during the storage phase. The ma-
chine may be stopped at any time by pressing the Start/Stop
button
q
for 3 seconds
Once the freezing time has expired, the machine will auto-
matically go into storage mode.
In the storage phase the cell temperature will be displayed.
4.3.6 Selecting blast freezing temperature cycle
With the machine in standby, select the freezing button
r
,
the display will show the value
240 min.
To select the temperature mode, press the blast chilling
mode button
t
and the default value will appear
- 18°C.
To increase or decrease the freezing time, use the up
u
and
down
y
buttons.
Insert the product inside the blast chiller making sure to po-
sition the probe on the product.
To start the freezing temperature cycle, press the Start/Stop
button
q
. The arrows on the left hand side
w
will flash du-
ring freezing and will be steady during the storage phase.
The machine may be stopped at any time by pressing the
Start/Stop button
q
for 3 seconds
Once the set freezing temperature has been reached in the
product core, the machine will automatically go into storage
mode.
In the storage phase the cell temperature will be displayed.
i
i


