background image


Using the Software


MemoCam Manual


79 


Video Motion Detector – MemoCam 

Plus and MemoCam DVR 

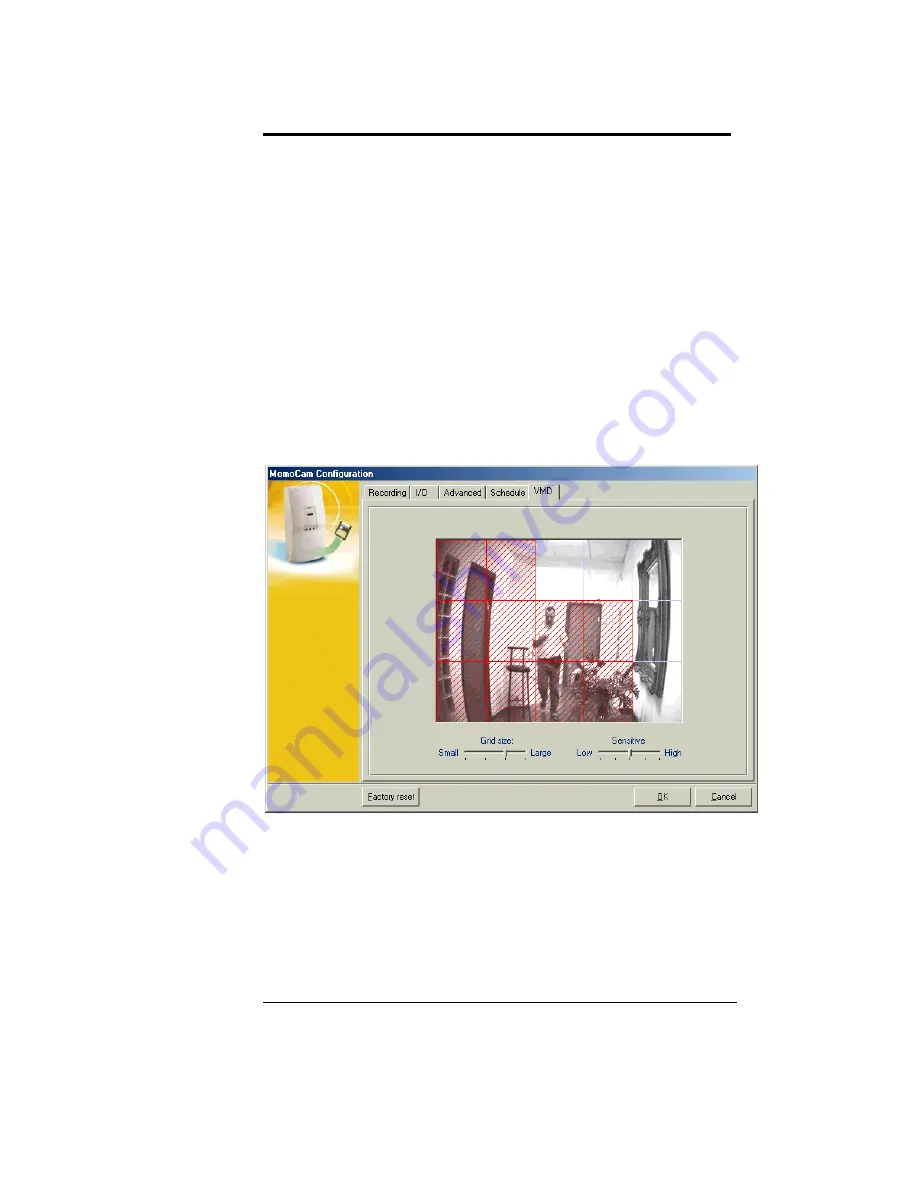
The VMD dialog is used to define the areas 

and sensitivity of MemoCam’s Motion 

Detection function.  

VMD settings are adjusted from the 

MemoCam Configuration Dialog VMD 

Tab

 (Figure 20). 


Figure 20:  MemoCam Configuration Dialog – 

VMD Tab 


Содержание MemoCam

Страница 1: ...MemoCam Series MemoCam MemoCam Plus MemoCam DVR Installation and Operation Manual...

Страница 2: ...the Software attempt to modify reprogram translate dissemble decompose or otherwise reverse engineer the Software sublicense the Software to anyone else or allow any one else to access or execute the...

Страница 3: ...in force until terminated You may terminate this License at any time by destroying the documentation and the Software together with all copies and adaptations This License shall also automatically ter...

Страница 4: ...DIFFERENT THAN OR IN ADDITION TO THE REPRESENTATIONS OR PROMISES OF THIS LICENSE AGREEMENT 14 Waiver No waiver of any right under this License Agreement shall be effective unless in writing signed by...

Страница 5: ...art 15 of the FCC Rules These limits are designed to provide reasonable protection against harmful interference in a residential installation This equipment generates uses and can radiate radio freque...

Страница 6: ...TS 4 APPLICATIONS 5 OPERATION 5 Device Setup 7 Remote Control Unit 8 Event Recording 8 Image Retrieval 9 SYSTEMS REQUIREMENTS 9 PACKING LIST 10 2 INSTALLING THE MEMOCAM 11 SELECTING A MOUNTING LOCATIO...

Страница 7: ...ISARMING THE MEMOCAM 33 MANUAL IMAGE RECORDING SNAPSHOT 34 USING THE VIDEO MONITOR 35 5 INSTALLING THE MEMOCAM SOFTWARE 37 INSTALLING THE SOFTWARE 38 6 USING THE SOFTWARE 41 BEFORE USING THE SOFTWARE...

Страница 8: ...GES 89 Copying Images 89 Filtering Images 93 Printing Images 94 Checking Image Integrity 94 MEMOCAM AND MULTIMEDIA CARD FUNCTIONS 96 Re naming the MemoCam Unit 96 Synchronizing the Time 98 Arming the...

Страница 9: ...iv...

Страница 10: ...d into functional sections as listed below 1 Introduction describes the main MemoCam features applications and system requirements 2 Installing the MemoCam describes the physical installation of the M...

Страница 11: ...software installation process 6 Using the Software describes the use of the functions available in the MemoCam software 7 Troubleshooting provides possible solutions to common problems 8 Technical Sp...

Страница 12: ...images from start of the cycle when Multimedia Card is full Disarm Disables the automatic detection and recording function Entry Delay Time between first trigger and actual recording unit is armed En...

Страница 13: ...room LED Light Emitting Diode Multimedia Card A stamp sized plastic card containing read write non volatile memory PIR Passive Infra Red motion detector Snapshot Recording of a single picture Trigger...

Страница 14: ...Assistance and Support Should you require assistance or support in using your MemoCam you can visit the support section of our web site at www vdomain com and file a problem report or contact the loc...

Страница 15: ...MemoCam x...

Страница 16: ...PIR detector MemoCam automatically records events on the Multimedia Card following a trigger The recording can be activated by an external open contact an internal PIR detector or a video motion dete...

Страница 17: ...rated CCTV system packaged in a standard PIR detector case MemoCam DVR contains no internal camera or PIR B W camera color optional MemoCam MemoCam Plus CCIR EIA B W video inputs 2 for MemoCam Plus 3...

Страница 18: ...e and recording time per event delay between frames and more Fixed or cyclic recording modes Pre alarm recording Image integrity protection Event and Arm Disarm Scheduler Video motion detection MemoCa...

Страница 19: ...e stand alone MemoCam replaces the classic Time Lapse VCR PIR detector Camera equipment set Modular solution from single camera to multiple site multiple camera systems Easy to use PC software Economi...

Страница 20: ...d at a different site location and set up using the Multimedia Card The MemoCam is activated using the remote control unit The camera starts recording snapshots when triggered by the PIR or an externa...

Страница 21: ...MemoCam 6 All images are stored in the Multimedia Card Figure 1 The MemoCam System...

Страница 22: ...a PC connected to a Multimedia Card reader Configuration parameters include Recording e g fps frames quality Video setup video out brightness contrast Triggering e g external connection source action...

Страница 23: ...ring setup MemoCam Plus DVR only Record one frame or snapshot Event Recording An event results in the recording of one or more images following a single trigger activation Each event is recorded accor...

Страница 24: ...PC via a USB or Parallel Multimedia Card Reader Systems Requirements Minimum system requirements are as follows CPU Pentium II 200Mhz or higher RAM 16 Mega bytes or higher Graphic adapter Super VGA or...

Страница 25: ...MemoCam Kit includes the following items MemoCam unit Multimedia Card 8 MB or higher Protective card cover MemoCam Plus only Mounting Kit brackets Power Supply IR Remote Control Unit and 2 AAA Batter...

Страница 26: ...unting location see page 12 2 Install the mounting bracket see page 13 3 Connect the power supply to the MemoCam see page 13 4 Connect optional detectors and external devices such as external cameras...

Страница 27: ...ord can reach a nearby power receptacle The PIR is most sensitive in detecting sideway motion The MemoCam performs best in steady light and stable temperature Avoid the Following Locations Facing dire...

Страница 28: ...nnect the power supply to the power jack coming out of the MemoCam unit Plug the power supply unit into a wall socket The MemoCam status LED indicators turn on see page 25 for details Optional Connect...

Страница 29: ...ver from its base Remove the MemoCam s front cover by unscrewing the holding screw as shown in Figure 2 Figure 2 Removing the MemoCam Front Cover The MemoCam printed circuit board contains a wire conn...

Страница 30: ...Installing the MemoCam MemoCam Manual 15 Figure 3 MemoCam Terminal Block Figure 4 MemoCam Plus DVR Terminal Block...

Страница 31: ...2VDC 500mA power supply that feeds both the PIR and the video circuits The MemoCam DVR is powered by a 12 VDC 400 mA power supply Dual Power Source The MemoCam can be connected to a normal power suppl...

Страница 32: ...able 1 for terminal connections Not Installed In this mode the MemoCam can be connected to a backup power supply e g UPS or battery from an alarm panel in addition to the main power supply The backup...

Страница 33: ...power supply ground 2 12V Connect to the positive output of the ordinary power supply when jumper J1 is installed or to the backup power supply when jumper J1 is not installed 3 12VID Connect to the...

Страница 34: ...e an external alarm device When triggered movement is detected the relay N C contact opens for 1 8 sec standard 6 and 7 RELAY 2 terminals Normally Open contact This relay is software activated When tr...

Страница 35: ...removed Can be connected to an external alarm device Other Terminal Blocks IN2 and Gnd Connects an auxiliary device IN3 and Gnd Connects an auxiliary device V_In2 and Gnd Connects to an external came...

Страница 36: ...ly Connect camera1 using the external video plug Figure 5 Figure 5 MemoCam DVR External Connectors Note The same video standard CCIR or EIA must be used for all cameras internal and external in MemoCa...

Страница 37: ...e MemoCam 2 Insert the device wires through the wire access hole 3 Connect the wires from the connectors on the terminal block as shown in Table 1 Note If you are connecting a backup power device ensu...

Страница 38: ...r see page 41 You can use the remote control unit to arm disarm the MemoCam or take a snapshot see Remote Control Operation on page 31 for details To operate the MemoCam you must 1 Plug in the power s...

Страница 39: ...emoCam as follows 1 Ensure that the MemoCam unit is powered 2 Insert the Multimedia Card into the MemoCam unit 3 Wait until the red LED1 turns off 4 Remove the MultiMedia Card from the unit and insert...

Страница 40: ...MemoCam Manual 25 LED Indicators The MemoCam unit contains three LED status indicators The LED indicators are located on the front of the MemoCam unit The 3 LED indicators as shown in Figure 7 Figure...

Страница 41: ...een New recordings on the card Blink Green Off Data is written on the card Orange Card is full Off Card is inserted and working properly LED 2 PIR activation Power Red Flashes when movement detected D...

Страница 42: ...beep Enter a disarm code short beep after each button is pressed Disarm the unit 2 or 3 long beeps The MemoCam unit can also emit an audible signal when In Disarm mode The Multimedia Card is not inser...

Страница 43: ...otect the Multimedia card slot You must remove this cover before attempting to insert or remove the Multimedia card Insert the Multimedia Card into the card slot on the bottom of the MemoCam as shown...

Страница 44: ...oCam Manual 29 Remove the Multimedia Card by pushing it gently into the card slot and quickly releasing it This will unlock the card from the slot Note The MemoCam must be in disarm mode before you re...

Страница 45: ...MemoCam 30...

Страница 46: ...attempting to use it The Remote Control Unit The Remote Control Unit provided with your MemoCam is used to Arm Disarm manually record image snapshots The Remote Control Unit can be used to control the...

Страница 47: ...To activate arm the MemoCam 1 Make sure the MemoCam is plugged in and the Multimedia card is inserted 2 Point the Remote Control unit at the MemoCam and Click on the Arm button The MemoCam beeps once...

Страница 48: ...m To de activate disarm the MemoCam 1 Point the Remote Control unit at the MemoCam and enter the Disarm Code using the four digit buttons Note To find out how to define a Disarm Code see page 69 2 Cli...

Страница 49: ...age Recording Snapshot To manually record an image 1 Make sure that the MemoCam is not in Active armed mode and that the Multimedia card is inserted 2 Point the Remote Control unit at the MemoCam and...

Страница 50: ...to the MemoCam for live video monitoring Use the numbered buttons on the remote control unit to switch between the cameras whose image is shown on the video monitor as follows 1 Shows the image from C...

Страница 51: ...MemoCam 36...

Страница 52: ...e enclosed CD ROM The MemoCam software has the look and feel of Microsoft ExplorerTM It allows you to program MemoCam using the Multimedia Card The MemoCam software allows you to View recorded images...

Страница 53: ...rt up Windows If you are using Windows NT ensure that the Active Desktop feature is on 2 Insert the enclosed MemoCam software CD ROM into the CD ROM drive The Install Shield Wizard starts the installa...

Страница 54: ...ing Screen of Setup Wizard 4 Select the Restart option and click Finish to complete the setup and exit the Setup Wizard The computer is re started Note An error message will appear during the installa...

Страница 55: ...MemoCam 40...

Страница 56: ...fine MemoCam I O parameters Define the disarm code indicators default viewer and enable image integrity verification Schedule arm disarm times Adjust VMD area and Sensitivity MemoCam Plus only Retriev...

Страница 57: ...re that the MemoCam unit is powered 2 Insert the Multimedia Card into the MemoCam unit 3 Wait until the red LED 1 turns off 4 Remove the Multimedia Card and insert it into the card reader that is conn...

Страница 58: ...en Microsoft Explorer and enter MemoCam in the Address field The following message Figure 12 is displayed for a few seconds then the MemoCam screen opens Figure 12 Multimedia Card Reader Communication...

Страница 59: ...MemoCam 44 The MemoCam screen Figure 13 lists the files that reside on the Multimedia Card Figure 13 MemoCam Software Screen...

Страница 60: ...he following unique buttons Details displays a list of the pictures see page 83 Thumbnails displays thumbnails of the pictures see page 85 Configure opens the MemoCam configuration screens see page 48...

Страница 61: ...dialog box see page 98 File Clear event files Deletes image files from the Multimedia Card see page 101 File Arm MemoCam Unit Arms the MemoCam unit upon insertion of the Multimedia Card see page 100...

Страница 62: ...ult image player see page 86 Edit Print Prints selected image see page 94 Edit MemoCam Properties Opens the MemoCam configuration screens see page 48 Edit View Details Displays a dialog providing deta...

Страница 63: ...configure the following MemoCam parameters Define recording options see page 50 Recording Configuration Recording Method Camera Settings Define I O Settings see page 59 Define Advanced Options Disarm...

Страница 64: ...ened To open the MemoCam Configuration Dialog Click on the Configure button in the MemoCam software window or Select Edit MemoCam Properties in the MemoCam software menu The MemoCam Configuration Dial...

Страница 65: ...uration Dialog Recording Tab Figure 14 Note Before you configure any of the parameters ensure that the Multimedia Card is inserted into the Multimedia Card reader Figure 14 MemoCam Configuration Dialo...

Страница 66: ...and contrast per camera Setting Picture Quality There are four available picture quality settings listed in increasing quality resolution and image size Good 6 to 9 Kbytes Very Good 9 to 12 Kbytes Exc...

Страница 67: ...is appropriate to your requirements To set picture quality 1 Open the MemoCam Configuration Dialog Recording Tab 2 Slide the Recording Quality selector to the required setting The quality level is ind...

Страница 68: ...The available range for post alarm frames is 1 100 frames Note The MemoCam always records one frame prior to alarm activation To set the number of post alarm frames 1 Open the MemoCam Configuration D...

Страница 69: ...MemoCam alarm activation The available range for delay between frames is 0 3 300 seconds To set the time between frames 1 Open the MemoCam Configuration Dialog Recording Tab 2 Enter the delay time in...

Страница 70: ...one trigger activation and the next Available range for time between triggers is 0 999 seconds To set the time between triggers 1 Open the MemoCam Configuration Dialog Recording Tab 2 Enter the time...

Страница 71: ...first trigger activation and the actual time of image recording This delay is used for entering the room or detection field and de activating the MemoCam The available range for both the entry and exi...

Страница 72: ...yclic manner when the Multimedia Card memory is full new images are recorded over the oldest ones in the memory To define the recording method 1 Open the MemoCam Configuration Dialog Recording Tab 2 I...

Страница 73: ...ation MemoCam supports only 1 camera while MemoCam Plus and DVR support a total of 3 cameras each To adjust video source brightness and contrast 1 Open the MemoCam Configuration Dialog Recording Tab 2...

Страница 74: ...configured from the MemoCam Configuration Dialog I O Tab The I O Tab for MemoCam is shown inFigure 15 The I O Tab for MemoCam Plus and MemoCam DVR is shown in Figure 16 Note Before you configure any o...

Страница 75: ...Configuration Dialog I O Tab Figure 16 MemoCam Plus DVR Configuration Dialog I O Tab MemoCam Only The MemoCam I O Tab is used to define following options Triggers External Arm Disarm option Define rel...

Страница 76: ...log I O Tab 2 In the Triggers area check the required triggers from the available options PIR internal Allow manual snapshots from control manual External trigger 3 Click OK The settings are saved in...

Страница 77: ...he arm disarm dry contact input Arm when OPEN Normally Closed or Disarm when OPEN Normally Open 4 To save the settings click the OK button The Configure Dialog closes Relay Settings Relay time is the...

Страница 78: ...lay time in seconds in the Relay time field or check the Use Relay for IR Flash checkbox 3 Click OK The Configure window closes MemoCam Plus DVR Only The MemoCam Plus DVR I O Tab contains a matrix of...

Страница 79: ...nction is de activated when a cell shows a cross mark x A function is not available when the cell shows a hollow cross mark The following functions can be activated Record Camera 1 through 3 External...

Страница 80: ...re available for that particular input An external device e g control panel connected to an Input can be used for External Arm Disarm function The External Arm Disarm contact can be defined as Normall...

Страница 81: ...ted only after the PIR and VMD detect movement Only a single camera can be activated using the combination of PIR AND VMD Other cameras can remain PIR activated only The VMD can be used independently...

Страница 82: ...n event is being recorded and a new trigger occurs MemoCam Plus DVR records at least 2 frames from all selected cameras then switches to the new trigger Note Relay Activation is different for MemoCam...

Страница 83: ...ers are configured from the MemoCam Configuration Dialog Advanced Tab Figure 17 Note Before you configure any of the parameters ensure that the Multimedia Card is inserted into the Multimedia Card rea...

Страница 84: ...Editor Image Integrity Defining the Disarm Code The disarm code is used when you de activate disarm the MemoCam with the remote control unit The code consists of four 1 to 4 digits Note Consecutive n...

Страница 85: ...om 1 to 4 in each of the value fields These four numbers make up the disarm code 3 If required check the box to select the following option Use disarm code also for arming If checked the disarm code i...

Страница 86: ...e in disarm mode Continuous beeping while MMC is not inserted To define indicators 1 Open the MemoCam Configuration Dialog Advanced Tab 2 Select the desired options by checking the appropriate box Dis...

Страница 87: ...n also use the browse button to find the picture editor If you leave the field empty MemoCam uses the default image editor 3 To save the settings click the OK button The Configure Dialog closes Image...

Страница 88: ...Integrity Unchecking the checkbox disables the image integrity function To set an image integrity key 1 With image integrity enabled enter the key using the keyboard or load the key from a file using...

Страница 89: ...ew key Scheduling Events MemoCam Schedule is an weekly schedule function with a 10 minute time resolution You can use the Schedule function to configure the time at which Arm Disarm and Beep operation...

Страница 90: ...the Software MemoCam Manual 75 Figure 18 MemoCam Configuration Dialog Schedule Tab Note Before you configure any of the parameters ensure that the Multimedia Card is inserted into the Multimedia Card...

Страница 91: ...Add Button The Schedule Event dialog opens Figure 19 Schedule Event Dialog 2 Select an Action from the Action drop menu 3 Enter a Time in the Time field 4 Check the days to perform the action 5 Click...

Страница 92: ...ed Notes 1 Ensure that the time is synchronized before using Schedule see page 98 2 Ensure that you have the proper Time Zone setting on your PC 3 When you move the clock back or forth one hour becaus...

Страница 93: ...scheduled configuration is correct and click OK Re insert the Multimedia Card into the MemoCam 4 After power reset and inserting the Multimedia Card the MemoCam unit ignores all event prior to the cu...

Страница 94: ...r MemoCam Plus and MemoCam DVR The VMD dialog is used to define the areas and sensitivity of MemoCam s Motion Detection function VMD settings are adjusted from the MemoCam Configuration Dialog VMD Tab...

Страница 95: ...vity Before you access the MemoCam Configuration Dialog VMD Tab select an image of your area of interest in the MemoCam image list The image will be shown on the VMD Tab image display To adjust the gr...

Страница 96: ...ng the settings for intrusion detection Reverting to Factory Settings There are cases where you may need to revert to factory settings for the MemoCam configuration To revert to factory settings 1 Ver...

Страница 97: ...MemoCam 82 4 Click OK to confirm the reset The dialog closes and the factory default values are saved to the Multimedia Card...

Страница 98: ...are a number of ways in which you can view the MemoCam images As thumbnails As a detailed image list Separately using the default image viewer Viewing a List of Images To view a list of images Click o...

Страница 99: ...MemoCam 84 Figure 21 MemoCam Image List Note In case of multiple camera use you can see the name of the cameras as the part of the event name in the list of images...

Страница 100: ...the Software MemoCam Manual 85 Viewing Thumbnails To view thumbnails of the images on the Multimedia Card Click on the Thumbnails button The thumbnail images appear Figure 22 Figure 22 MemoCam Thumbn...

Страница 101: ...case of multiple camera use the image also includes a stamp with the name of the camera To view individual images using the default viewer Right click on an image name or thumbnail and choose View fr...

Страница 102: ...87 Whether integrity check is enabled or not To view an event s details 1 Select an event in the image name list or thumbnail 2 Choose Edit View Details in the MemoCam menu The Details dialog opens F...

Страница 103: ...ges consecutively Select Edit Play on the MemoCam menu The default player starts to cycle through the images You can also double click on an image in the list the player starts to cycle from that imag...

Страница 104: ...up file location Filter images by date time or camera Print images Check an image s integrity Copying Images MemoCam images can be copied from the Multimedia Card to a directory on your PC To copy im...

Страница 105: ...files are copied into the clipboard 4 Open your target directory using Microsoft Explorer 5 Select Edit Paste The image files are pasted into the target directory Note You can also copy files into a...

Страница 106: ...ion in a location other than the Multimedia Card for later processing To save MemoCam data files 1 Select File Save to in the MemoCam menu The Directory dialog appears Figure 25 Directory Dialog 2 Sel...

Страница 107: ...Select File Load from in the MemoCam menu The Directory dialog appears 2 Select the drive and directory from which to load the MemoCam data 3 Click OK The image list updates To return to default locat...

Страница 108: ...r by camera number in case of multiple camera use To filter the images 1 Click on the Filter button The Select filter date dialog opens Figure 22 Figure 26 Select Filter Date Dialog 2 Enter the range...

Страница 109: ...ted Printing Images You can print images directly from the MemoCam software To print an image 1 Select the image that you want to print 2 Select the Edit Print The file is printed Checking Image Integ...

Страница 110: ...igure 28 Integrity Check Dialog 2 Enter or load the Integrity Key 3 Click OK A message informs you if the image integrity is successfully verified 4 If the integrity check is not successful verify tha...

Страница 111: ...nit Synchronize the time with your computer Arm the MemoCam unit upon insertion of the Multimedia Card Delete data from the Multimedia Card Re naming the MemoCam Unit You may want to re name the MemoC...

Страница 112: ...eader 2 Select an image file from the list or thumbnail 3 Select File Rename MemoCam in the MemoCam software menu The Rename MemoCam dialog opens Figure 29 Figure 29 Rename MemoCam Dialog 4 Enter a ne...

Страница 113: ...dia Card into the MemoCam 2 Ensure that the MemoCam is not armed 3 Click on the Rec button on the Remote Control Unit and note the time on your watch 4 Remove the Multimedia Card from the MemoCam 5 Ve...

Страница 114: ...ialog 8 Enter the date and time when you clicked the Remote Unit s Rec button step 3 in the respective fields 9 Click OK The following message appears Figure 31 Synchronization Message 10 Click OK 11...

Страница 115: ...tion of the Multimedia Card To automatically arm the MemoCam Unit 1 Verify that the Multimedia Card is inserted into the Multimedia Card reader 2 Select File Arm MemoCam Unit from the MemoCam software...

Страница 116: ...d is inserted into the Multimedia Card reader 2 Select File Clear Event files The following dialog box opens Figure 32 Erase Confirmation Dialog 3 Click Yes to delete the data from the card The follow...

Страница 117: ...k power supply and power cable 2 Unit does not read Multimedia Card Left red LED still glows when Multimedia Card is inserted into the unit Multimedia Card is full and not defined for cyclic recording...

Страница 118: ...ot be disarming it properly You must enter the disarm code and the click the disarm button Check that code is correct 6 Image recording using the remote control doesn t work You cannot use snapshot re...

Страница 119: ...n the manual If not reinstall it 9 You have error messages while your working with MemoCam application Restart application 10 Reader is not installed as additional drive You see the Multimedia Card as...

Страница 120: ...Troubleshooting MemoCam Manual 105...

Страница 121: ...se 67 x 135 x 56 mm Weight excluding base 250 g Camera In MemoCam and MemoCam Plus only TV standard B W CCIR or EIA Resolution 420 TV lines Sensitivity 0 1 Lux F2 0 S N Ratio Better than 48db Shutter...

Страница 122: ...icture quality options Good Great Better and Best modes from 5K up to 20K image sizes Recording rates From 3 images per second to 1 image per 5 minutes Recording options Fixed records fixed number of...

Страница 123: ...F 0 6 m sec 2 ft sec Detection Speed 0 3 1 5 m sec 1 5 ft sec Temp compens Bi directional Pulse count 1 2 Dip switch 2 3 Automatic depending on speed spectrum analysis Coverage Wide angle 90o 18m x 18...

Страница 124: ...ial resistor opens for 1 8 sec upon detection Normally Closed 2 Control relay Normally Open Tamper switch If cover is removed Separated power feeds Optional Separated power feeds for PIR and Recording...

Страница 125: ...ments are as follows CPU Pentium II 200Mhz or higher RAM 16 Mega bytes or higher Graphic adapter Super VGA or higher Display resolution 640x480 16 bit or higher Operating systems Windows 95 98 2000 ME...

Отзывы: