background image

WT538 Bedienungsanleitung 

DE1 


Umwelteinflüsse auf Funkempfang 

Die Uhr empfängt kabellos die genaue Uhrzeit. Wie bei allen kabellosen Geräten kann der 

Funkempfang durch folgende Einflüsse beeinträchtigt sein: 


lange Übertragungswege 


naheliegende Berge und Täler 


nahe Autobahnen, Gleisen, Flughäfen, Hochspannungsleitungen, etc. 


nahe Baustellen 


inmitten hoher Gebäude 


in Betonbauten 


nahe elektrischer Geräte (Computer, Fernseher, etc) und metallischer Gegenstände 


in bewegten Fahrzeugen 

Platzieren Sie die Uhr an einem Ort mit optimalem Empfang, z.B. in der Nähe von Fenstern 

und entfernt zu metallischen oder elektrischen Gegenständen. 


Vorsichtsmaßnahmen 


Dieses Gerät ist ausschließlich für den Gebrauch in Innenräumen gedacht. 


Setzen Sie das Gerät nicht extremer Gewalteinwirkung oder Stößen aus. 


Setzen Sie das Gerät nicht hohen Temperaturen, direktem Sonnenlicht, Staub und 

Feuchtigkeit aus. 


Tauchen Sie das Gerät nicht in Wasser. 


Vermeiden Sie den Kontakt mit ätzenden Materialien.     

Содержание WT538

Страница 1: ...ektrischer Geräte Computer Fernseher etc und metallischer Gegenstände in bewegten Fahrzeugen Platzieren Sie die Uhr an einem Ort mit optimalem Empfang z B in der Nähe von Fenstern und entfernt zu metallischen oder elektrischen Gegenständen Vorsichtsmaßnahmen Dieses Gerät ist ausschließlich für den Gebrauch in Innenräumen gedacht Setzen Sie das Gerät nicht extremer Gewalteinwirkung oder Stößen aus ...

Страница 2: ...mals alte und neue Batterien Entfernen Sie erschöpfte Batterien sofort Entfernen Sie die Batterien bei Nichtnutzung Laden Sie die Batterien nicht auf und werfen Sie sie nicht ins Feuer Sie könnten explodieren Bewahren Sie die Batterien nicht in der Nähe von Metallobjekten auf da ein Kontakt einen Kurzschluss verursachen kann Setzen Sie Batterien keinen hohen Temperaturen extremer Feuchtigkeit oder...

Страница 3: ...erien unentgeltlich bei ihrem Händler und Sammelstellen zurückgeben Sie sind als Verbraucher zur Rückgabe von Altbatterien gesetzlich verpflichtet Hinweispflicht nach dem Elektronikgerätegesetz Laut Elektro und Elektronikgerätegesetz ElektroG gehört Elektroschrott nicht in den Hausmüll sondern ist zu recyceln oder umweltfreundlich zu entsorgen Entsorgen Sie ihr Gerät in einen Recycling Container o...

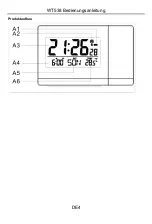
Страница 4: ...WT538 Bedienungsanleitung DE4 Produktaufbau ...

Страница 5: ...WT538 Bedienungsanleitung DE5 Teil A LCD Anzeige A1 Sommerzeit Symbol A2 Funksymbol A3 Uhrzeit A4 Datum und Alarm ...

Страница 6: ...orgung B1 Projektionsfenster B2 Projektionsschalter ON OFF B3 SET Taste B4 ALARM Taste B5 Taste B6 Taste B7 WAVE Taste B8 Alarmschalter ON OFF B9 Projektionsrotationstaste B10 DC Netzteilanschluss Teil C Obere Taste C1 Snooze light Taste Funktionen Funkgesteuerte DCF77 Uhr 12 24 Stunden Zeitformat ...

Страница 7: ... enthalten Inbetriebnahme Verbinden Sie das enthaltende Netzteil mit einer Haushaltssteckdose und der Rückseite der Uhr Alternativ können Sie Batterien nutzen öffnen Sie hierfür die Abdeckung des Batteriefachs Legen Sie 2 x AAA Batterien unter Berücksichtigung der richtigen Polarität und Markierungen ein Beim Einlegen der Batterien blinken alle Symbole für 3 Sekunden auf der Anzeige auf ein Klinge...

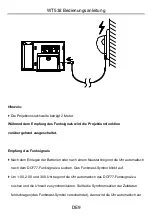
Страница 8: ...onsfunktion Batteriebetrieb Drücken Sie die SNOOZE LIGHT Taste um die Hintergrundbeleuchtung und die Projektion für 8 Sekunden zu aktivieren mit Projektionsschalter auf der ON Position DC Netzbetrieb Drücken Sie während des Netzbetriebs die WAVE Taste um zwischen hoher geringer oder keiner Helligkeit der Hintergrundbeleuchtung zu wählen Die Projektion wird dauerhaft angezeigt außer wenn die Projek...

Страница 9: ...ls Nach dem Einlegen der Batterien oder nach einem Neustart beginnt die Uhr automatisch nach dem DCF77 Funksignal zu suchen Das Funkmast Symbol blinkt auf Um 1 00 2 00 und 3 00 Uhr beginnt die Uhr automatisch das DCF77 Funksignal zu suchen und die Uhrzeit zu synchronisieren Sollte die Synchronisation der Zeitdaten fehlschlagen das Funkmast Symbol verschwindet dann wird die Uhr automatisch zur ...

Страница 10: ... Funkmast Symbol signalisiert eine aktive DCF77 Empfangssuche Ein dauerhaft aufleuchtendes Funkmast Symbol bedeutet dass das DCF Funksignal erfolgreich empfangen wurde Eine Mindestentfernung von 2 5 Metern zu allen möglichen Störquellen wird empfohlen wie z B von Fernsehgeräten und Computerbildschirmen Der Funkempfang ist schwächer in Räumen mit Betonwänden z B in Kellern und in Büros In solchen U...

Страница 11: ...aste um die Einstellung zu bestätigen und die Minutenanzeige blinkt Drücken Sie die und die Tasten um die Minuten einzustellen Drücken Sie die SET Taste um die Einstellung zu bestätigen und die Datums und Monatsanzeigen blinken Drücken Sie die und die Tasten um eine Anzeige aus Monat Datum oder Datum Monat zu wählen Drücken Sie die SET Taste um die Einstellung zu bestätigen und die Jahresanzeige 2...

Страница 12: ...s Symbol an Die Alarmfunktion ist nun angeschaltet Schieben Sie den Alarmschalter auf OFF und das Symbol verschwindet vom Display Die Alarmfunktion ist nun ausgeschaltet Drücken Sie die ALARM Taste um die Alarmzeit anzuzeigen Halten Sie die ALARM Taste für 2 Sekunden gedrückt und die Stunde der Alarmzeit blinkt Drücken Sie die und die Taste um die Alarmstunde einzustellen Drücken Sie die ALARM Tas...

Страница 13: ...en automatisch wiederholt Der ansteigende Alarmton Crescendo wechselt die Lautstärke viermal während der Alarm zu hören ist Alarmton ausschalten Drücken Sie jede Taste außer der Snooze Taste um den Alarm zu beenden Der Alarm muss nicht neu aktiviert werden und die letzte eingestellte Alarmzeit wird beibehalten Schlummerfunktion Drücken Sie die Snooze Taste und der Alarmton wechselt in die Schlumme...

Страница 14: ...rsorgungsspannung 2 5 3 3V Netzteil 4 5V150mA Ewiger Kalender Bereich 2000 1 1 2099 12 31 Zeitzone 12 12Hr Projektionsreichweite 1 0 2 0 Meter Innentemperaturmessbereich 9 9 50 14 2 122 Temperaturauflösung 0 1 Temperaturgenauigkeit 0 40 1 9 9 0 40 50 2 ...

Страница 15: ...nside concrete buildings near electrical appliances computers TV s etc and metallic structures inside moving vehicles Place the clock at a location with optimal signal i e close to a window and away from metal surfaces or electrical appliances Precautions This main unit is intended to be used only indoors Do not subject the unit to excessive force or shock Do not expose the unit to extreme tempera...

Страница 16: ...nd do not dispose of batteries in fire as the batteries may explode Ensure batteries are stored away from metal objects as contact may cause a short circuit Avoid exposing batteries to extreme temperature or humidity or direct sunlight Keep all batteries out of reach from children They are a choking hazard Use the product only for its intended purpose Consideration of duty according to the battery...

Страница 17: ...trical devices This symbol means that you must dispose of electrical devices separated from the General household waste when it reaches the end of its useful life Take your unit to your local waste collection point or recycling centre This applies to all countries of the European Union and to other European countries with a separate waste collection system Product Appearance ...

Страница 18: ...WT538 Manual EN4 Part A Positive LCD A1 TimeDST icon A2 Radio Controlled Icon A3 Time A4 Date and alarm ...

Страница 19: ...window B2 Projection Switch ON OFF B3 SET button B4 ALARM button B5 button B6 button B7 WAVE button B8 Alarm Switch ON OFF B9 Projection rotate button B10 DC Adapter input jack Part C TOP Touch button C1 Snooze light Touch button Features Radio controlled DCF 77 clock 12 24 hour time format ...

Страница 20: ...y with the socket on the backside Alternatively you can use batteries Open the clocks battery compartment cover Insert 2 x AAA batteries observing polarity and marks When you insert the batteries all icons on the LCD display will light up for 3 seconds you will hear a beep tone and the clock detects indoor temperature Then the clock will enter the radio controlled time signal reception mode Projec...

Страница 21: ...ter Mode When using the DC adapter supply touch the WAVE button can choose high brightness low brightness no backlight brightness The projection will always work unless the projection switch is placed in the OFF position Please note When the projection is triggered the projection distance is about 2 meters The projection function is temporarily switched off during reception of the radio ...

Страница 22: ... at the next full hour This procedure is repeated automatically up to total 5 times To start manual DCF signal reception press and hold down the WAVE button for two seconds If no signals received within 7 minutes then the DCF signal search stops the radio mast icon disappears and start again at the next full one hour During RC reception to stop searching radio signal press the WAVE button once Ple...

Страница 23: ...SET button to confirm your setting the Time zones start to flash Now use and buttons set the time zone 12 to 12 For Germany the time zone is 0 for UK it is 1 Press SET to confirm your setting the hour display starts to flash Now use and buttons to set the hour Press SET to confirm your setting the Minute displays starts to flash Now use and buttons to set the minute Press SET button to confirm you...

Страница 24: ... automatically from Set Mode to Normal Time Mode Setting the daily alarms Please toggle the alarm switch to ON position LCD display the icon the alarm function is ON toggle the alarm switch to OFF position the icon will disappears from the display the alarm function is OFF Press ALARM button once to switch display to alarm time Press and hold ALARM button for 2 seconds until hour of the Alarm time...

Страница 25: ...ton In this case the alarm will be repeated automatically after 24 hours Rising alarm sound crescendo duration 2 minutes changes the volume 4 times whilst the alarm signal is heard Switching off the alarm signal Press any button except the Snooze button to stop the alarm signal It is not necessary to reactivate the alarm It switches itself automatically to the alarm time which has already been set...

Страница 26: ...unit in C or F SPECIFICATIONS Supply voltage 2 5 3 3V Adapter 4 5V150mA Perpetual calendar range 2000 1 1 2099 12 31 Time zone 12 12Hr Projection distance 1 0 2 0meter IN Temperature measuring range 9 9 50 14 2 122 Temperature resolution 0 1 Temperature accuracy 0 40 1 9 9 0 40 50 2 ...

Страница 27: ...ntouré de bâtiments élevés À l intérieur de bâtiments en béton À proximité d appareils électriques ordinateurs téléviseurs etc et de structures métalliques À l intérieur de véhicules mobiles Placez votre horloge dans un endroit avec des signaux optimaux par exemple près d une fenêtre loin des surfaces métalliques et des appareils électriques Précautions Cet appareil n est destiné qu à une utilisat...

Страница 28: ...les piles en même temps Ne combinez pas des piles usagées avec des piles neuves Lorsque les piles sont déchargées retirez les immédiatement de l appareil Retirez les piles lorsque vous n utilisez pas l appareil N essayez pas de recharger des piles qui ne sont pas rechargeables et ne jetez aucune pile dans le feu elle risque d exploser Rangez vos piles de façon à ce qu aucun objet métallique ne pui...

Страница 29: ... tant que consommateur vous êtes obligé par la loi de ramener les piles usagées aux revendeurs et aux points de collecte Respect de l obligation en vertu de la législation sur les appareils électriques Ce symbole signifie que les appareils électriques ne doivent pas être jetés aux ordures ménagères à la fin de leur vie utile Ramenez votre appareil à votre point de collecte de déchets ou à un centr...

Страница 30: ...Guide d utilisation WT538 FR4 Aspect du produit ...

Страница 31: ...Guide d utilisation WT538 FR5 Partie A partie supérieure du LCD A1 Icône Heure d été A2 Icône de la radiocommande A3 Heure A4 Date et alarme A5 Jour A6 Température intérieure ...

Страница 32: ... Touche B6 Touche B7 Touche WAVE B8 Interrupteur d alarme ON OFF B9 Bouton de projection rotatif B10 Prise d entrée de l adaptateur secteur Partie C touches tactiles de la face supérieure C1 Touche Rappel d alarme Rétroéclairage Caractéristiques Horloge radio pilotée DCF 77 Format de l heure 12 24 heures Choix du fuseau horaire 12h Réglage manuel de l heure ...

Страница 33: ... dans la prise située à l arrière Vous pouvez également utiliser des piles Ouvrez le compartiment à piles Insérez 2 piles AAA en respectant les polarités marques et Lorsque vous insérez les piles tous les icônes de l écran LCD s allument pendant 3 secondes un bip sera émis et et l horloge détecte la température intérieure Ensuite l horloge passe en mode réception du signal horaire radio pilotée Pr...

Страница 34: ...n en position ON Mode DC adaptateur Lorsque vous utilisez l alimentation DC adaptateur effleurer la touche WAVE bouton peuvent choisir une luminosité élevée faible luminosité pas luminosité du rétro éclairage La projection sera toujours travailler moins que le commutateur de projection est placé dans la position OFF Notez s il vous plaît Lorsque la projection est déclenchée la distance de projecti...

Страница 35: ...ynchronisation l icône d antenne radio disparaît de l écran le système va automatiquement essayer une nouvelle synchronisation après une heure Cette procédure est répétée automatiquement jusqu à un total de 5 fois Pour lancer la réception manuelle du signal DCF maintenez enfoncée la touche WAVE pendant deux secondes Si aucun signal n est reçu dans les 7 minutes la recherche du signal DCF s arrête ...

Страница 36: ...LARME et WAVE peuvent être utilisés les autres touches sont désactivées Pour pouvoir effectuer d autres fonctions appuyez sur la touche WAVE pour quitter le mode réception Réglage manuel de l heure Maintenez appuyée la touche SET pendant 2 secondes 12 24HR se met à clignoter Utilisez les touches et pour régler le mode 12 24 heures Appuyez sur la touche SET pour confirmer votre réglage le fuseau ho...

Страница 37: ...s se met à clignoter Utilisez maintenant les touches et pour régler le mois Appuyez sur la touche SET pour confirmer votre réglage le jour se met à clignoter Utilisez les touches et pour régler le jour Appuyez sur la touche SET pour confirmer votre réglage la langue du jour de semaine se met à clignoter Utilisez maintenant les touches et pour sélectionner une langue Allemand Anglais Français Itali...

Страница 38: ...r régler les heures Appuyez sur la touche ALARM pour confirmer votre réglage les minutes de l heure de l alarme se mettent à clignoter Utilisez les touches et pour régler les minutes Appuyez sur la touche ALARM pour confirmer votre choix Le délai de rappel d alarme se met à clignoter Utilisez les touches et pour régler le délai de rappel d alarme Appuyez sur la touche ALARM pour confirmer votre ré...

Страница 39: ...RME pour arrêter le signal d alarme Il n est pas nécessaire de réactiver l alarme L horloge se règle automatiquement sur l heure de l alarme qui a déjà été réglée Fonction de rappel d alarme Appuyez sur le touche Rappel d alarme le signal d alarme se déclenche et l horloge passe en mode RAPPEL D ALARME L alarme se déclenche à nouveau une fois le délai de rappel d alarme écoulé Passage de C à F App...

Страница 40: ...tuel De 01 01 2000 au 31 12 2099 Fuseau horaire de 12 à 12 Distance de projection 1 à 2 mètres Plage de mesure de température intérieure 9 9 50 C 14 2 122 F Résolution de la température 0 1 C F Précision de la température 0 C 40 C 1 C 9 9 C 0 C 40 C 50 C 2 C ...

Страница 41: ...trucción encontrarse entre edificios altos en el interior de edificios de hormigón proximidad de aparatos eléctricos PCs TVs etc y estructuras metálicas en el interior de vehículos en movimiento Coloque el reloj en una posición donde obtenga una señal óptima p ej cerca de una ventana y lejos de superficies metálicas o aparatos eléctricos Precauciones La unidad principal está diseñada solamente par...

Страница 42: ...e baterías usadas y nuevas Quite las pilas agotadas de inmediato Quite las pilas cuando no se utilicen No las recargue ni las deseche en el fuego ya que pueden explotar Asegúrese de que las pilas estén almacenadas lejos de objetos metálicos ya que el contacto con ellos puede causar un cortocircuito Evite exponer las pilas a temperaturas extremas a la humedad o a los rayos directos del sol Mantenga...

Страница 43: ... distribuidor y otros puntos de recogida Consideración de obligaciones según las leyes sobre dispositivos electrónicos Este símbolo indica que no debe deshacerse de los aparatos eléctricos en la basura doméstica general cuando lleguen al final de su vida útil Lleve su unidad a su punto de recogida selectiva de basura o al centro de reciclaje de su localidad Esto es de aplicación en todos los paíse...

Страница 44: ...WT538 Manual ES4 Aspecto del producto ...

Страница 45: ...WT538 Manual ES5 Elementos A Pantalla LCD A1 Icono hora DST A2 Icono de radio controlada A3 Hora A4 Fecha y alarma A5 Día A6 Temperatura interior ...

Страница 46: ...3 Botón SET B4 Botón ALARM B5 Botón B6 Botón B7 Botón WAVE B8 Interruptor de alarma ON OFF B9 Botón para girar la proyección B10 Conector del adaptador eléctrico CC Elementos C Botón táctil SUPERIOR C1 Botón táctil Retardo alarma luz Funciones Reloj radio controlado DCF 77 Formato horario 12 24 Ajuste de zona horaria 12h ...

Страница 47: ...ador eléctrico suministrado en el conector de la parte trasera Como alternativa puede utilizar pilas Abra la tapa del compartimiento de las pilas del reloj Introduzca 2 pilas AAA colocando la polaridad correctamente marcas y Cuando coloque las pilas todos los iconos de la pantalla LCD se encenderán durante 3 segundos oirá un pitido y el reloj detectará la temperatura del interior de la casa A cont...

Страница 48: ...ZE LIGHT a la luz de fondo activa y proyección durante 8 segundos el interruptor de proyección en posición ON una vez Modo de adaptador DC Cuando se utiliza la alimentación de CC adaptador toque el botón WAVE pueden elegir alto brillo brillo bajo sin brillo de la retroiluminación La proyección siempre funcionará a menos que el interruptor de la proyección se coloca en la posición OFF ...

Страница 49: ... señal DCF para corregir cualquier desviación de la hora exacta Si este intento de sincronización no tiene éxito el icono de la señal de radio desaparece de la pantalla el sistema intentará automáticamente otra sincronización a la siguiente hora en punto Este procedimiento se repite automáticamente hasta un total de 5 veces Para iniciar la recepción de la señal manual DCF mantenga pulsado el botón...

Страница 50: ...ótanos y en oficinas En tales circunstancias extremas coloque el sistema cerca de la ventana Durante el modo de recepción de la señal radio controlada solo funcionan los botones RETARDO DE ALARMA y WAVE El resto de botones no funciona Si desea utilizar el resto de funciones pulse el botón WAVE para detener y salir del modo de recepción Ajuste manual de la hora Mantenga pulsado el botón SET durante...

Страница 51: ...Mes Pulse el botón SET para confirmar el ajuste y el año 2015 empezará a parpadear Ahora use los botones y para configurar el año Pulse el botón SET para confirmar el ajuste y los dígitos del mes empezarán a parpadear Ahora use los botones y para configurar el mes Pulse el botón SET para confirmar el ajuste y los dígitos del día empezarán a parpadear Ahora use los botones y para seleccionar el día...

Страница 52: ... el botón ALARM una vez para ver en la pantalla la hora de la alarma Mantenga pulsado el botón ALARM durante 2 segundos hasta que los dígitos de las horas de la alarma empiecen a parpadear Use los botones y hasta ajustar las horas que desee Pulse el botón ALARM para confirmar el ajuste y los minutos de la hora de alarma empezarán a parpadear Use los botones y para configurar los minutos Pulse el b...

Страница 53: ...entras se oye la señal de la alarma Apagar la señal de alarma Pulse cualquier botón excepto el botón de Retardo de alarma para que la alarma deje de sonar No es necesario volver a activar la alarma Se cambia automáticamente a la hora de la alarma que ya se ha fijado Función retardo Toque el botón de Retardo de alarma cuando esté sonando la alarma para entrar en el modo de RETARDO DE ALARMA La seña...

Страница 54: ... 4 5 V 150 mA Alcance del calendario perpetuo 2000 1 1 2099 12 31 Zona horaria 12 12Hr Distancia de proyección 1 0 2 0 metros Margen de medida de temperatura INTERIOR 9 9 50 C 14 2 122 F Resolución de la temperatura 0 1 C F Exactitud de la temperatura 0 C 40 C 1 C 9 9 C 0 C 40 C 50 C 2 C ...

Страница 55: ...lektrische apparatuur computers TV s enz en metalen structuren Binnenin bewegende voertuigen Plaats de klok op een plek met optimale signaalontvangst d w z dicht in de buurt van een raam en uit de buurt van metalen oppervlaktes of elektrische apparatuur Voorzorgsmaatregelen Het hoofdapparaat is uitsluitend bestemd voor gebruik binnenshuis Stel het apparaat niet bloot aan overmatige krachten of sch...

Страница 56: ...k Gebruik nooit nieuwe en gebruikte batterijen door elkaar Verwijder lege batterijen onmiddellijk Verwijder de batterijen als het toestel niet wordt gebruikt Herlaad de batterijen niet en gooi ze niet in vuur omdat de batterijen zouden kunnen ontploffen Zorg ervoor dat de batterijen uit de buurt van metalen voorwerpen worden bewaard omdat hierdoor kortsluiting kan ontstaan Stel batterijen niet blo...

Страница 57: ...erplicht verbruikte batterijen in te leveren bij distributeurs of andere inzamelpunten Houd rekening met heffingen in het kader van wetgeving m b t het afvoeren van elektrische apparatuur Dit symbooltje betekent dat u elektrische apparaten aan het einde van hun levensduur niet als algemeen huishoudelijk afval mag afvoeren Lever uw apparaat in bij een plaatselijk inzamelpunt voor afvalverwerking of...

Страница 58: ...Gebruiksaanwijzing WT538 DU4 Uiterlijk van het product ...

Страница 59: ...Gebruiksaanwijzing WT538 DU5 Deel A Positief LCD scherm A1 Pictogram DST tijd A2 Radiogestuurd icoontje A3 Tijd A4 Datum en alarm A5 Dag A6 Binnentemperatuur ...

Страница 60: ...ets SET B4 Toets ALARM B5 toets B6 toets B7 WAVE toets B8 Alarmschakelaar ON OFF B9 Toets voor roteren projectie B10 Ingang klinkstekker lichtnetadapter Deel C Aanraaktoetsen bovenkant C1 Aanraaktoets sluimerstand verlichting Eigenschappen Radiogestuurde DCF 77 klok 12 24 uur tijdformaat Tijdzone instelling 12 u Handmatige tijdinstelling ...

Страница 61: ...tief batterijen gebruiken Open het deksel van het batterijvak van de klok Installeer 2 x AAA batterijen en let daarbij op de polariteit en markeringen Zodra u de batterijen plaatst lichten alle pictogrammen op het LCD scherm gedurende 3 seconden op klinkt er een pieptoon en detecteert de klok de binnentemperatuur Daarna gaat de klok naar de ontvangstmodus voor het radiogestuurde tijdsignaal Projec...

Страница 62: ...ichting en projectie voor 8 seconden de projectie schakelaar in stand ON DC adapter modus Bij gebruik van de DC adapter voeding raakt u de WAVE knop kan een hoge helderheid lage helderheid geen helderheid van de achtergrondverlichting te kiezen De projectie zal altijd werken tenzij de projectie schakelaar wordt geplaatst in de stand OFF ...

Страница 63: ...et het DCF signaal om enigerlei afwijkingen van de exacte tijd te corrigeren Als het synchroniseren niet lukt het pictogram met de radiomast verdwijnt van het scherm probeert het systeem automatisch op het volgende hele uur weer om te synchroniseren Deze procedure wordt tot op maximaal 5 keer automatisch herhaald U kunt de DCF signaalontvangst ook handmatig starten door de WAVE toets voor twee sec...

Страница 64: ...jdens het ontvangen van het signaal van de radiogestuurde klok werken alleen de toetsen SLUIMERSTAND en WAVE de ander toetsen werken niet Als u andere functies uit wilt voeren druk dan op de toets WAVE om de ontvangst te stoppen Handmatige tijdinstelling Houd de toets SET gedurende 2 seconden ingedrukt het scherm voor de 12 24 uuraanduiding begint te knipperen Gebruik nu de toetsen en om de 12 24 ...

Страница 65: ...sen en om het jaar in te stellen Druk op doe toets SET om de instelling te bevestigen de maandaanduiding begint te knipperen Gebruik vervolgens de toetsen en om de maand in te stellen Druk op doe toets SET om de instelling te bevestigen de datumaanduiding begint te knipperen Gebruik nu de toetsen en om de datum in te stellen Druk op de SET toets om uw instelling te bevestigen en de taalselectie vo...

Страница 66: ...ektijd Houd gedurende 2 seconden de toets ALARM ingedrukt totdat de urenaanduiding van het alarm begint te knipperen Gebruik nu de toetsen en om het gewenste uur in te stellen Druk op de toets ALARM om de instelling te bevestigen de minutenaanduiding van de wektijd begint te knipperen Gebruik de toetsen en om de minuten in te stellen Druk op de toets ALARM om uw instelling te bevestigen De sluimer...

Страница 67: ...ten het volume wordt 4 keer verhoogd terwijl het alarm klinkt Het alarmsignaal uitschakelen Druk op iedere willekeurige toets behalve de toets Sluimerstand om het weksignaal te stoppen Het is niet nodig het alarm opnieuw te activeren Het schakelt zichzelf automatisch weer op de eerder ingestelde alarmtijd Sluimerfunctie Druk wanneer het weksignaal klinkt op de toets Sluimerstand om naar de SLUIMER...

Страница 68: ... 2 5 3 3 V Adapter 4 5 V 150 mA Doorlopend kalenderbereik 2000 1 1 2099 12 31 Tijdzone 12 12uur Projectieafstand 1 0 2 0 meter Meetbereik binnentemperatuur 9 9 50 C 14 2 122 F Temperatuurresolutie 0 1 C F Temperatuur nauwkeurigheid 0 C 40 C 1 C 9 9 C 0 C 40 C 50 C 2 C ...

Страница 69: ... di edifici in cemento in prossimità di apparecchiature elettriche computer TV ecc e strutture metalliche All interno di veicoli in movimento Posizionare l orologio in una posizione per un segnale ottimale ad esempio vicino a una finestra e lontano da superfici metalliche o elettrodomestici Precauzioni L unità principale è intesa solo per uso in interni Non esporre l unità a forza eccessiva o shoc...

Страница 70: ...so Non ricaricare e non smaltire le batterie nel fuoco in quanto possono esplodere Assicurarsi che le batterie siano conservate lontano da oggetti metallici in quanto il contatto può causare un corto circuito Evitare di esporre le batterie a temperatura o a umidità estreme o a luce solare diretta Tenere tutte le batterie fuori dalla portata dei bambini Esse possono comportare pericolo di soffocame...

Страница 71: ...se alla normativa sui dispositivi elettrici Questo simbolo indica che i dispositivi elettrici alla fine del loro ciclo di vita devono essere smaltiti separatamente dai rifiuti domestici generali Portare l unità al proprio punto di raccolta rifiuti locale o a un centro di riciclaggio Questa disposizione si applica a tutti i paesi dell Unione europea e agli altri paesi europei in cui viene praticata...

Страница 72: ...Manuale WT538 IT4 Parte A LCD positivo A1 Icona TempoDST A2 Icona radiocontrollo A3 Ora A4 Data e sveglia A5 Giorno ...

Страница 73: ...F B3 Tasto SET B4 Pulsante ALARM B5 Tasto B6 Pulsante B7 Tasto WAVE B8 Interruttore sveglia ON OFF B9 Tasto rotazione proiezione B10 Jack ingresso per adattatore DC Parte C Tasto SUPERIORE touch C1 Tasto ritarda luce Funzioni Orologio DCF 77 radio controllato Formato 12 24 ore Regolazione zona oraria 12h Impostazione manuale dell ora ...

Страница 74: ...iva è possibile usare delle batterie Aprire lo sportello dello scomparto batterie dell orologio Inserite 2 batterie di tipo AAA rispettando la polarità i segni e Una volta inserite le batterie tutte le icone del display LCD si accendono per 3 secondi si sente un bip e l orologio rileva la temperatura interna Poi l orologio entra in modalità di ricezione del segnale orario radio controllato Funzion...

Страница 75: ...one per 8 secondi l interruttore di proiezione in posizione ON una volta Modalità DC adapter Quando si utilizza l alimentazione DC adattatore premere il tasto WAVE può scegliere ad alta luminosità bassa luminosità no luminosità della retroilluminazione La proiezione sarà sempre funziona a meno che l interruttore di proiezione è collocato in posizione OFF ...

Страница 76: ...azione con il segnale DCF per correggere eventuali differenze con l ora esatta Se il tentativo di sincronizzazione fallisce l icona dell antenna radio scompare dal display il sistema effettuerà automaticamente un secondo tentativo di sincronizzazione all ora successiva Questa procedura viene ripetuta automaticamente fino a 5 volte Per avviare la ricezione manuale del segnale DCF tener premuto il t...

Страница 77: ...il sistema vicino alla finestra In modalità ricezione radio controllata dell ora solo le funzioni RITARDA e WAVE sono attive gli altri tasti non hanno funzioni Se si desidera utilizzare altre funzioni premere il tasto WAVE per uscire dalla modalità di ricezione Impostazione manuale dell ora Tener premuto il tasto SET per 2 secondi la modalità 12 24 ore inizia a lampeggiare sullo schermo Usare ora ...

Страница 78: ...play Usare adesso i tasti e per regolare l anno Premere il tasto SET per confermare la scelta il display del mese inizia a lampeggiare Usare adesso i tasti e per regolare il mese Premere il tasto SET per confermare la scelta il display del giorno inizia a lampeggiare Usare ora i tasti e per regolare il giorno Premere il tasto SET per confermare la scelta la selezione lingua per il giorno della set...

Страница 79: ...rmare la scelta I minuti della sveglia iniziano a lampeggiare Usare i tasti e per regolare i minuti Premere il pulsante ALARM per confermare l impostazione L intervallo della ripetizione della sveglia inizia a lampeggiare Usare i tasti e per regolare l intervallo Premere il tasto ALARM per confermare la scelta e terminare la procedura Nota Dopo 20 secondi di inattività l orologio passa automaticam...

Страница 80: ...l segnale sonoro entri in modalità RIPETI Il segnale della sveglia suona di nuovo trascorso il tempo impostato per la funzione ritardo Modifica C o F Premere una volta il tasto per modificare l unità di misura della temperatura su C o F DATI TECNICI Voltaggio alimentazione 2 5 3 3V Adattatore 4 5V 150mA Intervallo calendario perpetuo 2000 1 1 2099 12 31 Fascia oraria 12 12Hr Distanza di proiezione...

Страница 81: ...Manuale WT538 IT13 Risoluzione della temperatura 0 1 C F Precisione della temperatura 0 C 40 C 1 C 9 9 C 0 C 40 C 50 C 2 C ...

Страница 82: ...vbami Umístění uvnitř betonových staveb Blízkost elektrických zařízení počítačů televizorů apod a kovových předmětů Umístění uvnitř jedoucích vozidel Budík umístěte na místo s optimálním signálem tj blízko oknu a v dostatečné vzdálenosti od kovových povrchů a elektrických spotřebičů Bezpečnostní opatření Tato jednotka je určena pro použití ve vnitřních prostorách Nevystavujte jednotku působení nad...

Страница 83: ...ie Slabé baterie okamžitě vyměňte Jestliže zařízení nepoužíváte vyjměte z něj baterie Baterie nenabíjejte a nevhazujte je do ohně mohou explodovat Baterie skladujte mimo dosah kovových předmětů kontakt s nimi může způsobit zkrat Nevystavujte baterie extrémním teplotám vlhkosti či přímému slunečnímu svitu Veškeré baterie skladujte mimo dosah dětí Hrozí riziko udušení Výrobek používejte pouze ke sta...

Страница 84: ...míst Povinnosti dle zákona o elektrických zařízeních Tento symbol znamená že elektrická zařízení na konci jejich životnosti je třeba likvidovat odděleně od běžného domácího odpadu Zařízení vraťte do místního sběrného místa nebo centra pro recyklaci To platí pro všechny země Evropské unie a ostatní evropské země se samostatným systémem shromažďování odpadu Vzhled budíku ...

Страница 85: ...Návod k použití budíku WT538 CZ4 Část A pozitivní LCD A1 Ikona letního času A2 Rádiově řízená ikona A3 Čas A4 Datum a alarm ...

Страница 86: ... Okno projekce B2 Spínač projekce ON OFF B3 Tlačítko SET B4 Tlačítko ALARM B5 Tlačítko B6 Tlačítko B7 Tlačítko WAVE B8 Přepínač alarmu ON OFF B9 Tlačítko rotace projekce B10 DC adaptér vstupního konektoru jack Část C horní dotykové tlačítko C1 Dotykové tlačítko funkce opakovaného buzení světlo ...

Страница 87: ...9 9 C 49 9 C Napájení DC adaptér součástí balení baterie 1 5 V velikost AAA LR03 2 ks není součástí balení První použití Připojte k přiloženému zdroji prostřednictvím zástrčky umístěné na boku Lze také použít baterie Otevřete kryt prostoru pro baterie budíku Vložte 2 ks AAA baterií správnou polaritou značky a Po vložení baterií se na LCD displeji na 3 sekundy zobrazí všechny ikony ozve se pípnutí ...

Страница 88: ...ekce Podsvícení a projekce funkce Režim baterií Dotkněte se tlačítka SNOOZE LIGHT k aktivnímu podsvícení a projekce po dobu 8 sekund promítací spínačem v poloze on jednou Režim DC adapter Při použití napájení DC adaptéru stiskněte tlačítko WAVE si mohou vybrat vysokým jasem nízký jas ne jas podsvícení Projekce bude vždy fungovat pokud je projekční přepínač je umístěn v poloze OFF ...

Страница 89: ...ronizační pokus neúspěšný ikona rozhlasového stožáru zmizí z displeje tak se systém automaticky pokusí o další synchronizaci v další celou hodinu Tento proces se automaticky opakuje až 5 krát Chcete li spustit příjem signálu DCF ručně stiskněte tlačítko WAVE a držte jej stisknuté po dobu dvou sekund Pokud během 7 minut nedojde k přijmu signálu DCF hledání signálu se zastaví ikona rozhlasového stož...

Страница 90: ...m příjmu Ruční nastavení času Stiskněte a podržte tlačítko SET po dobu 2 sekund 12 24 hodinový režim zobrazení začne blikat Nyní můžete použít tlačítka a pro nastavení 12 24 hodinového režimu Stiskněte tlačítko SET pro potvrzení vašeho nastavení začne blikat displej časového pásma Nyní můžete tlačítky a nastavit časové pásmo 12 až 12 Pro Německo je časové pásmo 0 pro Velkou Británii je 1 Stiskněte...

Страница 91: ... použít tlačítka a pro nastavení data Stiskněte tlačítko SET pro potvrzení vašeho nastavení začne blikat výběr jazyka pro zobrazení Dne v týdnu Nyní pomocí tlačítek a vyberte jazyk Němčina Angličtina Francouzština Italština Španělština Nizozemština Dánština Stiskněte tlačítko SET pro potvrzení vašeho nastavení a pro ukončení procesu nastavování Upozornění Po 20 sekundách se hodiny bez stisknutí ja...

Страница 92: ...ne blikat čas opakovaného buzení Tlačítky a nastavte čas opakovaného buzení Stiskněte tlačítko ALARM pro potvrzení vašeho nastavení a pro ukončení procesu nastavování Upozornění Po 20 sekundách se bez stisknutí jakéhokoliv tlačítka hodiny automaticky přepnou z nastavovacího režimu do normálního režimu hodin Budík bude znít po dobu 2 minut pokud jej nedojde k deaktivaci stisknutím jakéhokoliv tlačí...

Страница 93: ...tavení času opakovaného buzení znovu zazní zvuk alarmu Přepnutí mezi jednotkami C a F Jedním stisknutím tlačítka přepnete mezi jednotkami teploty C nebo F TECHNICKÉ ÚDAJE Napájecí napětí 2 5 3 3V Adaptér 4 5 V 150 mA Rozsah kalendáře 1 1 2000 až 31 12 2099 Časová zóna 12 až 12 hodin Vzdálenost projekce 1 0 2 0 metry Rozsah měření vnitřní teploty 9 9 50 C 14 2 122 F Teplotní rozlišení 0 1 C F Teplo...

Страница 94: ...zy wysokimi budynkami Wewnątrz betonowych budynków Znajdujące się w pobliżu urządzenia elektryczne komputery telewizory itd i struktury metalowe W poruszających się pojazdach Zegar najlepiej jest ustawić w miejscu gdzie uzyska on najlepszy zasięg sygnału tj blisko okna i z dala od metalowych powierzchni czy urządzeń elektrycznych Środki ostrożności Jednostkę główną można wykorzystywać jedynie w po...

Страница 95: ...wością Zawsze należy wymieniać cały zestaw baterii Nigdy nie wolno mieszać zużytych i nowych baterii Zużyte baterie należy natychmiast wymieniać Wyjmować baterie jeśli urządzenie nie jest używane Nie ładować ponownie baterii ani nie wyrzucać ich do ognia ponieważ mogą eksplodować Należy zapewnić że baterie są przechowywane z dala od metalowych obiektów ponieważ zetknięcie z nimi może spowodować zw...

Страница 96: ...rawem do zwrotu odpowiednich baterii sprzedawcom lub w innych punktach zbiórek Zobowiązania według przepisów prawa dotyczących urządzeń elektrycznych Ten symbol oznacza że użytkownik musi utylizować urządzenia elektryczne z dala od ogólnych odpadów domowych kiedy osiągną one koniec okresu eksploatacji Swoje urządzenie najlepiej jest oddać w lokalnym punkcie zbiórki odpadów lub centrum recyklingu D...

Страница 97: ...WT538 Instrukcja PL4 Wygląd produktu ...

Страница 98: ...WT538 Instrukcja PL5 Part A wyświetlacz LCD pozytywny A1 Ikona czasu letniego A2 Ikona sterowania radiowego A3 Godzina A4 Data i alarm A5 Dzień A6 Temperatura wewnątrz ...

Страница 99: ...Przycisk B6 Przycisk B7 Przycisk WAVE B8 Przełącznik alarmu ON OFF B9 Przycisk obrotu wyświetlania B10 Gniazdo wejściowe adaptera DC Część C górny przycisk dotykowy C1 Przycisk dotykowy drzemki oświetlenia Właściwości Zegar sterowany radiowo DCF 77 Format czasu 12 24 godz Ustawianie strefy czasowej 12 godz Ręczne ustawianie czasu Wyświetlanie czasu ...

Страница 100: ...u Alternatywnie można użyć baterii Otworzyć pokrywę komory baterii zegara Włożyć 2 baterie AAA zgodnie z biegunowością oznaczenia i Po włożeniu baterii wszystkie ikony na wyświetlaczu LCD zaświecą się przez 3 sekundy rozlegnie się sygnał dźwiękowy oraz wykryta zostanie temperatura wewnętrzna Następnie zegar przejdzie do trybu odbioru sygnału czasu sterowanego radiowo Funkcja wyświetlania wyświetla...

Страница 101: ... DC W przypadku korzystania z zasilania DC adapter dotknij przycisk WAVE można wybrać wysokiej jasności niskiej jasności brak jasności podświetlenia Projekcja zawsze będzie działać chyba że przełącznik projekcji znajduje się w pozycji OFF Proszę zanotować Po projekcji jest wyzwalany odległość projekcji wynosi około 2 metrów Funkcja projekcji zostaje tymczasowo wyłączona podczas odbioru sygnału rad...

Страница 102: ...zinie Ta procedura powtarza się automatycznie maksymalnie 5 razy Aby rozpocząć ręczny odbiór sygnału DCF należy nacisnąć i przytrzymać przez 2 sekundy przycisk WAVE Jeśli w ciągu 7 minut nie zostanie odebrany żaden sygnał wyszukiwanie sygnału DCF zostanie zatrzymane ikona masztu radiowego zniknie i uruchomi się ponownie o najbliższej pełnej godzinie Podczas odbioru zegara radiowego wyszukiwanie sy...

Страница 103: ...ekundy wyświetlacz 12 24 zacznie migać Przyciskami i należy ustawić właściwy tryb godzin 12 24 Nacisnąć przycisk SET aby potwierdzić ustawienia strefy czasowe zaczną migać Przyciskami i można teraz ustawić strefę czasową od 12 do 12 W Niemczech strefa czasowa to 0 a w Wielkiej Brytanii 1 Nacisnąć SET aby potwierdzić ustawienia wyświetlacz godziny zacznie migać Przyciskami i należy ustawić godzinę ...

Страница 104: ...żyć przycisków oraz aby wybrać język niemiecki angielski francuski włoski hiszpański holenderski duński Nacisnąć SET aby potwierdzić ustawienia i zakończyć procedury ustawień Uwaga Po 20 sekundach bez naciskania żadnego przycisku zegar automatycznie przełączy się z trybu ustawiania to trybu zwykłego czasu Ustawianie alarmów codziennych Przestawić przełącznik alarmu do pozycji ON na wyświetlaczu LC...

Страница 105: ...ndach bez naciskania żadnego przycisku zegar automatycznie przełączy się z trybu ustawiania to trybu zwykłego zegara Dźwięk alarmu będzie trwał przez 2 minuty jeśli nie zostanie wyłączony poprzez naciśnięcie dowolnego przycisku W takim przypadku alarm powtórzy się automatycznie po 24 godzinach Nasilający się dźwięk alarmu crescendo czas trwania 2 minuty zmienia głośność 4 razy podczas gdy rozlega ...

Страница 106: ...rzemki Wybór temperatury C lub F Nacisnąć raz przycisk aby przełączać temperaturę w C lub F DANE TECHNICZNE Napięcie zasilania 2 5 3 3V Adapter 4 5V 150mA Zakres kalendarza wiecznego 2000 1 1 2099 12 31 Strefa czasowa 12 12 godzin Odległość wyświetlania 1 0 2 0 metry Zakres pomiaru temperatury 9 9 50 C 14 2 122 F Stopniowanie temperatury 0 1 C F Dokładność temperatury 0 C 40 C 1 C 9 9 C 0 C 40 C 5...

Отзывы: