background image

 FR


EN

 IT

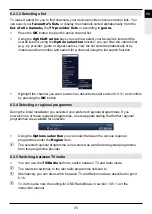
6.3 AV source

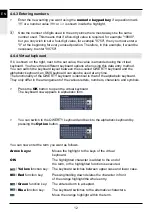
Press the 

AV 

 button to open the 

AV sources 

selection window and select a 

device connected to the TV’s HDMI inputs 

(HDMI 1 / 2 / 3)

 or to the Scart socket 

(EuroAV).

Select the source you want using the 

up/down arrow keys 

and confirm by pressing 

the 

OK 

button to switch over to the selected input.

  To do this also observe items 7.2.1 - 7.2.3, 7.2.6, 10.9 and 12 in the instruction manual.

6.4 Channel/source information

6.4.1 Info box

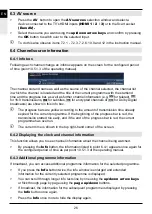
Following each channel change an infobox appears on the screen for the configured period 

of time (point 10.5.1.3 of the operating manual).

The channel slot and name as well as the source of the channel selected, the channel list 

in which the channel is located and the title of the current programme with the start/end 

time and the progress bar, as well as further channel information (e.g. 

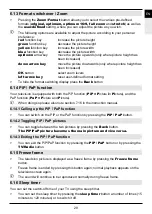
 for teletext, 


for 16:9 transmissions, 

 for subtitles, 

 for encrypted channels or 

 for Dolby Digital 

broadcasts) are shown in this Info box.

  The progress bars are yellow according to the amount of transmission time already 

expired for the current programme. If the beginning of the progress bar is red, the 

transmission started too early, and if the end of the progress bar is red, the current 

programme has overrun.

    The current time is shown in the top right-hand corner of the screen.

6.4.2 Displaying the clock and channel information

This function allows you to see channel information about the channel being watched.

By pressing the 

Info

 button, the information listed in point 6.4.1 appears once again for 

the configured period of time as per point 10.5.1.3 of the operating manual.

6.4.3 Additional programme information

If broadcast, you can access additional programme information for the selected programme.

If you press the 

Info

 button twice, the info window is enlarged and extended 

information for the currently selected programme is displayed.

You can scroll through longer info texts line by line using the 

up/down arrow keys


or flick through page by page using the 

page up/down

 buttons.

If broadcast, the information for the subsequent programme is displayed by pressing 

the

 Info

 button once again.

Press the 

Info

 once more to hide the display again.

26

Содержание TechniMedia UHD

Страница 1: ...Quick start manual TechniMedia UHD...

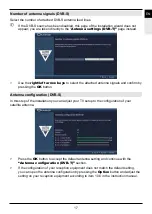
Страница 2: ...ck plug 4 Headphone output 3 5 mm jack plug 5 Audio output digital S P DIF optical 6 USB port 7 HDMI interface 1 8 HDMI interface 2 15 USB port 16 HDMI interface 3 ARC 17 LAN network port 18 Scart con...

Страница 3: ...ptions selection Timer Audio channel Teletext PiP PaP PaT Freeze frame Jogshuttle Genre Channel Stop DVR Rewind Arrow keys Function keys off Menu Zoom Format Function selection Volume OK Info Page dow...

Страница 4: ...ifting it off Insert the supplied batteries ensuring that the poles are the right way around indicator visible in battery compartment then close the battery compartment again 2 2 Legal Notices The dev...

Страница 5: ...en operating with an antenna signal the LNB must be connected to LNB Input 1 b Connecting the cable connector digital and or analogue and or the DVB T antenna to the antenna input on the TV c Connecti...

Страница 6: ...le to connect your BluRay DVD player for example to an HDMI connection 3 4 Surround sound Hi Fi amplifier You can connect the LCD TV to a surround sound or Hi Fi amplifier to obtain the best possible...

Страница 7: ...e along the lower edge of the screen where the various buttons on the remote control are shown with their current functions In this instruction manual the terms shown in the OSD as well as the buttons...

Страница 8: ...te how you reach the main menu and call up a submenu The objective of the example is to call up the Picture settings menu Press the Menu button The main menu appears on the screen Select the Settings...

Страница 9: ...ossible to move the highlight from line to line and to move upwards and downwards page by page using the page up down buttons You will see the so called menu path in the uppermost line of the menu Thi...

Страница 10: ...and confirm your selection by pressing the OK button The changes will now be saved or discarded according to your selection and you move back to the next menu level up Alternatively Press the Menu bu...

Страница 11: ...e is changed using the selection list Press the OK button to open the selection list Highlight the setting you want using the up down arrow keys By pressing the up down arrow keys it is possible to mo...

Страница 12: ...ic keyboard an SMS keyboard can also be used at any time The functionality of the QWERTY keyboard is identical to that of the alphabetic keyboard They only differ in the arrangement of the various let...

Страница 13: ...0 1 2 3 4 5 6 7 8 9 Once you have reached the field you want with the highlight you can immediately begin selecting the next character since in this case the character is directly added to the term I...

Страница 14: ...ther options for a number of subordinate selection options are located in the options groups Highlighting one of these option groups automatically opens another window on the left You can use the up d...

Страница 15: ...nu language The installation wizard starts when you select the menu language Use the up down arrow keys to highlight the menu language you want and confirm by pressing the OK button The preferred audi...

Страница 16: ...y pressing the OK button Selecting reception signals Use the up down arrow keys to select the reception signals for which you want to switch availability on or off DVB S for digital satellite channels...

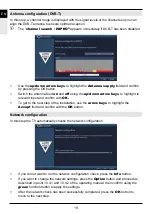
Страница 17: ...rm by pressing the OK button Antenna configuration DVB S In this step of the installation you can adjust your TV setup to the configuration of your satellite antenna Press the OK button to accept the...

Страница 18: ...levant input and confirm with OK To get to the next step of the installation use the arrow keys to highlight the Accept field and confirm with the OK button Network configuration In this step the TV a...

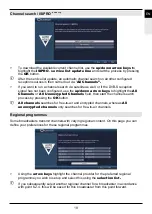
Страница 19: ...Channels or All Unencrypted Channels field then start the channel search process by pressing the OK button All channels searches for free to air and encrypted channels whereas All unencrypted channel...

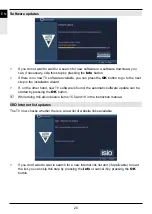
Страница 20: ...izard If on the other hand new TV software is found the automatic software update can be started by pressing the OK button While doing this also observe items 15 5 and 18 in the instruction manual ISI...

Страница 21: ...nInfo can be displayed you must first download it To this end your TV automatically starts loading the SFI data If you do not want to wait for the SFI data to be downloaded you can skip this process b...

Страница 22: ...required to do so Exiting the installation wizard Confirm the final message from the installation assistant by pressing the OK button 6 Operating the unit 6 1 Switching the TV on and off 6 1 1 Switchi...

Страница 23: ...tabase is saved when switching off the device This process takes a few seconds During this time the LCD display is already switched off After saving the device switches fully to standby The device is...

Страница 24: ...g a key to complete the entry If you wish to enter a one two or three digit number you can accelerate the switching process by holding down the last digit for longer or by pressing the OK button 6 2 3...

Страница 25: ...watch as described under section 6 2 3 1 and confirm by pressing the OK button 6 2 4 Selecting a regional programme During the initial installation you selected your preferred regional programmes If...

Страница 26: ...according to the amount of transmission time already expired for the current programme If the beginning of the progress bar is red the transmission started too early and if the end of the progress ba...

Страница 27: ...ced according to the power on volume set using the sound settings menu section 10 2 1 in the instruction manual To adjust the volume of your TV press Volume to increase the volume and Volume to decrea...

Страница 28: ...d by the broadcaster When doing this you should also observe point 7 11 of the operating manual 6 11 Subtitles When switching to a programme being broadcast with subtitles the subtitles symbol appears...

Страница 29: ...n is equipped with both the PiP function PiP Picture in Picture and the PaP function PaP Picture and Picture When doing so please also note section 7 16 in the instruction manual 6 14 1 Calling up the...

Страница 30: ...ed Timeline graphic display of the available data for the marked programme 2 Channel name with the corresponding channel slot within the active favourites list 3 Progress bars or the start stop time o...

Страница 31: ...he HbbTV application by pressing the red function key Display and use of the HbbTV application is determined by the data received Generally it is basically operated as described below Within the HbbTV...

Страница 32: ...st This list can be expanded and amended as desired To ensure interference free display of moving pictures a minimum bandwidth of 3Mbit s must be available If the bandwidth is less this can cause inte...

Страница 33: ...list is sorted You can search for a saved Internet link via the Option selection List search option To filter an Internet list by specific genres go to Option select Filter Genre and select the genre...

Страница 34: ...considerably more convenient You can also easily move the mouse cursor on the screen by using the MyTechniSat app on your smartphone or tablet provided the smartphone operation function is activated...

Страница 35: ...d on and off for the selected broadcast to make a recording for example while you are out You can do this by programming the timer either manually or automatically using the SFI 3 Timeshift recording...

Страница 36: ...ou can for example select 1 hour so the TV will continue to record the channel for this period and then automatically stop recording 7 1 5 Timer recordings This function turns your television on and o...

Страница 37: ...Stop DVR button or In Function selection call up Films DVR If applicable first select the storage medium and then open the Own recordings folder 7 2 1 2 From playback of a running existing DVR recordi...

Страница 38: ...shuttle mode Playback of the recording is paused freeze frame and uII appears in the Infobox If the right left arrow keys are pressed a number of times you can change the speed and direction of playba...

Страница 39: ......

Страница 40: ......

Страница 41: ......

Страница 42: ...2235543951001...

Отзывы: