background image

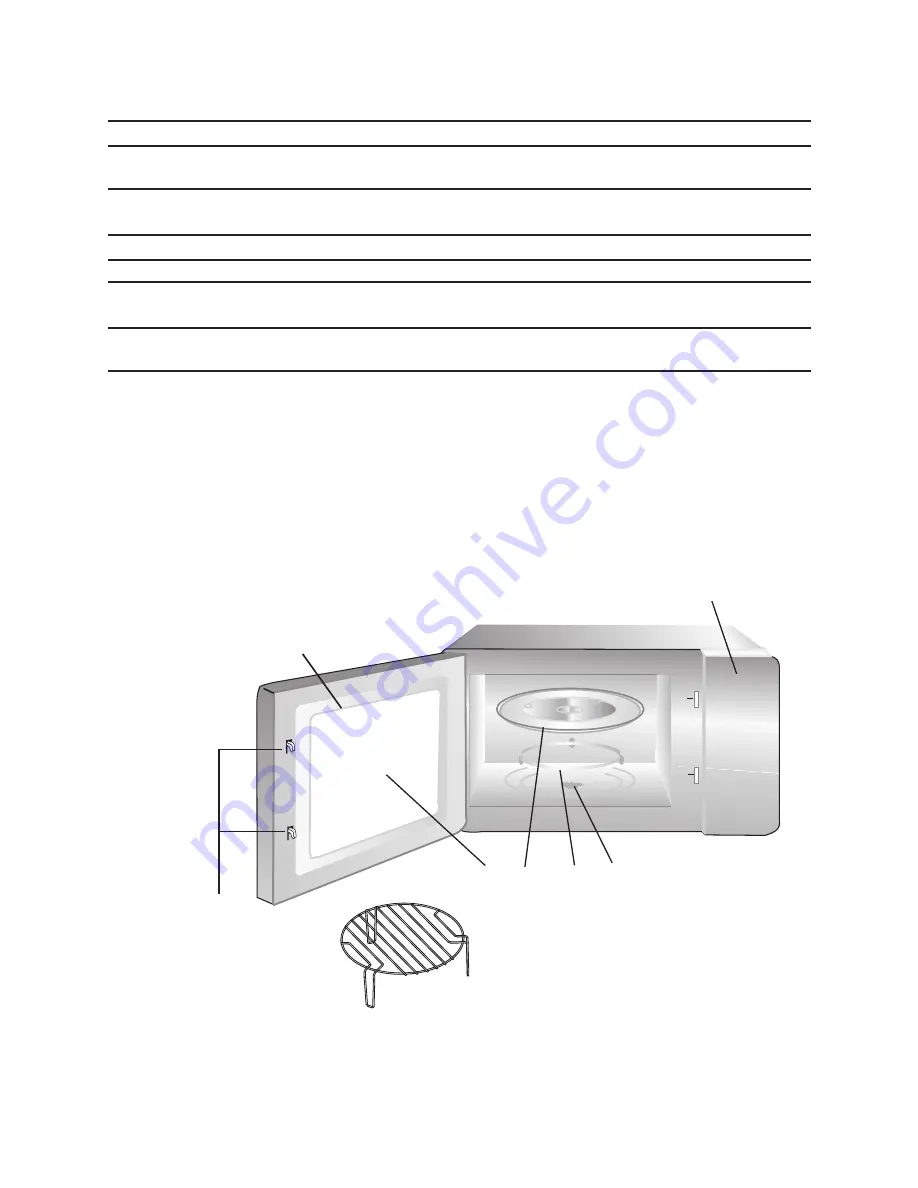
A) Control panel
B) Turntable shaft
C) Turntable ring assembly
D) Glass tray
E) Observation window
F) Door assembly
G) Safety interlock system

Materials to be avoided in microwave oven

Utensils                     Remarks

Aluminum tray
Food carton with
metal handle
Metal or metal-
trimmed utensils
Metal twist ties
Paper bags
Plastic foam

Wood

F

G

A

C

B

E

D

SETTING UP YOUR OVEN

Names of Oven Parts and Accessories

Remove the oven and all materials from the carton and oven cavity.
Your oven comes with the following accessories:
Glass tray                             1
Turntable ring assembly       1
Instruction Manual                1

Metal shields the food from microwave energy. Metal trim may
cause arcing.

May cause a fire in the oven.
Plastic foam may melt or contaminate the liquid inside when exposed
to high temperature.
Wood will dry out when used in the microwave oven and may split
or crack.

May cause arcing. Transfer food into microwave-safe dish.

May cause arcing and could cause a fire in the oven.

Grill Rack( Only be used in grill function

and be placed on the glass tray )

7

Содержание WD905

Страница 1: ...INSTRUCTIONS CAREFULLY Read these instructions carefully before using your microwave oven and keep it carefully If you follow the instructions your oven will provide you with many years of good service Model WD905 ...

Страница 2: ......

Страница 3: ...aces c WARNING If the door or door seals are damaged the oven must not be operated until it has been repaired by a competent person Specifications Model Rated Voltage Rated Input Power Microwave Rated Output Power Microwave Rated Input Power Grill Oven Capacity Turntable Diameter External Dimensions Net Weight 1450 W 900 W 1100 W 28 L 315 mm 595mmX395mmX Approx 1 kg If the apparatus is not maintai...

Страница 4: ...as bread cookies etc inside the oven 12 Remove wire twist ties and metal handles from paper or plastic containers bags before placing them in the oven 13 Install or locate this oven only in accordance with the installation instructions provided 14 Eggs in the shell and whole hard boiled eggs should not be heated in microwave ovens since they may explode even after microwave heating has ended 15 Th...

Страница 5: ...ended to be operated by means of an external timer or separate remote control system 27 Accessible parts may become hot during use Young children should be kept away 28 Steam cleaner is not to be used 29 During use the appliance becomes hot Care should be taken to avoid touching heating elements inside the oven 30 Only use the temperature probe recommended for this oven for ovens provided with a f...

Страница 6: ...nce must be grounded In the event of an electrical short circuit grounding reduces the risk of electric shock by providing an escape wire for the electric current This appliance is equipped with a cord having a grounding wire with a grounding plug The plug must be plugged into an outlet that is properly installed and grounded Consult a qualified electrician or serviceman if the grounding instructi...

Страница 7: ...may break Heat resistant oven glassware only Make sure there is no metallic trim Do not use cracked or chipped dishes Follow manufacturer s instructions Do not close with metal tie Make slits to allow steam to escape Use for short term cooking warming only Do not leave oven unattended while cooking Use to cover food for reheating and absorbing fat Use with supervision for a short term cooking only...

Страница 8: ...carton and oven cavity Your oven comes with the following accessories Glass tray 1 Turntable ring assembly 1 Instruction Manual 1 Metal shields the food from microwave energy Metal trim may cause arcing May cause a fire in the oven Plastic foam may melt or contaminate the liquid inside when exposed to high temperature Wood will dry out when used in the microwave oven and may split or crack May cau...

Страница 9: ...use only It is not intended for counter top use or for use inside a cupboard 3 Please observe the special installation instructions 4 The appliance can be installed in a 60cm wide wall mounted cupboard at lease 55cm deep and 85cm off the floor 5 The appliance is fitted with a plug and must only be connected to a properly installed earthed socket 6 The mains voltage must correspond to the voltage s...

Страница 10: ... must only be installed and the connecting cable must only be replaced by a qualified electrician If the plug is no longer accessible following installation and all pole isolating switch must be present on the installation side with a contact gap of at least 3mm TRIM KIT PLASTIC COVER SCREW A Built in furniture The built in cabinet shall not have a rear wall behind the appliance Minimum installati...

Страница 11: ...10 45 20 45 500 595 16 390 550 min MDF sheet 310 510 3 mm thick Screw Black Plastic Cover ...

Страница 12: ...stalled in the center of the cabinet 2 Open the door fix the oven to the cabinet with SCREW at the INSTALLATION HOLE of TRIM KIT Then fix the TRIM KIT PLASTIC COVER to the INSTALLATION HOLE TRIM KIT UPPER AIR TUNNEL TRIM KIT INSTALLATION HOLE TRIM KIT PLASTIC COVER INSTALLATION HOLE SCREW ...

Страница 13: ... to choose the power wished 2 Delay Start Example to start cooking at 12 12 1 Set the clock first Consult the instruction of clock setting 2 Set the cooking program wanted defrost should not be set here Please do not press START EXPRESS COOK to start cooking at the last step 3 Press Clock Pre set to display the current clock 4 ess 1 2 1 2 in order 5 Press START EXPRESS COOK to confirm the setting ...

Страница 14: ...by Weight Example Defrost beef of 500g 1 Press Defrost By W T LED will display dEF1 and will light 2 Press 5 0 0 in order g will light the range of defrosting weight is 100g 2000g 3 Press Start Express Cook to start defrosting g will go out and will flash Example Choose 50 power for cooking 10 minutes 1 Press Microwave thrice and will light 2 Press the numeral buttons of 1 0 0 0 in order 3 Press S...

Страница 15: ...g 2 about 400g 3 about 600g 1 about 80g 2 about 160g 3 about 250g 500 750 1000 550 1100 Once Twice Thrice 4 times Once Twice Thrice Once Twice Thrice 4 times 5 times Once Twice Thrice 4 times Once Twice Thrice Once Twice Thrice Once Twice Thrice Once Twice Thrice Once Twice Example Cook vegetable of 350g 1 Press Vegetable button and will light 2 Press Vegetable button twice to choose weight LED wi...

Страница 16: ...llowing 1 Press Microwave once to choose 100 microwave power 2 Press number keys 1 0 0 0 in order to adjust the cooking time 3 Press Microwave twice to choose 80 microwave power 4 Press number keys 1 5 0 0 in order to adjust the cooking time 5 Press Start Express Cook to start cooking 8 Grilling Cooking 1 Press the GRILL COMBI button once to choose the grill function the LED will display G 1 and w...

Страница 17: ... beep denoting entering into the children lock state and LED will display Lock quitting In locked state press Stop Clear for 3 seconds there will be a long beep denoting that the lock is released 14 Display Specification 1 In waiting state LED will display clock and will flash 2 In function setting state LED will display the related setting 3 In the operation and suspending state LED will display ...

Страница 18: ... any time in future you need to dispose of this product please do NOT dispose of this product with household waste Please send this product to WEEE collecting points where available It is forbidden to run the unit without any food inside It is very dangerous 17 For technical support contact Technika Service 1800 333 244 or Service technika com ...

Страница 19: ...uld not be regarded as an infallible guide Actual product only should be used to derive cut out sizes All Technika Appliances must be installed by a qualified person s with adherence to the relevant electrical plumbing and AGA codes with compliance being issued as required by state or national legislation Additionally all Technika Upright cookers must have chains installed correctly in adherence t...

Отзывы: