Technika SH340T Скачать руководство пользователя страница 4

UNPACKING

The packaging contains:

• The camera, carrying pouch, wrist strap, USB cable, A/V playback cable, 2xAAA batteries, software CD
• If any item is damaged or missing please contact your nearest Tesco store for a replacement. Please have your
receipt ready when you call.

PREPARING THE CAMERA FOR USE

You will need 2 AAA batteries.

These can be Alkaline or

rechargeable. Do not mix battery types. If you use alkaline cells,
make sure that they are the same type and rating. Replace
batteries in sets. Do not mix new and used batteries

You will also need a standard SD card.

The internal memory

is small and will hold only a very few pictures. The camera will
support SD cards up to 2GB.
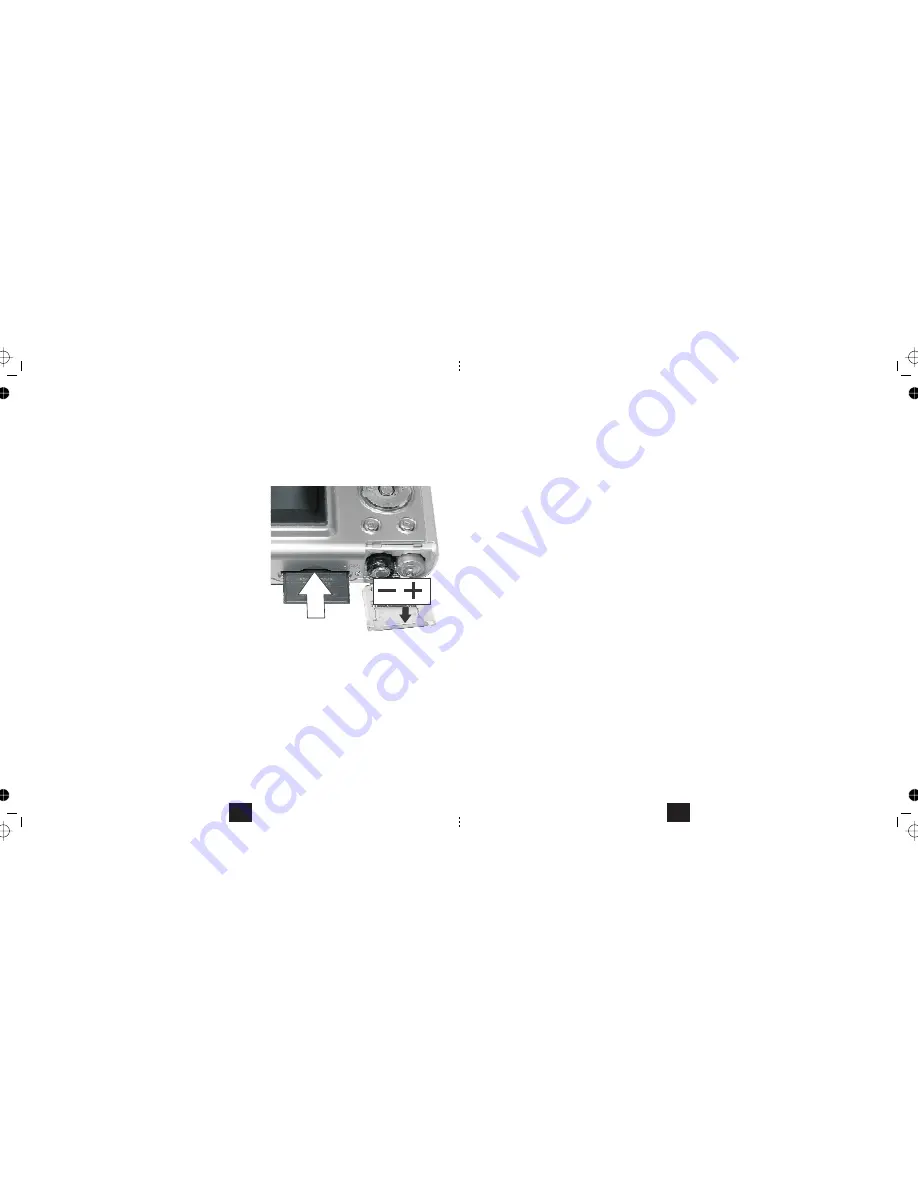
Slide the battery cover back and it will spring open. Insert the
batteries with the polarities as shown. Close the cover
Insert the SD Card with the connectors facing upwards as shown. Push it in until it latches in place. Never touch the
connecting terminals of the card. (To remove the card press it in and the internal catch will release the card).

CAUTION

Handle batteries safely.

Do not short circuit batteries with any metal objects. Dispose of used batteries safely in

accordance with relevant recycling provisions. Do not throw used batteries in water a fire or in the general rubbish.

LOADING THE CAMERA DRIVER

(See Page 29 for full details)

Windows ME/2000/XP:

Windows 98 SE:

If you do not wish to use the webcam facility you need not install the camera driver. The

PC will recognise the camera as a USB drive on connection allowing you to upload and view your pictures.

Installation of the driver is necessary to upload to a PC and view your files.

Refer to Page 29.

2

TROUBLESHOOTING

If your camera does not work as expected please run through this checklist before you contact Tesco.

Camera will not turn on

1. Batteries are not properly installed- remove and reinstall the batteries.
2. Insufficient battery voltage - Do not use old batteries or batteries with mixed battery life.
Do not use low voltage or low capacity rechargeable batteries

Flash will not fire

1. Flash set to OFF -Set the flash to Auto or On.
2. Flash has not been fully charged The flash takes a few seconds to charge -the Operation LED blinks. The Flash
light is fully charged when the Operation LED turns off.
3. Battery level low - the voltage is too low for the flash to work. Insert new batteries.

Image is blurred or out of focus

1. Subject is out of focal range. Ensure that there is at least 1.5m (5ft ) between the camera lens and subject.
2. The camera moved- Hold the camera steady while taking the picture.

The PC does not recognize the Camera.

In Windows 98SE, the camera driver has to be installed before downloading.

Subject in recorded image is too dark

Insufficient light for shooting Set the flash ON, or adjust the exposure value to a positive (+) setting.

Flickering on LCD screen or recorded image

Incorrect frequency setting. Check the anti-flicker frequency ( 50Hz or 60Hz ) under fluorescent light.

Flash card does not display images recorded.

The flash card is faulty or improperly formatted. Re-format the SD card and if necessary, replace it.

The SD card is locked. Move the switch at the side of the card to unlock it.

35

Содержание SH340T

Страница 1: ...Tesco Stores Ltd Delamare Road Cheshunt Herts EN8 9SL SH340T 3 1 MP Digital Camera User Guide...

Страница 2: ...ERA SOFTWARE Page 29 TRANSFERRING FILES FROM CAMERA TO PC Page 30 INSTALLING THE CAMERA AS A WEBCAM Page 31 USING THE CAMERA AS A WEBCAM IN WIN XP Page 32 INSTALLING USING PHOTO EXPLORER 8 Page 33 TRO...

Страница 3: ...ranty innowayaffectsyourconsumerrights Producedafter13thAugust2005 Waste electrical products should not be disposedofwithhouseholdwaste Please recycle where facilities exist Check with your Local Auth...

Страница 4: ...drive on connection allowing you to upload and view your pictures Installation of the driver is necessary to upload to a PC and view your files Refer to Page 29 2 TROUBLESHOOTING If your camera does n...

Страница 5: ...andsaveittoafolderon thePCharddrive 5 Close Click toexitthemenu NowunplugthecamerafromthePC 3 4 5 34 8 9 10 11 DISP OK 19 20 21 18 22 7 12 13 14 15 16 17 23 24 CAMERA LAYOUT 1 Lens 2 Wrist Strap Hook...

Страница 6: ...ENU DISP OK Snapshot Audio Recorder Video Cam CAPTURE MODE MODE SCREEN 4 Installing and Using Ulead Photo Explorer 8 Photo Explorer 8 SE BASIC enables you to access archive and catalogue all the image...

Страница 7: ...d Image Size If you do not see this icon and a card is inserted you should format the card See P 26 Macro Mode if selected Burst Snapshot if selected Timed Snapshot if selected 25 01 2007 USINGTHECAME...

Страница 8: ...USY 5M 0354 5M 0354 READY BUSY READY 5M 0354 5M 0354 Because the flash needs to be charged the rate at which you take successive pictures is reduced Battery life is reduced when using flash photograph...

Страница 9: ...camera processes the image and the picture you have taken appears on the screen After a while the screen clears and you may now take another picture The pictures remaining indicator on the monitor sc...

Страница 10: ...ximumZoomis4 0 8 INSTALLING THE CAMERA SOFTWARE The utilities disc supplied with this camera include The camera driver Ulead Photo Express 5 SE Installing the Camera Driver DO NOT CONNECT THE CAMERA T...

Страница 11: ...Setup screen To exit the Setup Screen MODE Press the button PC Cam 5 MIN 50 5 MIN OK 50 50 Restore default System settings Continue OK OK 50 50 O7 01 23 01 Press Press 50 60 Press Yes OK No MENU 28 P...

Страница 12: ...to recognise the camera if set to NTSC to toggle between Press to confirm and return to the list of items Press to confirm and exit Setup MODE TV Output USB Connection Format Storage Setting the TV S...

Страница 13: ...T Large resolutions offer higher picture definition but only if you are printing large pictures The downside is that large formats take up more space and need more processing time which shortens batte...

Страница 14: ...ime has elapsed the camera will take the picture The Selftimer will reset to Off when you switch the camera off Time Stamp Select with the Time Stamp keys You can overprint your snaps with the Date th...

Страница 15: ...plays MODE Navigate to the icon using the Camcorder buttons Press the button to confirm OK The Camera will now enter Camcorder mode Line up your subject and press the Shutter The Action Icon will disp...

Страница 16: ...MODE Press the key to return to the Video Camera mode or press to exit 14 PLAYING BACK AUDIO RECORDINGS SWITCH THE CAMERA AND THE HI FI OR TV SET OFF Connect the jack plug of the supplied A V lead to...

Страница 17: ...d the TV off then unplug the connecting lead You can carry out all the functions of the camera using the TV screen This includes taking and viewing still and video images recording and playing audio f...

Страница 18: ...Protect Screen Press to select ON OFF Protected or Not Protected Press to return to the previous screen MENU Protecting a video or a picture prevents it being erased You can select which images on the...

Страница 19: ...OK YES NO MENU 25 01 2007 12 30 2048x1536 50 50 20 Viewing one picture at a time to move back a picture Press to move forward one picture Zoom and Pan to increase Zoom to decrease Zoom Press to the p...

Страница 20: ...Press to delete the picture OK Press to return to thumbnail view MENU 18 Video Playback Press the button to begin play Press the button to pause Press the button to resume play During Play button to...

Отзывы: