background image

English   

- 31 -

Important Instruction

For your own safety read following instruction carefully before attempting to connect this unit to the mains 
supply.

MAINS (AC) OPERATION

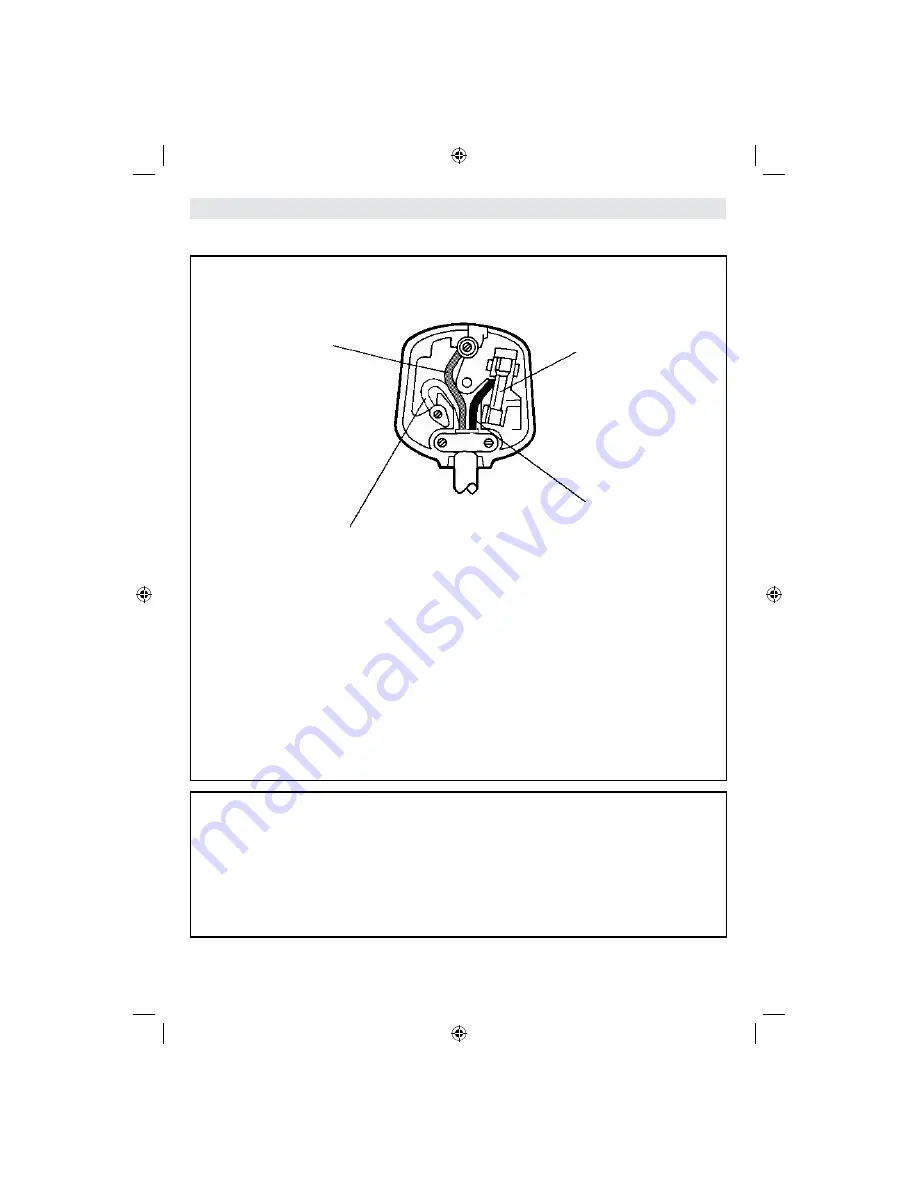
The wires in the mains lead are coloured in accordance with the following code :

IMPORTANT

As the colours of the wires in the mains lead of this appliance may not correspond with the coloured 
markings identifying the terminals in your plug, proceed as follows:
The wire which is coloured green and yellow must be connected to the terminal which is marked with 
the letter E, or by the earth symbol, or coloured green or green and yellow.
The wire which is coloured blue or black must be connected to the terminal which is marked with the 
letter N or coloured Black.
The wire which is coloured brown or red must be connected to the terminal which is marked with the 
letter L or coloured Red.
For continued protection against risk of 

fi

 re, replace only with same type and rating of fuse (ASTA 

approved 5A 250VAC fuse).

CAUTION

TO PREVENT ELECTRIC SHOCK DISCONNECT FROM THE MAINS BEFORE REMOVING 
COVER. NO USER SERVICEABLE PARTS INSIDE. REFER SERVICING TO QUALIFIED SERVICE 
PERSONNEL.

SAFETY PRECAUTION

THIS EQUIPMENT MUST BE DISCONNECTED FROM THE MAINS WHEN NOT IN USE. DO NOT 
ALLOW THIS UNIT TO BE EXPOSED TO RAIN OR MOISTURE.

GREEN

&

YELLOW

(Earth)

(if there is earth cable)

FUSE

BROWN
(Live)

BLUE
(Neutral)

[GB]_MB25_(01-TV)_COST_1900UK_PEUIDTV_22855W_NICKEL5_10065841.indd   31

[GB]_MB25_(01-TV)_COST_1900UK_PEUIDTV_22855W_NICKEL5_10065841.indd   31

02.11.2009   15:00:18

02.11.2009   15:00:18

Содержание LCD22-921

Страница 1: ...COLOUR TELEVISION WITH REMOTE CONTROL OPERATING INSTRUCTIONS For assistance please call our Tesco Electrical Helpline on 0845 4566767 LCD22 921 ...

Страница 2: ...Off 11 Input Selection 11 Basic Operations 11 Operation with the Buttons on the TV 11 Operation with the Remote Control 11 Initial Settings 12 General Operation 13 Information Banner 13 Electronic Programme Guide EPG 13 Displaying Subtitles 13 Digital Teletext for UK only 13 Analogue Teletext 14 Widescreen 14 Dijital TV Menu System 14 Channel List 14 Timers 16 Conditional Access 16 TV Setup 17 Set...

Страница 3: ...ndby mode PLL Frequency Search PC input Plug Play for Windows 98 ME 2000 XP Vista Audio line out Game Mode optional Active antenna power optional Accessories MENU INFO EPG FAV PRESETS SUBTITLE RETURN SOURCE SLEEP SCREEN LANG Remote Controller Batteries 2 X AAA Instruction Book Introduction Thank you for choosing this product This manual will guide you for the proper operation of your TV Before ope...

Страница 4: ...ames and sources of intense heat such as an electric heater Ensure that no open flame sources such as lighted candles are placed on top of the TV Batteries should not be exposed to excessive heat such as sunshine fire or the like Lightning In case of storm and lightning or when going on holiday disconnect the power cord from the wall outlet Replacement Parts When replacement parts are required mak...

Страница 5: ...l if the option is available LCD Screen The LCD panel is a very high technology product with about a million thin film transistors giving you fine picture details Occasionally a few non active pixels may appear on the screen as a fixed blue green or red point Please note that this does not affect the performance of your product Warning Do not leave your TV in standby or operating mode when you lea...

Страница 6: ...age 11 Red Sound Page up in DTV mode 16 Green Picture Page down in DTV 17 mode Yellow Feature Current language in 18 DTV mode Menu 19 Blue Install 20 OK Select 21 Cursor right TXT Subpage 22 Cursor down TXT Downpage 23 Volume up 24 Volume down 25 Mute 26 Teletext Mix 27 Subtitle in DTV mode TXT Subtitle 28 FAV Favourite Selection in DTV mode 29 Only available for EU country options Note Buttons th...

Страница 7: ...cting component video You can connect the component video and audio sockets with a device that has component output Connect the component video cables between the COMPONENT VIDEO INPUTS on on the TV and the component video outputs of your device While connecting be sure that the letters on your TV Y Pb Pr correspond with your device s connectors PC YPbPr Audio Inputs 3 are used for connecting audi...

Страница 8: ...g High Definition pictures from devices such as a High Definition Satellite Receiver or DVD Player These devices must be connected via the HDMI sockets or Component Socket These sockets can accept either 480i 480p 576p 576i 720p 1080i 1080p signals No sound connection is needed for an HDMI to HDMI connection Viewing the Connections Side Connectors CI Slot is used for inserting a CI card A CI card ...

Страница 9: ...e you connect the set to the mains Plug the power cable to the mains socket outlet Aerial Connection Connect the aerial or cable TV plug to the AERIAL INPUT socket located at the rear of the TV GB _MB25_ 01 TV _COST_1900UK_PEUIDTV_22855W_NICKEL5_10065841 indd 8 GB _MB25_ 01 TV _COST_1900UK_PEUIDTV_22855W_NICKEL5_10065841 indd 8 02 11 2009 15 00 08 02 11 2009 15 00 08 ...

Страница 10: ...wer off both the TV and the device before making any connections Note Cables shown in the illustration are not supplied If your DVD player has an HDMI socket you can connect via HDMI When you connect to DVD player as illustrated below switch to HDMI source See Input Selection section Most DVD players are connected through COMPONENT SOCKETS Use a component video cable to connect video input For ena...

Страница 11: ...ppropriate SPDIF cable to enable sound connection You should also set SPDIF Out option in the Sound menu as On External Speakers A device that supports SPDIF signal Connecting Other Equipment via Scart Most devices support SCART connection You can connect a DVD recorder a VCR or a decoder to your LCD TV by using the SCART socket Note that cables shown in the illustration are not supplied Power off...

Страница 12: ...V Volume Setting Press button to decrease volume or buttontoincreasevolume soavolumelevelscale slider will be displayed on the screen Programme Selection Press P CH button to select the next programme or P CH button to select the previous programme Viewing Main Menu Press buttons at the same time to view main menu In the Main menu select sub menu using P CH or P CH buttons and enter the sub menu u...

Страница 13: ...d instead of the active antenna See Configuration Menu in the following sections for more information Press OK button on the remote control to continue and the following message will be displayed on the screen To select the Yes or No option highlight the item by using or buttons and press the OK button The Digital TV will automatically tune to the UHF or VHF for EU countries transmission channels ...

Страница 14: ...ms weekly by means of 7 DAY EPG All programs of channels are displayed On the bottom of the screen info bar showing all the available commands will be displayed RED button Shrink makes the info boxes smaller GREEN button Expand makes the info boxes larger YELLOW button Prev Day displays the programmes of previous day BLUE button Next day displays the programmes of the next day INFO Details display...

Страница 15: ...broadcasting Use the SOURCE button to select DTV mode Press the MENU button The menu below appears on the screen Channel List Using the or button on the remote control make sure that the first item Channel List is highlighted and press the OK button to display the Channel List The following operations can be performed in this menu Navigating the entire list of channels Deleting channels Renaming c...

Страница 16: ...he button one by one as the button is pressed Press the MENU button to cancel the editing or OK button to save the new name Adding Locks to Channels Channel locking provides a password protected access to channels selected by parents In order to lock a channel you should know the parental lock password default value is set to 0000 in the factory and can only be changed from the Configuration menu ...

Страница 17: ...a the Left Right or the numeric buttons End Ending time is entered via the Left Right or the numeric buttons Change Delete permits or prohibits any modifications for other users Duration Duration between Start and End time Repeat You can set a timer to be repeated as Once Daily or Weekly You can save the adjustments by pressing the GREEN key or cancel the process by pressing the RED button You can...

Страница 18: ... Off If the channel that you are watching supports AC3 Audio turn this setting on Hard of Hearing for EU countries only Use or button to select Hard of Hearing and then press or button to set this setting as On or Off If the broadcaster enables any special signal concerning the audio you can set this setting as On to receive such signals Favourite Mode Use this function to enable or disable favour...

Страница 19: ...lly Enter PIN If it is incorrect Wrong Pin OSD will be displayed If it is correct the Parental Control menu will be displayed Maturity Lock If you set Country option as UK in the first time installation Maturity Lock option will not be visible This setting is available only for EU countries When set this option gets the maturity information from the broadcast and if this maturity level is disabled...

Страница 20: ... or Finland Use or button to select Standby Search and then press or button to set this setting as On or Off If you change Standby Search to Off this function will be unavailable To use Standby search please make sure that you select Standby Search as On Language In this menu the user can adjust the preferred language Language is changed by pressing OK button Menu shows the language of the system ...

Страница 21: ...r buttons Press OK or RED button to continue To cancel press BLUE button The following menu will be displayed during the automatic tuning AfterAPS is finalized the programme table will appear on the screen In the programme table you will see the programme numbers and names assigned to the programmes Manual Channel Scan In manual channel scan the number of the multiplex is entered manually and only...

Страница 22: ...o search for analogue channels appears on the screen This process is same as described in Automatic Search section Analogue TV Menu System Picture Menu Mode For your viewing requirements you can set the related mode option Press or button to select Mode Press or button to choose from one of these options Cinema Dynamic and Natural Brightness Contrast Colour Sharpness Hue Press or button to select ...

Страница 23: ...er Press button to view equalizer menu Press or button to change the preset In equalizer menu the preset can be changed to Music Movie Speech Flat Classic and User Select the desired frequency by pressing or button and increase or decrease the frequency gain by pressing or button Press the M button to return to the previous menu Note Equalizer menu settings can be changed only when the Equalizer M...

Страница 24: ...Language Use or button to select the Language Default Zoom While zoom mode is set as AUTO the TV will set the zoom mode in accordance with the signal of the broadcast If there is no WSS or aspect ratio information the TV will then use this setting to adopt Press or button to select Default Zoom You can set Default Zoom to Panoramic 16 9 4 3 or 14 9 by pressing or button Blue Background If the sign...

Страница 25: ... colour system to PAL PAL 60 SECAM or AUTO Sound System Press or button to select Sound System Press or button to change the sound system to BG DK I L or L Fine Tune Press or button to select Fine Tune Press or button to adjust the tuning Search Press or button to select Search Use or button to start programme searching You can also enter the desired frequency using the numeric buttons while Searc...

Страница 26: ...on When you press OK or RED button for starting automatic tuning all stored programmes will be erased and the TV will search for available channels During the search the following OSD will be displayed Whenever you press the BLUE button APS function stops and Program Table appears on the screen If you wait until the end of APS Program Table will be displayed with the programmes found and located S...

Страница 27: ...tion Programme Number Programme Name Sound Indicator and Zoom Mode information is displayed on the screen when a new programme is entered or INFO button is pressed Mute Function Press button to disable sound Mute indicator will be displayed in the upper side of the screen To cancel mute there are two alternatives the first one is pressing the button and the second one is increasing the volume leve...

Страница 28: ...s the teletext index page Subcode Pages Selects subcode pages if available when the teletext is activated INFO Reveal Shows hidden information e g solutions of games SCREEN Expand Press once to enlarge top half of the page press again to enlarge the bottom half of the page Press again to revert back to normal size P P and numbers 0 9 Press to select a page Note Most TV stations use code 100 for th...

Страница 29: ...lugs connected tightly to the aerial socket Is the aerial cable damaged Are suitable plugs used to connect the aerial If you are in doubt consult your dealer No Picture means that your TV is not receiving a transmission Have you selected the correct button on the remote control Try once more Also make sure the correct input source has been selected Sound You can not hear any sound Did you perhaps ...

Страница 30: ...280 960 60 60 0 VESA 20 1280 1024 60 64 0 VESA 21 1280 1024 75 80 0 VESA 22 1600 1200 60 75 0 VESA Appendix B AV and HDMI Signal Compatibility Input Signal Types Source Supported Signals Available EXT 1 SCART PAL 50 60 O NTSC 60 O RGB 50 O RGB 60 O FAV PAL 50 60 O NTSC 60 O YPbPr 480I 60Hz O 480P 60Hz O 576I 50Hz O 576P 50Hz O 720P 50Hz O 720P 60Hz O 1080I 50Hz O 1080I 60Hz O 1080P 50Hz O 1080P 60...

Страница 31: ...ode FEC all DVB modes Video MP ML PAL 4 3 16 9 Audio MPEG Layer I II 32 44 148kHz NUMBER OF PRESET CHANNELS 200 CHANNEL INDICATOR On Screen Display RF AERIAL INPUT 75 Ohm unbalanced OPERATING VOLTAGE 220 240V AC 50 Hz AUDIO German Nicam Stereo AUDIO OUTPUT POWER WRMS 10 THD 2 x 4 POWER CONSUMPTION W 70 W max 1 W Standby PANEL 22 Wide Display DIMENSIONS mm DxLxH With foot 117 x 532 x 376 Weight Kg ...

Страница 32: ...he terminal which is marked with the letter N or coloured Black The wire which is coloured brown or red must be connected to the terminal which is marked with the letter L or coloured Red For continued protection against risk of fire replace only with same type and rating of fuse ASTA approved 5A 250VAC fuse CAUTION TO PREVENT ELECTRIC SHOCK DISCONNECT FROM THE MAINS BEFORE REMOVING COVER NO USER ...

Страница 33: ... 41 Rapid Advance Rapid Reverse 41 Skipping Ahead or Back to Chapters 41 Skipping ahead 41 Skipping back 41 Still Picture PAUSE 41 Frame Advance STEP Forward 41 Slow motion Play 41 Direct Selection of Scenes 42 Selecting Scenes by Time 42 CD Menu 42 Basic Play 42 MP3 MPEG File 42 PAUSE 43 Stopping Play 43 Rapid Advance Rapid Reverse 43 ZOOM 43 Repeat 43 Display Function 43 DVD MENU ITEMS 44 VIDEO ...

Страница 34: ... Video method can be played Some DVD R RW discs may be incompatible due to laser pick up and disc design Some discs may be incompatible with JPEG Viewer function due to different recording format or condition of the discs About this Manual Safety Information CAUTION DVD Player is a class 1 laser product However this product uses a visible laser beam which could cause hazardous radiation exposure B...

Страница 35: ...isc If the disc is contaminated with any substance like glue remove before using it Do not expose the disc to direct sunlight or heat sources such as hot air ducts or leave it in a car parked in direct sunlight as the temperature can rise quickly and damage the disc After playing store the disc in its case On cleaning Before playing clean the disc with a cleaning cloth Wipe the disc from the cente...

Страница 36: ...and especially the USB device itself USB MEMORY MEMORY CARD SIDE VIEW MC Card Connection Insert the MC card into the Memory Card Input of the TV Make sure the gold contact area faces up The card is designed to fit easily into the system one way only Do not bend the card or force it into the slot Insert only one card at a time When you want to eject the card do not grab the card all at once Push to...

Страница 37: ... menu 14 Clear 15 Stop 16 No function 17 Rapid Reverse 18 Rapid advance 19 Info 20 No function 21 Picture mode selection 22 Source selection 23 Zoom 24 Repeat 25 Root 26 Menu 27 Title 28 OK Select 29 Cursor right 30 Cursor down 31 Volume up 32 Volume down 33 Subtitle 34 Mute 35 No function in DVD mode 36 No function 37 Angle 38 Search mode 39 Play 40 Pause Play 41 Skip next 42 Skip previous 43 GB ...

Страница 38: ...al Control Buttons for Media Mode OK SELECT Enter View Highlight an item by moving up or down Play Pause Stop RETURN M e d i a s o u r c e selection Control Buttons for Playback Rapid reverse rapid advance SEARCH Search for a specific time DISPLAY Displays time ZOOM Zooms picture Picture Playback Previous next picture Rotate picture REPEAT Displays repeat options ZOOM Zooms picture ROOT Go back to...

Страница 39: ...on the remote control The next frame of the movie is displayed You can press SKIP FRAME for the following frames To return to normal play press PLAY NOTE Reverse stepping is not available Slow motion Play Forward Press PAUSE once during play The screen freezes Press SEARCH SLOW on the remote control The unit starts playing the movie at four different speeds 1 2 1 4 1 8 and 1 16 You can increase or...

Страница 40: ...isappears Input Invalid message is displayed on screen If you wait five seconds without pressing any key to enter time selecting scenes by time option is cancelled You can press RETURN key to cancel time search Convenient Functions Displaying the time information Press DISPLAY during play Some information is displayed on TV screen to indicate the current status of the disc On the display screen yo...

Страница 41: ...is button a number of times until Subtitle Off appears on the screen Changing Audio Soundtrack Language It is possible to change the audio language from the one selected at the initial settings to a different language if available This operation works only with discs on which multiple audio soundtrack languages are recorded if not prohibited by the DVD Press LANG during play Press LANG a number of...

Страница 42: ...for selecting items for video CDs Stopping play To stop the play permanently press STOP twice When the STOP button is pressed for the first time a message Press Play Key To Continue will appear on the screen to remind you if you want to continue the play To stop the play press the STOP button again or you can press PLAY to continue Rapid Advance Rapid Reverse Press or on the remote control during ...

Страница 43: ...displayed the elapsed time for the title which is being played will be displayed If Single remain is displayed the remaining time for the title which is being played will be displayed Pressing the INFO key again closes display menu screen DISPLAY OFF is diplayed Displaying a scene with a larger and closer view CD Menu CD Menu is used to display the directory structure of data discs which would con...

Страница 44: ... to normal play Press ZOOM again JPEG Press PLAY to start slide show During slideshow you may change slide type effect by pressing ANGLE button It is provided both ZOOM in out and Zoom pan functions for JPEG pictures Press ZOOM to turn on off this function When this mode is on a message will indicate the current ratio on screen If zoom mode is on Press to control the ratio of zoom in out The zoom ...

Страница 45: ...sub item is selected on the right menu Use arrow buttons to change the selected sub item Press SELECT to choose the selected sub item on the right menu DVD MENU ITEMS VIDEO SETUP PAGE TV Type TV Type is only available as PAL The TV set also supports NTSC signal however the signal will be converted to PAL when it appears on the screen LANGUAGE SETUP OSD LANG You can select the default OSD language ...

Страница 46: ...disc or condensation may effect the equipment Wait for 1 to 2 hours in Stand by to dry the equipment Disc does not play No disc in the machine Place a disc into the loader Disc incorrectly loaded Ensure that the DVD disc is in the drawer with the label uppermost Wrong type of disc The machine cannot play CD ROMS etc The region code of the DVD must match the player Wrong OSD language Select the lan...

Страница 47: ...or even longer duration play Subtitles These are printed lines appearing at the bottom of the screen which translate or transcribe the dialogue They are recorded on the DVD discs Time Number This indicates the playtime which has elapsed from the start of a disc or a title It can be used to find a specific scene quickly Not all discs permit the time search feature to be used Availability is determi...

Страница 48: ...ale Progressive JPEG Up to 4 Mega pixel Support format 444 440 422 420 Grayscale External Subtitles ssa Support Text File Format but do not support Picture File Format ass srt smi sub Supported Memory Card Types SD Secure Digital MMC Multi Media Card MS Memory Stick MS PRO Memory Stick Pro Memory Stick is a trademark of Sony Corporation Secure Digital is a trademark of SD Card Association MULTIMED...

Страница 49: ... b le sid ed 480 m in S ing le side d 80 m in D o u b le sid ed 160 m in C h aracteristic s D V D co n ta in s ex cellen t so u n d a n d vid eo du e to D olby D igital and M P E G 2 S ystem Vario u s screen and au dio fu nctio n s ca n b e easily selected throu gh th e on scr een m enu A n LP is record ed as an an alo g sig n al w ith m ore d isto rtio n C D is re cord e d as a D ig ita l S ig n ...

Страница 50: ...SC pixels 50 and 60 Hz frame refresh rates PAL NTSC Digital bit stream processing rate up to 108Mbits sec Line resolution more than 500 lines Audio Type Dolby Digital Decoding MPEG Multichannel Decoding LPCM Audio Output Digital Audio Outputs Analog Outputs IEC 958 TOSLINK 24 bit 48 44 1kHz down sampling DAC GB _MB25_ 02 DVD _1900UK_PEUIDTV_NICKEL5_ WODIVX_WOVCD _10065841 indd 49 GB _MB25_ 02 DVD ...

Страница 51: ...50157421 ...

Отзывы: