Technika 42-502 Скачать руководство пользователя страница 17

 TV SETUP

E-16

 TV SETUP

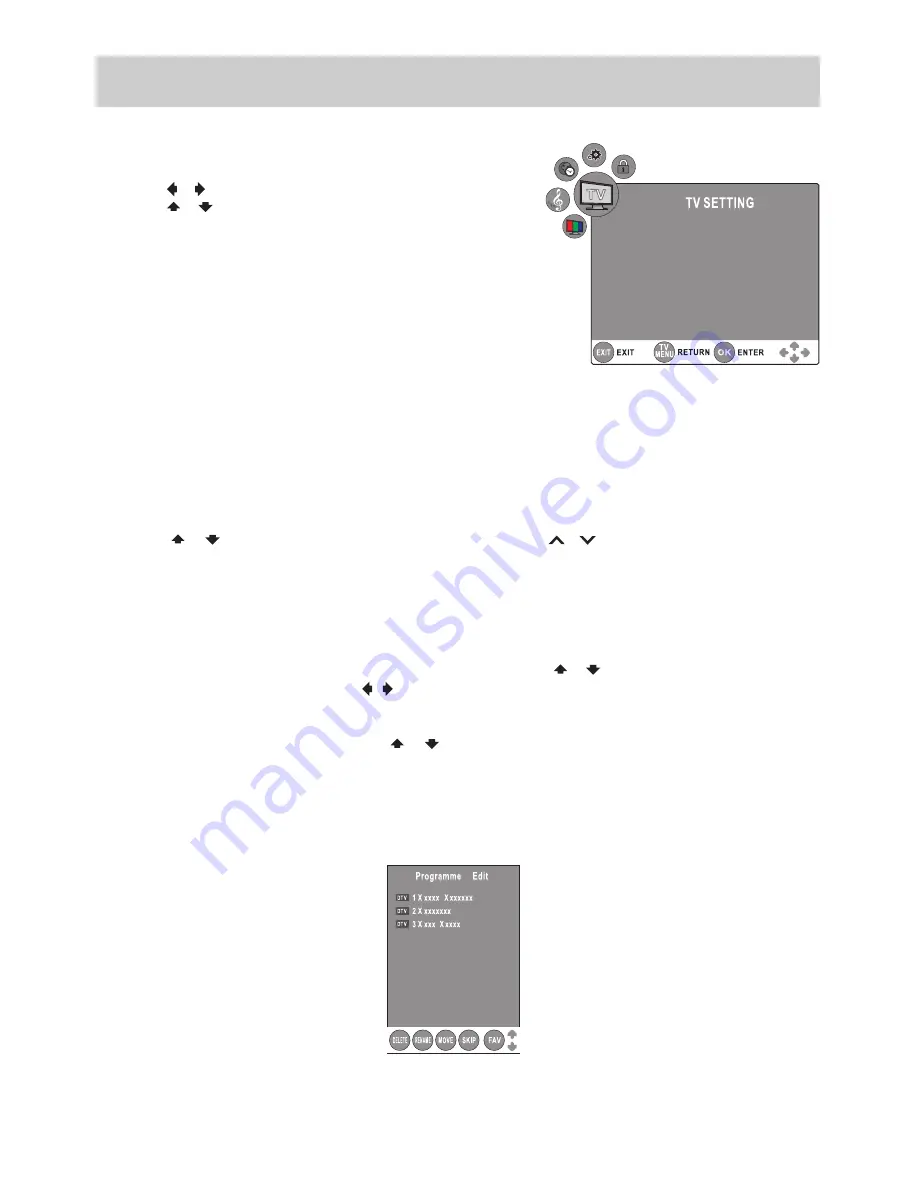
TV SETTING MENU (only in ATV or DTV mode)

1.  Press the 

TV MENU

 button.

2.  Use the

   or   button to select the 

TV SETTING

.

3.  Use the 

 or 


button to select the options 

(Auto Tuning, DTV 

Manual Tuning, ATV Manual Tuning, Programme Edit 

or 

CI 

Information),

 and then press the 

ENTER/OK 

button to enter 

the settings. 

4.  Press the 

TV MENU

 button to return to previous menu, repeat 

step 2 to adjust other settings.

5.  To exit the setup menu and return to the normal screen, press 

the 

EXIT

 button.

•  Auto Tuning

  Automatically scan, sort and store all available programmes.

•  DTV Manual Tuning

  Perform manual search for DTV (Digital TV) programmes.

•  ATV Manual Tuning

  Perform manual search and fine tune for ATV (Analog TV) programmes.

•  Programme Edit

  All channels stored are listed in the Programme Edit menu, you can edit the channels by the following steps:

1.  Use the   or 


button to select a channel. (Press the 

PAGE

/

CH


 / 

 button to skip to previous / next 

page.)

2.  Press the 

RED / GREEN / YELLOW / BLUE

 button or the 

FAV

 button to edit the channel.

•  DELETE

  Press the 

RED

 button to delete the selected channel and press the 

ENTER/OK 

button to confirm. Press the 

TV MENU

 button to stop delete.

•  RENAME 

(for ATV mode only)

  Press the 

GREEN

 button to rename the selected channel. Use the   or 


button to select the characters to 

represent the station name, use the 

 / 

 button to move the next position of character, and then press the 

TV MENU

 button to confirm.

•  MOVE


(for ATV mode only)

  Press the 

YELLOW

 button and use the   or 


button to move the selected channel, then press the 

TV 

MENU

 button to confirm.

•  SKIP

  Press the 

BLUE

 button to skip or not skip the selected channel.

•  FAV (Favourite)

  Press the 

FAV

 button to set or cancel the selected channel as one of the favourite programmes.

•  CI Information

  Display CAM and Smart card information; select the language if available.

Auto Tuning
DTV Manual Tuning
ATV Manual Tuning
Programme Edit
CI Information

Содержание 42-502

Страница 1: ......

Страница 2: ...ETY INFORMATION When connecting or disconnecting the AC power cord grip the plug and not the cord itself Pulling the cord may damage it and create a hazard When you are not going to use the unit for a...

Страница 3: ...ning this could result in fatal electric shock ALWAYS disconnect the AC adaptor when you are not going to use the unit for a long period time ENSURE that all electrical connections including the mains...

Страница 4: ...2 Lay the unit down on a flat surface so the back side is facing up making sure to place a soft cushioned material such as a blanket or thick piece of foam beneath the screen 3 Put the stand into the...

Страница 5: ...t be disposed of with household waste Please refer to the retailer from whom you purchased this item for disposal instructions BATTERY REPLACEMENT When the batteries become weak the operating distance...

Страница 6: ...e channel information in DTV mode 8 GUIDE Button Press to display the PROGRAMME Guide in DTV mode 9 TIME Button Press to display the current time information from DTV 10 VOL VOL Buttons Press to adjus...

Страница 7: ...or backward the page of Programme Edit Favourite inTV DTV mode 26 CURSOR Buttons Presstohighlightselectionsonamenuscreenandadjust certain settings ENTER OK Button Press to confirm selections on a menu...

Страница 8: ...Enters the on screen TV menu 3 FUNCTION Button Selects DTV TV AV1 S VIDEO AV2 SCART YUV HDMI1 HDMI2 and PC 4 CH CH Buttons Changes the TV channels 5 VOL VOL Controls Adjusts the volume level 6 Remova...

Страница 9: ...13 MONITOR VGA Jack PC IN 14 SCART Jack AV IN 2 15 AUDIO IN Left Right Jacks AV IN1 16 VIDEO IN Jack AV IN 1 17 AUDIO OUT Left Right Jack 18 AUDIO IN Left Right Jacks YUV IN 19 COMMON INTERFACE Slot 2...

Страница 10: ...with a CI slot The CI slot allows you to insert a CAM Conditional Access Module with an appropriate subscription card for some pay for view services It is required to subscribe to a pay channel compa...

Страница 11: ...ent such as a VCR camcorder satellite system or cable etc Connecting to a VCR Camcorder Satellite System Cable Connect the AUDIO and S VIDEO cable not included as shown Make sure you connect the cable...

Страница 12: ...able not included as shown Make sure you connect the cable from the source equipment HDMI OUT to this unit HDMI IN To match the video source output quality press the FUNCTION button then choose the HD...

Страница 13: ...T To AUDIO OUT jacks To AUDIO IN jacks To PC AUDIO OUT jack To PC Connector CONNECTING A PC Connect the 15 pin D SUB PC VGA connector from your computer to the 15 pin D SUB PC VGA input on this unit u...

Страница 14: ...l to turn on the unit NOTES Be sure the AC power cord is disconnected and the TV is switched off before making connections Make sure that all components are connected correctly When you are not going...

Страница 15: ...4 Use the button to move to Start Press the ENTER OK button to confirm Start The system will automatically start to scan and preset all available programmes 5 After scanning has finished the TV will...

Страница 16: ...R OK button to watch the selected channel Press the EXIT button to exit the PROGRAMME GUIDE menu Note Guide information display may be different according to the DTV programmes Use the or button to se...

Страница 17: ...the or button to select a channel Press the PAGE CH button to skip to previous next page 2 Press the RED GREEN YELLOW BLUE button or the FAV button to edit the channel DELETE Press the RED button to d...

Страница 18: ...icher in darkness and the white become brighter Brightness Adjust the brightness of the picture Colour Adjust the colour of the picture Sharpness Adjust the sharpness level to improve detail in the pi...

Страница 19: ...the options Sound Mode Treble Bass Balance or AVL then adjust them using the or button Only when Sound Mode is set as Personal can the Treble and Bass options be activated 4 Press the TV MENU button t...

Страница 20: ...version for your choice Restore Setting Press the ENTER OK button to restore the system settings to the factory default Gamma Middle Restore Setting Restore Setting Power Level 1 ISM Method Standard S...

Страница 21: ...o the normal screen press the EXIT button Lock System Select to lock or unlock the programmes Change Password If you change the password remember your password Block Programme In the Block Programme m...

Страница 22: ...button The text will be superimposed over the TV programme Press the MIX button again to return to the text page Page search whilst watching TV In Text mode press the CANCEL button Enter the page numb...

Страница 23: ...e watching is broadcast in colour and not black white Make sure the unit is plugged in and turned on Make sure that TV mode is selected Try a new channel to check for possible station trouble Make sur...

Страница 24: ...in no way affects your consumer rights UK Waste electrical products should not be disposed of with household waste Separate disposal facilities exist for your nearest facilities see www recycle more...

Отзывы: