background image

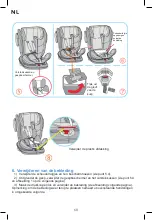
Stap 3: Haal de bovenriem door de blauwe gordelgeleider aan één kant van het autostoeltje, 

maak de bovenriem vast aan het bovenriem-

verankeringspunt van uw voertuig (het 

verankeringspunt wordt aangegeven in de handleiding van uw voertuig). Stel de bovenriem 

strak, de spanningsindicator moet groen worden. Haal daarna het vrije deel van de 

bovenriem door de blauwe gordelgeleider aan de andere kant van het autostoeltje.

Haal vervolgens het vrije uiteinde door de gleuf aan de achterkant van het autostoeltje 

achter de hoofdsteun (afbeelding 1) en daarna door het metalen plaatje (afbeelding 2). Trek 

aan het uiteinde en haal er nog e

en keer doorheen (afbeelding 3) om het riemuiteinde vast 

te zetten. Span de bovenriem en het riemuiteinde zo nodig aan (afbeelding 4). De 

spanningsindicator moet groen zijn, als teken dat de bovenriem juist is aangespannen.

Stap 4: Plaats uw kind in het autostoeltje, gebruik het 5-puntstuigje om uw kind veilig vast te 

zetten. Maak het tuigje vast en span het aan, controleer of de hoogte van de 

schouderriemen en de hoofdsteun correct zijn (zie punt 4.2, 4.3, 4.4 en 4.5). Let erop dat de 

riempjes van het tuigje niet gedraaid zijn en goed strak staan.

Installatiemethode nr. 2: driepuntsgordel van het voertuig

Voor kinderen van 9 tot 18 kg, installatie 

IN DE RIJRICHTING

.

Stap 1: Zoals hieronder afgebeeld haalt u de driepuntsgordel van uw voertuig door de 

gordelgeleiders van het autostoeltje, klik de gordel vast en span hem strak. Let erop dat de 

autogordel goed strak staat en dat hij niet verdraaid is.

Stap 2: Plaats uw kind in het autostoeltje, gebruik het 5-puntstuigje om uw kind veilig vast te 

zetten. Maak het tuigje vast en span het aan, let erop dat de riempjes niet gedraaid zijn en 

dat de hoogte is aangepast aan het kind (zie punt 4.2, 4.3, 4.4 en 4.5).

Installatiemethode nr. 3:  driepuntsgordel van het voertuig

Voor kinderen van 9 tot 18 kg, installatie 

IN DE RIJRICHTING

.

Stap 1: Gebruik de ISOFIX

-aansluitpunten om het autostoeltje vast te zetten. Let erop dat ze 

goed vergrendeld zijn, de indicators van de aansluitpunten moeten groen worden. Druk 

vervolgens tegen het autostoeltje zodat het goed contact maakt met de rugleuning van de 

autostoel (zie punt 4.6 en 4.7).

Stap 2: Zoals hieronder afgebeeld haalt u de driepuntsgordel van uw voertuig door de 

gordelgeleiders van het autostoeltje, klik de gordel vast en span hem strak. Let erop dat de 

autogordel goed strak staat en dat hij niet verdraaid is.

Stap 3: Plaats uw kind in het autostoeltje, gebruik het 5

-puntstuigje om uw kind veilig vast te 

zetten. Maak het tuigje vast en span het aan, let erop dat de riempjes niet gedraaid zijn en 

dat de hoogte is aangepast aan het kind (zie punt 4.2, 4.3, 4.4 en 4.5).

64

65

NL

Содержание SEATY 360

Страница 1: ......

Страница 2: ...tre norme quivalente En cas d incertitude contacter le fabricant du dispositif de retenue ou votre revendeur AVERTISSEMENT Ce si ge auto est un dispositif de retenue Universel pour enfant Homologu sel...

Страница 3: ...rs ISOFIX 4 7 Installation du si ge auto avec les connecteurs ISOFIX 4 8 Ajuster l inclinaison du si ge auto 4 9 Rotation du si ge auto 5 Installation and use of Child car seat 5 1 5 2 5 3 5 4 6 Retra...

Страница 4: ...otation Sangle de r glage du harnais Base Levier d inclinaison Cache ajusteur Prot ge boucle Boucle R ducteur Sangle harnais d paule Guide sangle harnais d paule Guide ceinture 3 points Fourreau du ha...

Страница 5: ...de r glage du harnais Levier d ajustement de l appui t te Sangle Top Tether Bretelles des fourreaux Sangles du harnais Bouton de d verouillage ISOFIX T moin de v rouillage ISOFIX Connecteurs ISOFIX ur...

Страница 6: ...toutes circonstances m me lorsque votre enfant n est pas install dans le si ge auto Un si ge auto non attach peut devenir un projectile en cas de choc Veillez ce que les bagages et autres objets susc...

Страница 7: ...apt e la taille de votre enfant Levier d ajustement de l appui t te la e e s et es nt er me ne Connecteurs ISOFIX N utilisez cette position que si le si ge du v hicule est quip d ancrages ISOFIX Ce si...

Страница 8: ...est bien verrouill dans sa boucle Etape 3 Pour d verrouiller le harnais appuyez sur le bouton rouge au centre de la boucle 4 5 Ajuster le harnais 1 Serrer le harnais Tirez la sangle de r glage du har...

Страница 9: ...yez les connecteurs au maximum Si vous souhaitez r tracter les connecteurs ISOFIX poussez les connecteurs ISOFIX vers l int rieur du si ge en appuyant sur le bouton de d verrouillage des connecteurs 4...

Страница 10: ...5 2 et 5 3 4 8 Ajuster l inclinaison du si ge auto Comme le montrent les illustrations 1 et 2 ci dessous l inclinaison du si ge peut tre r gl e en actionnant le levier de r glage de l inclinaison Cert...

Страница 11: ...z ensuite le si ge auto jusqu ce qu il soit bien en contact contre le dossier du si ge du v hicule r f rez vous aux points 4 6 et 4 7 tape 3 Comme illustr ci dessous faites passer le Top Tether par de...

Страница 12: ...curiser votre enfant Bouclez et tendez correctement le harnais v rifiez que la hauteur sangles d paules et de l appui t te sont correctes r f rez vous aux points 4 2 4 3 4 4 4 5 5 2 Installation du si...

Страница 13: ...derri re l appui t te illustration 1 puis travers la plaque m tallique illustration 2 tirez et effectuez un retour illustration 3 pour s curiser le brin de sangle Retendez la sangle Top Tether et le...

Страница 14: ...ns le si ge auto utilisez le harnais 5 points pour s curiser votre enfant Bouclez et tendez correctement le harnais assurez vous que ses sangles ne sont pas vrill es et que sa hauteur est adapt e l en...

Страница 15: ...e pour s curiser le si ge auto et votre enfant Assurez vous que la ceinture du v hicule est bien tendue et qu elle n est pas vrill e 5 3 Installation du si ge auto Gr 2 3 15 36 kg M thode d installati...

Страница 16: ...e ajustez d abord le si ge auto dans la position la plus inclin e puis retirez le cache en plastique pr s du levier de r glage d inclinaison puis comme indiqu sur l illustration 7 faites passer la pet...

Страница 17: ...r voir point 5 4 et illustration 1 page suivante 3 D tachez les boutons pression puis retirez la housse voir illustration page suivante Remarque pour remettre la housse en place r p tez ces op rations...

Страница 18: ...s sur la surface du si ge auto les harnais et les pi ces en plastique avec une ponge humide puis laissez s cher l air libre 4 Si les harnais sont t ch s par des aliments de la boisson retirez les et r...

Страница 19: ...kg If in doubt please contact the car seat manufacturer or the retailer WARNING This is a SEMI UNIVERSAL SAFETY RESTRAINT DEVICE FOR CHILDREN It is compliant with Regulation 44 04 and may only be used...

Страница 20: ...safety seat using the ISOFIX clips 4 8 Adjusting the inclination of the child safety seat 4 9 Swiveling the child safety seat 5 Installation and use of the child safety seat 5 1 Installing the child...

Страница 21: ...at Headrest Backrest Strap slot shoulder harness Shoulder harness strap Reducer 3 point seatbelt slot Buckle Harness sheath Adjuster cover Harness adjuster strap Buckle protection Base Inclination lev...

Страница 22: ...Headrest adjustment lever Top Tether strap Sheath straps Harness straps Harness adjuster strap ISOFIX clips ISOFIX unlock button ISOFIX locking indicator 22 EN...

Страница 23: ...ic parts of the car seat must be placed and installed so as they may not in normal use become trapped under a movable seat or in the vehicle door Keep all the straps that fix the car seat to the vehic...

Страница 24: ...ty Recommended positions Positions not recommended Only use this position if the vehicle s seat is equipped with ISOFIX attachments 4 2 Adjusting the height of the headrest The headrest has 11 differe...

Страница 25: ...ck that the harness is properly fastened in the buckle Step 3 To unfasten the harness press the red button in the middle of the buckle 4 5 Adjusting the harness 1 Tightening the harness Pull the harne...

Страница 26: ...ush outwards then extend the clips to the maximum If you wish to retract the ISOFIX clips push them back into the seat while pressing the clips unlock button 4 7 Installing the child safety seat using...

Страница 27: ...the inclination of the child safety seat As shown in illustrations 1 and 2 below the inclination of the seat can be adjusted by operating the inclination adjustment lever Certain types of installation...

Страница 28: ...e green Then push the child safety seat back until it comes into contact with the backrest of the vehicle s seat refer to points 4 6 and 4 7 Step 3 As illustrated below pass the Top Tether over the he...

Страница 29: ...ecure your child Buckle and properly tighten the harness make sure the height of the shoulder straps and the headrest are properly adjusted refer to points 4 2 4 3 4 4 4 5 5 2 Installing the child saf...

Страница 30: ...e back of seat behind the headrest illustration 1 then through the metal plate illustration 2 pull and fold back illustration 3 to secure the strap strand Re tighten the Top Tether strap and the strap...

Страница 31: ...nt safety belt For children weighing from 9 to 18 kg FORWARD FACING installation Step 1 Use the ISOFIX clips to fasten the child safety seat in place Make sure they are properly locked the indicators...

Страница 32: ...e vehicle s seatbelt is well tightened and that it is not twisted Installation method no 2 ISOFIX vehicle s 3 point safety belt For children weighing from 15 to 36 kg FORWARD FACING installation Pleas...

Страница 33: ...ext page first adjust the child safety seat to the fully inclined position then remove the plastic cover next to the inclination adjustment lever Next as shown in illustration 7 pass the small metalli...

Страница 34: ...reducer see point 5 4 and illustration 1 on the next page 3 Undo the press studs and remove the seat cover see illustration on next page Remark to replace the seat cover repeat these operations in re...

Страница 35: ...d mold 3 Clean dust from the surface of the child safety seat the harness and plastic elements with a damp sponge and allow to dry in the fresh air 4 If the harness is soiled by food or drink remove i...

Страница 36: ...den Sie sich an den Hersteller des R ckhaltesystems oder Ihren H ndler ACHTUNG Dies ist ein HALB UNIVERSELLES ISOFIX KINDERR CKHALTESYSTEM Es ist nach der Rege lung Nr 44 nderungen 04 zugelassen Diese...

Страница 37: ...Rastarme 4 7 Einbau des Kindersitzes mit ISOFIX Rastarmen 4 8 Einstellung der Neigung des Kindersitzes 4 9 Rotation des Kindersitzes 5 Einbau und Nutzung des Kindersitzes 5 1 Einbau des Kindersitzes...

Страница 38: ...Kopfst tze R ckenlehne Schultergurtf hrung Schultergurt Reduktor 3 Punkt Gurtf hrung Schnappverschluss Schultergurtpads Abdeckkappe Versteller Gurtstraffer Verschlusskappe Basis Neigungshebel Rotation...

Страница 39: ...ung ss Stellhebel f r Kopfst tze Haltegurt Top Tether Riemen der Schultergurtpads Hosentr gergurte Gurtstraffer ISOFIX Rastarme ISOFIX Entriegelungs knopf ISOFIX Verriegelung sanzeige 39 DE...

Страница 40: ...inderr ckhaltesystems m ssen so platziert und montiert werden dass sie bei normalem Gebrauch des Fahrzeugs nicht unter einem beweglichen Sitz oder in der Fahrzeugt r eingeklemmt werden k nnen Alle Gur...

Страница 41: ...nen Nicht empfohlene Positionen Verwenden Sie diese Position nur wenn der Sitz im Fahrzeug mit ISOFIX Verankerungen ausgestattet ist 4 2 Einstellung der H he der Kopfst tze Die Kopfst tze verf gt ber...

Страница 42: ...urt gut im Schnappverschluss eingerastet ist Schritt 3 Um den Hosentr gergurt zu entriegeln dr cken Sie auf den roten Knopf in der Mitte des Schnappverschlusses 4 5 Einstellung des Hosentr gergurts 1...

Страница 43: ...die Rastarme in die maximale Stellung auszufahren Wenn Sie die ISOFIX Rastarme einfahren m chten schieben Sie die ISOFIX Rastarme am Sitz nach innen indem Sie auf den Entriegelungsknopf der Rastarme d...

Страница 44: ...ersitzes Wie in Bild 1 und 2 weiter unten dargestellt kann die Neigung des Kindersitzes eingestellt werden indem der Stellhebel f r die Sitzneigung bet tigt wird Bei einigen Einbaukonfigurationen ist...

Страница 45: ...en Sie dann den Kindersitz vor bis ein fester Kontakt mit der R ckenlehne des Autositzes hergestellt ist siehe Punkt 4 6 und 4 7 Schritt 3 Wie weiter unten dargestellt f hren Sie den Top Tether ber di...

Страница 46: ...lie en und spannen Sie den Hosentr gergurt ordnungsgem und stellen Sie sicher dass die H he der Schultergurte und der Kopfst tze korrekt eingestellt ist siehe Punkt 4 2 4 3 4 4 4 5 5 2 Einbau des Kind...

Страница 47: ...r der Kopfst tze Bild 1 und durch die Metallplatte Bild 2 ziehen Sie es an und machen Sie eine Schlaufe Bild 3 um das Gurtende zu sichern Spannen Sie ggf den Top Tether Haltegurt und das Gurtende noch...

Страница 48: ...9 und 18 kg erfolgt der Einbau IN Fahrtrichtung Schritt 1 Verwenden Sie die ISOFIX Rastarme um den Kindersitz zu befestigen Stellen Sie sicher dass sie korrekt verriegelt sind wobei die Anzeigen jede...

Страница 49: ...Fahrzeuggurt gut gespannt und nicht verdreht ist Einbauanleitung Nr 2 ISOFIX Dreipunktgurt des Fahrzeugs F r Kinder mit einem Gewicht zwischen 15 und 36 kg erfolgt der Einbau IN Fahrtrichtung Siehe bi...

Страница 50: ...Kindersitz in die maximale Neigungsposition entnehmen Sie die Plastik Abdeckkappe neben dem Stellhebel f r die Sitzneigung und f hren Sie dann gem Bild 7 den kleinen metallischen Schnappverschluss dur...

Страница 51: ...den Reduktor siehe Punkt 5 4 und Bild 1 auf der n chsten Seite 3 L sen Sie die Druckkn pfe und entnehmen Sie den Bezug siehe Bild auf n chster Seite Hinweis Um den Bezug wieder anzubringen befolgen S...

Страница 52: ...er Oberfl che des Kindersitzes den Hosentr gergurten und Plastikteilen mit einem feuchten Schwamm und lassen Sie die Teile an der Luft trocknen 4 Bei Flecken durch Lebensmittel oder Getr nke auf den H...

Страница 53: ...elier van het bevestigingssysteem indien u twi jfelt WAARSCHUWING Dit is een semi universeel bevestigingssysteem voor kinderen Het is goedgekeurd volgens Re glement Nr 44 amendementen serie 04 Dit aut...

Страница 54: ...laatsen van het autostoeltje met de ISOFIX aansluitpunten 4 8 De hellingshoek van het autostoeltje aanpassen 4 9 Rotatie van het autostoeltje 5 Plaatsen en gebruik van het autostoeltje 5 1 Plaatsen va...

Страница 55: ...Rugleuning Riemgeleider schoudertuigje Riem schoudertuigje Verkleinkussen Geleider driepuntsgordel Gesp Beschermhoes tuigje Afdekking versteller Verstelriem van het tuigje Gespbeschermer Onderstel Hel...

Страница 56: ...telhendel hoofdsteun Bovenriem Top Tether Schouderriemen van de beschermhoezen Riemen van het tuigje Verstelriem van het tuigje ISOFIX aansluitpunten ISOFIX ontgrendelingsknop ISOFIX statusweergave 56...

Страница 57: ...dit autostoeltje dienen op zodanige wijze te worden geplaatst dat zij bij normaal gebruik niet klem kunnen raken onder een verstelbare stoel of tussen een autoportier Houd alle banden ter bevestiging...

Страница 58: ...nbevolen posities Niet aanbevolen posities Gebruik deze positie alleen als de autostoel is voorzien van ISOFIX verankeringspunten 4 2 De hoogte van de hoofdsteun aanpassen De verstelbare hoofdsteun be...

Страница 59: ...eer of het tuigje goed is vergrendeld in de gesp Stap 3 Om het tuigje te ontgrendelen drukt u op de rode knop in het midden van de gesp 4 5 Het tuigje aanpassen 1 Het tuigje aanspannen Trek aan de ver...

Страница 60: ...u de ISOFIX aansluitpunten wilt intrekken duwt u de ISOFIX aansluitpunten richting de binnenkant van het stoeltje door op de ontgrendelingsknop van de aansluitpunten te drukken 4 7 Plaatsen van het au...

Страница 61: ...oek van het autostoeltje aanpassen Zoals de onderstaande afbeeldingen 1 en 2 aantonen kan de hellingshoek van het stoeltje worden versteld met behulp van de hendel voor de instelling van de hellingsho...

Страница 62: ...en groen worden Druk vervolgens tegen het autostoeltje zodat het goed contact maakt met de rugleuning van de autostoel zie punt 4 6 en 4 7 Stap 3 Zoals hieronder is afgebeeld haalt u de bovenriem onde...

Страница 63: ...ind veilig vast te zetten Maak het tuigje vast en span het aan controleer of de hoogte van de schouderriemen en de hoofdsteun correct zijn zie punt 4 2 4 3 4 4 en 4 5 5 2 Plaatsen van het autostoeltje...

Страница 64: ...het autostoeltje achter de hoofdsteun afbeelding 1 en daarna door het metalen plaatje afbeelding 2 Trek aan het uiteinde en haal er nog een keer doorheen afbeelding 3 om het riemuiteinde vast te zett...

Страница 65: ...et voertuig Voor kinderen van 9 tot 18 kg installatie IN DE RIJRICHTING Stap 1 Gebruik de ISOFIX aansluitpunten om het autostoeltje vast te zetten Let erop dat ze goed vergrendeld zijn de indicators v...

Страница 66: ...ordel goed strak staat en dat hij niet verdraaid is Installatiemethode nr 2 ISOFIX driepuntsgordel van het voertuig Voor kinderen van 15 tot 36 kg installatie IN DE RIJRICHTING Zie punt 5 4 Het tuigje...

Страница 67: ...tje eerst in de meest schuine stand daarna verwijdert u de plastic afdekking bij de hendel voor het instellen van de hellingshoek en daarna zoals afbeelding 7 laat zien haalt u de kleine metalen gesp...

Страница 68: ...5 4 en afbeelding 1 op de volgende pagina 3 Maak de drukknopen los en verwijder de bekleding zie afbeelding volgende pagina Opmerking om de bekleding weer terug te plaatsen herhaalt u bovenstaande han...

Страница 69: ...rkomen 3 Verwijder met een vochtige spons het stof van het oppervlak van het autostoeltje het tuigje en de plastic onderdelen en laat daarna drogen 4 Als het tuigje vuil is door vlekken van eten of dr...

Страница 70: ...ivenditore AVVERTENZA Questo un DISPOSITIVO DI RITENUTA PER BAMBINI SEMI UNIVERSALE omologato ai sensi del regolamento n 44 serie di emendamenti 04 Questo dispositivo di ritenuta pu essere utilizzato...

Страница 71: ...nstallazione del seggiolino auto con i connettori ISOFIX 4 8 Regolazione dell inclinazione del seggiolino auto 4 9 Rotazione del seggiolino auto 5 Installazione e utilizzo del seggiolino auto 5 1 Inst...

Страница 72: ...a imbracatura da spalla Cinghia imbracatura da spalla Riduttore Passante cintura 3 punti Fibbia Spallaccio dell imbracatura Copertura regolatore Cinghia di regolazione dell imbracatura Proteggi fibbia...

Страница 73: ...zione dell appoggiatesta Cinghia Top Tether Bretelle degli spallacci Cinghie dell imbracatura Cinghia di regolazione dell imbracatura Connettori ISOFIX Pulsante di sblocco ISOFIX Indicatore di bloccag...

Страница 74: ...ti in maniera tale che non possano in condizioni normali di utilizzo del veicolo incastrarsi sotto un sedile mobile o nella porta del veicolo Mantenere tese tutte le cinghie che servono a fissare il d...

Страница 75: ...zioni raccomandate Posizioni non raccomandate Utilizzare questa posizione soltanto se il sedile del veicolo dotato di ancoraggi ISOFIX 4 2 Regolazione dell altezza dell appoggiatesta L appoggiatesta d...

Страница 76: ...la fibbia Passaggio 3 Per sbloccare l imbracatura premere sul pulsante rosso al centro della fibbia 4 5 Regolazione dell imbracatura 1 Stringere l imbracatura Tirare la cinghia di regolazione dell imb...

Страница 77: ...l esterno ed estendere al massimo i connettori Se si desidera ritrarre i connettori ISOFIX spingere i connettori ISOFIX verso l interno del seggiolino premendo sul pulsante di sblocco dei connettori 4...

Страница 78: ...ell inclinazione del seggiolino auto Come mostrato nelle figure 1 e 2 di seguito l inclinazione del seggiolino pu essere regolata azionando la leva di regolazione dell inclinazione Alcune configurazio...

Страница 79: ...di il seggiolino auto fino a quando non risulta essere correttamente a contatto contro lo schienale del sedile del veicolo fare riferimento ai punti 4 6 e 4 7 Passaggio 3 Come illustrato di seguito fa...

Страница 80: ...e tendere correttamente l imbracatura verificare che l altezza delle cinghie da spalla e dell appoggiatesta sia corretta fare riferimento ai punti 4 2 4 3 4 4 4 5 5 2 Installazione del seggiolino aut...

Страница 81: ...e del seggiolino dietro all appoggiatesta figura 1 quindi attraverso la piastra metallica figura 2 tirare ed effettuare un passaggio di ritorno figura 3 per fissare l estremit della cinghia Tendere nu...

Страница 82: ...stallazione ORIENTATA nel senso di marcia Passaggio 1 Utilizzare i connettori ISOFIX per fissare il seggiolino auto Accertarsi che siano ben bloccati gli indicatori di ciascun connettore devono divent...

Страница 83: ...rsi che la cintura del veicolo sia ben tesa e che non sia attorcigliata Metodo d installazione n 2 ISOFIX cintura 3 punti del veicolo Per i bambini che pesano da 15 a 36 kg installazione ORIENTATA nel...

Страница 84: ...lino auto nella posizione pi inclinata quindi rimuovere la copertura di plastica vicino alla leva di regolazione di inclinazione quindi come indicato sulla figura 7 far passare la piccola fibbia metal...

Страница 85: ...o 5 4 e la figura 1 nella pagina seguente 3 Separare i pulsanti pressione quindi rimuovere la fodera si veda la figura nella pagina seguente Nota per rimettere la fodera in posizione ripetere queste o...

Страница 86: ...vere sulla superficie del seggiolino auto l imbracatura e i pezzi di plastica con una spugna umida quindi lasciarli asciugare all aria aperta 4 Se l imbracatura macchiata da alimenti e bevande rimuove...

Страница 87: ...ste es un DISPOSITIVO DE SUJECI N PARA NI OS SEMI UNIVERSAL Est homologado de acuerdo con el reglamento n 44 serie de enmiendas 04 Este dispositivo de sujeci n s lo puede ser utilizado en los veh cul...

Страница 88: ...ara coche con los conectores ISOFIX 4 8 Ajustar la inclinaci n del asiento para coche 4 9 Rotaci n del asiento para coche 5 Instalaci n y utilizaci n del asiento para coche 5 1 Instalaci n del asiento...

Страница 89: ...la correa del arn s de hombros Correa del arn s de hombros Reductor Gu a del cintur n de tres puntos Hebilla Funda del arn s Embellecedor del regulador Correa de ajuste del arn s Protector de la hebil...

Страница 90: ...Palanca de ajuste del reposacabezas Correa Top Tether Correas de las fundas Correas del arn s Correa de ajuste del arn s Conectores ISOFIX Bot n de desbloqueo ISOFIX Testigo de bloqueo ISOFIX 90 ES...

Страница 91: ...iones normales de utilizaci n del veh culo quedar atrapadas bajo un asiento m vil o en la puerta del veh culo Mantener tensas todas las correas que sirvan para unir al dispositivo de sujeci n al veh c...

Страница 92: ...ulo recomendados para su colocaci n Asientos del veh culo no recomendados para su colocaci n Coloque el asiento para coche en este asiento del veh culo nicamente si est equipado con anclajes ISOFIX 4...

Страница 93: ...tamente dentro de la hebilla Paso 3 Para desbloquear el arn s presione el bot n rojo situado en el centro de la hebilla 4 5 Ajustar el arn s 1 Apretar el arn s Tire de la correa de ajuste del arn s ha...

Страница 94: ...je hacia el exterior y extienda los conectores al m ximo Si desea acortar los conectores ISOFIX presi nelos hacia el interior del asiento presionando el bot n de desbloqueo de los conectores 4 7 Insta...

Страница 95: ...star la inclinaci n del asiento para coche Tal y como muestran las im genes 1 y 2 que se muestran a continuaci n la inclinaci n del asiento puede ajustarse utilizando la palanca de ajuste de la inclin...

Страница 96: ...igos de cada conector est n verdes A continuaci n empuje el asiento para coche hasta que est pegado contra el respaldo del asiento del veh culo consulte los apartados 4 6 y 4 7 Paso 3 Tal y como se mu...

Страница 97: ...puntos para asegurarlo Abroche y tense correctamente el arn s y verifique que las correas de los hombros y el reposacabezas se encuentren a la altura correcta consulte los apartados 4 2 4 3 4 4 y 4 5...

Страница 98: ...tr s del reposacabezas imagen 1 a continuaci n p sela por la placa met lica imagen 2 tire de ella y vuelva a llevarla hacia atr s imagen 3 para asegurar esta parte de la correa Vuelva a tensar la corr...

Страница 99: ...culo Para los ni os con un peso entre 9 y 18 kg instalaci n en SENTIDO DE LA MARCHA Paso 1 Utilice los conectores ISOFIX para fijar el asiento para coche Aseg rese de que est n correctamente bloqueado...

Страница 100: ...h culo est correctamente tensado y que no est torcido M todo de instalaci n n 2 ISOFIX cintur n de tres puntos del veh culo Para los ni os con un peso entre 15 y 36 kg instalaci n en SENTIDO DE LA MAR...

Страница 101: ...ugar el asiento para coche en la posici n m s inclinada A continuaci n retire el embellecedor de pl stico situado cerca de la palanca de ajuste de la inclinaci n y despu s como se muestra en la imagen...

Страница 102: ...o 5 4 y la imagen 1 de la p gina siguiente 3 Abra las presillas y retire la funda v ase la imagen de la p gina siguiente Atenci n para volver a colocar la cubierta realice estos mismos pasos pero en s...

Страница 103: ...o de la superficie del asiento para coche los arneses y las piezas de pl stico con una esponja h meda y d jelo secar al aire libre 4 Si los arneses se han manchado de alimentos o bebidas ret relos y e...

Страница 104: ...DISPOSITIVO DE RETEN O PARA CRIAN AS SEMI UNIVERSAL A mesma est homologada de acordo com o regulamento n 44 s rie de altera es 04 Este dispositivo de reten o apenas pode ser utilizado nos ve culos co...

Страница 105: ...OFIX 4 7 Instala o da cadeira auto com os fixadores ISOFIX 4 8 Ajustar a inclina o da cadeira auto 4 9 Rota o da cadeira auto 5 Instala o e utiliza o da cadeira auto 5 1 Instala o da cadeira auto Grup...

Страница 106: ...o Guia da correia do arn s de ombro Correia do arn s de ombro Redutor Guia do cinto de 3 pontos Fivela Protetor do arn s Cobertura do ajustador Correia de regula o do arn s Protetor da fivela Base Ala...

Страница 107: ...res ISOFIX Alavanca de ajuste do apoio de cabe a Correia Top Tether Al as dos protetores Correias do arn s Correia de regula o do arn s Bot o de desbloqueio do ISOFIX Indicador de bloqueio do ISOFIX 1...

Страница 108: ...o poderem ficar presos por baixo de um banco m vel ou na porta do ve culo em condi es normais de utiliza o do ve culo Mantenha todas as precintas de fixa o do dispositivo de reten o ao ve culo bem es...

Страница 109: ...o acrescida Posi es recomendadas Posi es n o recomendadas N o utilize esta posi o exceto caso o banco do ve culo esteja equipado com pontos de fixa o ISOFIX 4 2 Ajustar a altura do apoio de cabe a O...

Страница 110: ...fivela Etapa 3 para desbloquear o arn s pressione o bot o vermelho no centro da fivela 4 5 Ajustar o arn s 1 Apertar o arn s Puxe a correia de regula o do arn s at que este fique devidamente esticado...

Страница 111: ...e os para fora e estique os ao m ximo Se pretender retrair os fixadores ISOFIX empurre os para o interior da cadeira enquanto pressiona o bot o de desbloqueio dos fixadores 4 7 Instala o da cadeira au...

Страница 112: ...Ajustar a inclina o da cadeira auto Conforme apresentam as ilustra es 1 e 2 abaixo a inclina o da cadeira pode ser regulada atrav s da alavanca de regula o da inclina o Determinadas configura es de in...

Страница 113: ...assar para verde Empurre a cadeira auto at estar devidamente em contacto com o encosto do banco do ve culo consulte os pontos 4 6 e 4 7 Etapa 3 conforme ilustrado abaixo passe o Top Tether por cima do...

Страница 114: ...Introduza o arn s na fivela e estique o devidamente Certifique se de que a altura das correias de ombros e do apoio de cabe a est correta consulte os pontos 4 2 4 3 4 4 e 4 5 5 2 Instala o da cadeira...

Страница 115: ...ilustra o 1 e de seguida atrav s da placa met lica ilustra o 2 Puxe e efetue o retorno ilustra o 3 para segurar a fita da correia Se necess rio volte a esticar a correia do Top Tether e a fita da cor...

Страница 116: ...os entre 9 e 18 kg instala o voltada para a FRENTE Etapa 1 utilize os fixadores ISOFIX para segurar a cadeira auto Certifique se de que est o devidamente bloqueados sendo que os indicadores de cada fi...

Страница 117: ...devidamente esticado e de que n o se encontra torcido M todo de instala o n 2 ISOFIX cinto de 3 pontos do ve culo Para crian as com pesos entre 15 e 36 kg instala o voltada para a FRENTE Consulte o po...

Страница 118: ...primeiro a cadeira auto at posi o mais inclinada De seguida retire a cobertura em pl stico junto alavanca de regula o da inclina o e conforme indicado na ilustra o 7 fa a passar a pequena fivela met l...

Страница 119: ...nsultar o ponto 5 4 e a ilustra o 1 na p gina seguinte 3 Solte os bot es de press o para retirar a capa consultar a ilustra o na p gina seguinte Observa o para voltar a instalar a capa repita estas op...

Страница 120: ...3 Limpe a sujidade superficial da cadeira auto arneses e pe as de pl stico com uma esponja h mida e deixe secar naturalmente 4 Caso os arneses apresentem manchas de alimentos ou bebidas retire os enxa...

Страница 121: ...121 121...

Страница 122: ...122...

Страница 123: ...123...

Страница 124: ...FCNEWSEATYSBB R2 11 20 Rue du Claret 38230 Charvieu France www groupeteamtex com...

Отзывы: