background image


16

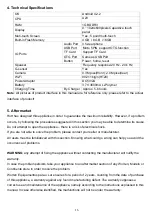
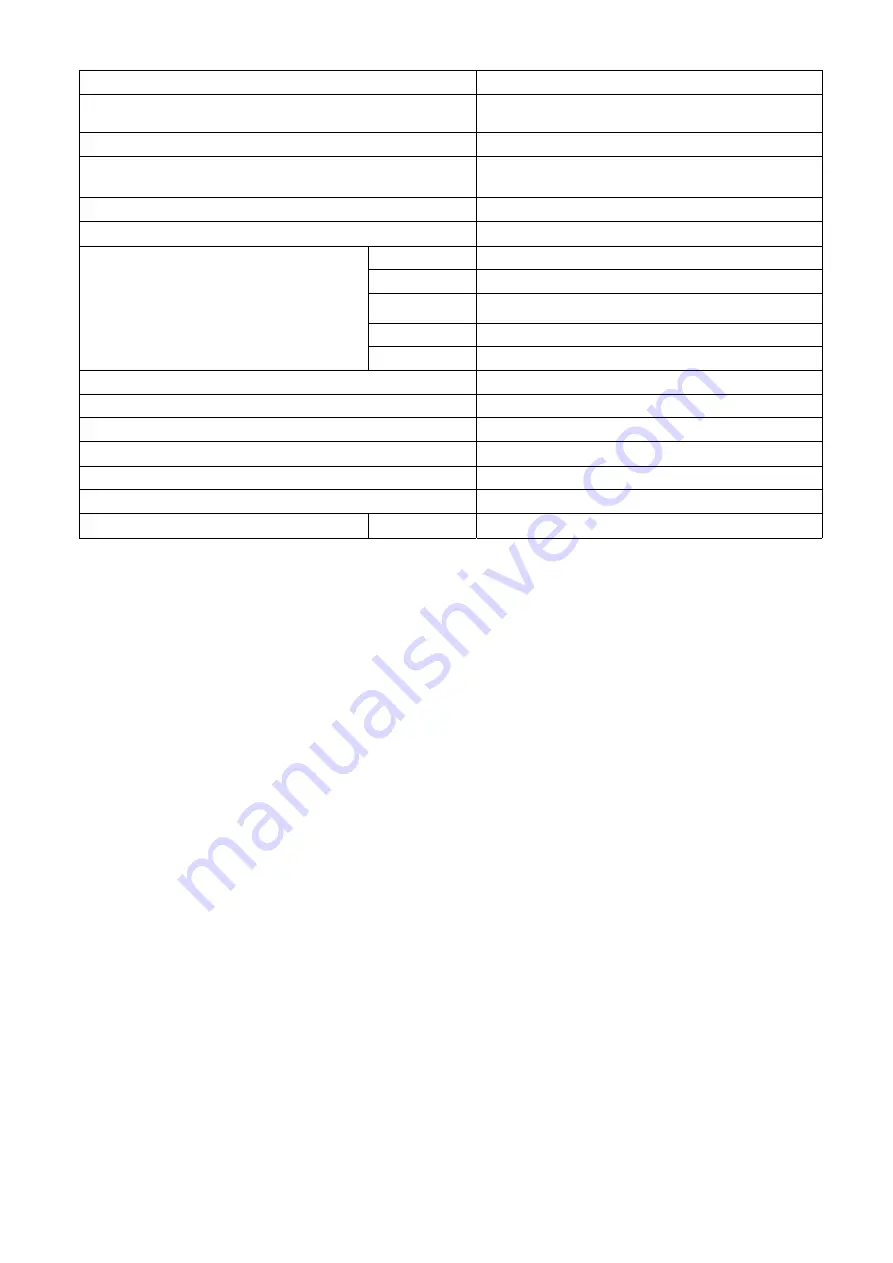
4. Technical Specifications 

OS 


Android 4.2.2 

CPU  

 A23 


RAM  


1GB DDR3  

Display 

 9.’’ 

1024x600pixels 

Capacitive touch 

panel 

Muti-touch Screen 


Yes : 5 point multi-touch 

Built-in Flash Memory 


4 GB  / 8 GB  / 16GB  

Audio Port 

3.5ø earphone 

USB Port 

Micro 5PIN  support OTG function 

TF Card 

Support TF Card  

OTG Port 

Same as USB Port 


IO Ports 

Button 

Power, home, reset


Speaker 

Frequency response:20 Hz - 20 k Hz,  

G-sensor Yes 
Camera 0.3M 

pixel(front); 2.0M pixel(rear) 

Wi-Fi  

802.11b/g/n(HT20)  

Power Adaptor 

DC5V/2A 

Battery 

3.7V 3800mA Li-Polymer 

Charging Time 

By Charger

Approx. 5-6 hours 

Note

: All pictures of product interface in this manual are for reference only; please refer to the actual 

interface of product! 


5. Aftermarket 

Hott has designed this appliance in order to guarantee the maximum reliability. However, if a problem 

occurs, by following the procedures suggested in this section you may be able to determine its cause.  

Do not attempt to open the appliance – there is a risk of electrical shock. 

If you are not able to solve the problem, please contact your seller or manufacturer. 

All users must be familiarized with this section. Knowing what could go wrong can help you avoid the 

occurrence of problems. 


WARNING

: any attempt of fixing the appliance without contacting the manufacturer will nullify the 

warranty. 

In case the problem persists, take your appliance to an aftermarket section of any Worten, Modelo or 

Continente store in order to solve the problem. 

Worten Equipamentos para o Lar ensures for a period of 2 years, counting from the date of purchase 

of this appliance, a warranty against any found manufacturing defect. The warranty supposes a 

correct use and maintenance of the appliance, namely according to the instructions expressed in this 

manual. In case otherwise identified, the malfunctions will not be under the warranty. 


Содержание T492

Страница 1: ...Instruction Manual Model T492...

Страница 2: ...ts which certify its quality To simplify the use of this appliance this instruction manual has been provided The instructions must ensure a quick and safe use Please read carefully the instructions an...

Страница 3: ...und 8 2 5 3 Display 8 2 5 4 Storage 9 2 5 5 Battery 9 2 5 6 Apps 11 2 6 Account Sync 10 2 7 Location Service 10 2 8 Security 11 2 9 Language Input 11 2 10 Date Time 12 2 11 Accessibility 12 2 12 Devel...

Страница 4: ...iance must not be used to other ends than the ones foreseen in the instructions manual Your safety is only guaranteed in a household use and not for commercial use The incorrect use will not be covere...

Страница 5: ...er clean it with a soft and dry cloth Do not use cleaning products 1 5 General Precautions Please follow the instructions of the user manual which helps properly installing and operating this product...

Страница 6: ...using some applications it is recommended to close running application in setting menu Caution For charging be sure to use the power adapter DC5V that is provided in the package otherwise the device m...

Страница 7: ...en lock standard Show Desktop 2 4 Standby Mode Screen Off Mode Unlock the Screen Short press the power button to turn on off the screen Standby mode On Off After standby mode off slide the lock icon i...

Страница 8: ...7 2 5 System Settings On the desktop press menu button and select system settings...

Страница 9: ...i Fi settings Press Wi Fi settings then the device will automatically search the available Wi Fi signals Select the network you want to connect with 2 5 2 Sound Set up each setting as you like 2 5 3 D...

Страница 10: ...9 2 5 4 Storage Check device memory and TF card status Unmount TF card Unmount the TF card for safe removal 2 5 5 Battery Check the battery usage status...

Страница 11: ...Sync Create your account After connecting Wi Fi network the e mailing system synchronizes your account with the device Emails are automatically downloaded into the device 2 7 Location Service Google s...

Страница 12: ...t Applications press Unknown sources and press OK Install from TF card Install encrypted certificates from TF card 2 9 Language Input Language Choose your preferable language Keyboard input method Cha...

Страница 13: ...s for application development 2 13 About Tablet See status legal information etc 3 Installation 3 1 How to Connect Disconnect the Device with from the Computer On the main desktop connect the device w...

Страница 14: ...uction on the screen for installation Method 2 1 With your computer search application file apk that you want to install into the device 2 Download the file apk into your computer 3 Connect the device...

Страница 15: ...14 3 3 Desktop Icons Press the upper right side icon of desktop the pop up displays...

Страница 16: ...on the desktop Wallpaper Long press the desktop press Wallpapers and select one of categories of wallpaper Select one you desired and press Set wall paper 3 4 Keyboard Input Tap the text input area t...

Страница 17: ...by following the procedures suggested in this section you may be able to determine its cause Do not attempt to open the appliance there is a risk of electrical shock If you are not able to solve the...

Страница 18: ...epairing must be made on the specialized locations of technical assistance as appropriate tools are needed 6 Environment Conservation Aiming to protect the environment we try to reduce to a maximum th...

Страница 19: ...communications However there is no guarantee that interference will not occur in a particular installation If this equipment does cause harmful interference to radio or television reception which can...

Отзывы: