background image

5

EN

22S SCT RTR, AVC: 1:10 2WD SHORT COURSE TRUCK • INSTRUCTION MANUAL

5

22S SCT RTR, AVC: 1:10 2WD SHORT COURSE TRUCK • INSTRUCTION MANUAL

DRIVING PRECAUTIONS 

•  Maintain sight of the vehicle at all times.
•  Routinely inspect the vehicle for loose wheel hardware. 
•  Routinely inspect the steering assembly for any loose hardware. Driving the vehicle  

off-road can cause fasteners to loosen over time.

•  Do not drive the vehicle in tall grass. Doing so can damage the vehicle or electronics.
•  Stop driving the vehicle when you notice a lack of power. Driving the vehicle when  

the battery is discharged can cause the receiver to power off. If the receiver loses power, 
you will lose control of the vehicle. Damage due to an over-discharged Li-Po battery is  
not covered under warranty.

CAUTION:

 Do not discharge a Li-Po battery below 3V per cell. Batteries discharged 

to a voltage lower than the lowest approved voltage may become damaged, result-

ing in loss of performance and potential fire when batteries are charged.

•  Do not apply forward or reverse throttle if the vehicle is stuck.  

Applying throttle in this instance can damage the motor or ESC.

•  After driving the vehicle, allow the electronics to cool before driving the vehicle again.

IMPORTANT:

 Keep wires away from all moving parts.

POWERING ON THE VEHICLE

1. Center the ST TRIM and TH TRIM dials on the transmitter.
2. Power on the transmitter.
3. Install a fully charged battery pack per the 

Installing the Battery

 section.

4. Power on the ESC. 

IMPORTANT:

 The vehicle MUST remain on a flat, level surface and motionless 

for at least 5 seconds.

BEFORE RUNNING YOUR VEHICLE

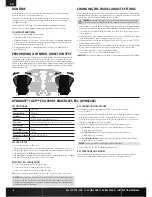
1. Check for free suspension movement. All suspension arms and steering components should 

move freely. Any binds will cause the vehicle to handle poorly. 

Tip:

 To increase the ride height and ground clearance of your vehicle, install the included 

shock spacers.

2. Charge a battery pack. Always charge the battery pack as per the battery and/or  

charger manufacturers’ instructions.

3. Set the transmitter steering trim. Follow the instructions to set the steering trim/subtrim  

so that the vehicle drives straight with no input to the steering.

4. Perform a Control Direction Test.

AVC

®

 SENSITIVITY

The ST RATE dial adjusts the sensitivity, or stability, value in the receiver. If you increase the 
sensitivity, the AVC

®

 system becomes more sensitive to the vehicle drifting left or right. You 

would use maximum sensitivity during high speed driving or drag racing, when you want  
the vehicle to stay in a straight line.

Turn the ST RATE knob counter-clockwise to reduce the sensitivity. 
Turn the ST RATE knob clockwise to increase the sensitivity.

IMPORTANT:

 The ST RATE knob will only adjust the sensitivity when 

the transmitter is bound to a DSMR

®

 receiver. When the transmitter 

is bound to a DSM

®

, DSM2

®

 or DSM Marine receiver,  

the ST RATE knob controls the steering dual rate.

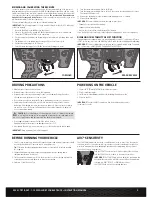
FORWARD

BRAKE/REVERSE

BINDING AND CALIBRATING THE RECEIVER 

In order to operate, the receiver must be bound to the transmitter. Binding is the process of 

programming the receiver to recognize the GUID (Globally Unique Identifier) code of a single 

specific transmitter. When a receiver is bound to a transmitter/model memory, the receiver will 

only respond to that specific transmitter/model memory. 

The receiver and transmitter are 

bound at the factory and ready for use.

 If your system becomes unbound or if you select 

a different transmitter, follow the steps below.
You must calibrate the receiver each time it is placed in bind mode.

IMPORTANT:

 The following sequence of steps must be followed in order for AVC technology 

to function properly.
1.  Insert the Bind Plug in the BIND port on the receiver.
2.  Power on the receiver. The orange LED flashes, indicating the receiver is in bind mode.
3.  Center the ST TRIM and TH TRIM on the transmitter.
4.  Put your transmitter in bind mode by powering on transmitter while holding down bind 

button. 

5.  The bind process is complete when the orange LED on the receiver is solid.
6.  Pull the transmitter trigger to Full Throttle.
7.  Push the transmitter trigger to Full Brake, then return the trigger to center.

8.  Turn the transmitter steering wheel to Full Right.
9.  Turn the transmitter steering wheel to Full Left, then return the steering wheel to center. 

The orange LED flashes once.

10. Remove the bind plug once the calibration and binding process is complete.
11. Power off the transmitter. 

IMPORTANT:

 You must rebind the transmitter and receiver if you:

• 

Change the servo reverse after binding

• 

Change the travel after binding

• 

Want to use the receiver with a different model memory

If you change the servo reversing or travel adjust after binding, AVC will not work properly.

DISABLING THE STABILITY ASSIST FUNCTION

If you participate in organized racing, you may be required to turn AVC

®

 technology off. To turn 

off AVC technology, insert a second Bind Plug in the Disable port before binding and calibrating.

IMPORTANT:

 You must calibrate the receiver each time it is placed in bind mode. To activate 

AVC, see the steps in BINDING AND CALIBRATING THE RECEIVER.

Содержание 22S SCT

Страница 1: ... please read all printed materials thoroughly Horizon Hobby is not responsible for inadvertent errors in this manual INSTRUCTION MANUAL BEDIENUNGSANLEITUNG MANUEL D UTILISATION MANUALE DI ISTRUZIONI Battery and Charger Not Included ...

Страница 2: ...does not endanger yourself and others or result in damage to the product or property of others This model is controlled by a radio signal subject to interference from many sources outside your control This interference can cause momentary loss of control so it is advisable to always keep a safe distance in all directions around your model as this margin will help avoid collisions or injury Never o...

Страница 3: ... collected in the tires by spinning them at high speed With the body removed place the vehicle upside down and pull full throttle for a few short bursts until the water has been removed CAUTION Always keep hands fingers tools and any loose or hanging objects away from rotating parts when performing the above drying technique Remove the battery pack s and dry the contacts If you have an air compres...

Страница 4: ... in injury to persons and or damage to property CAUTION Risk of explosion if battery is replaced by an incorrect type Dispose of used batteries according to national regulations CAUTION Never remove the transmitter batteries while the model is powered ON Loss of model control damage or injury may occur 1 Ensure the ESC is powered OFF 2 Rotate the battery hatch lock to align the flat section with t...

Страница 5: ...peed driving or drag racing when you want the vehicle to stay in a straight line Turn the ST RATE knob counter clockwise to reduce the sensitivity Turn the ST RATE knob clockwise to increase the sensitivity IMPORTANT The ST RATE knob will only adjust the sensitivity when the transmitter is bound to a DSMR receiver When the transmitter is bound to a DSM DSM2 or DSM Marine receiver the ST RATE knob ...

Страница 6: ...el in the full right position Turn the ST TRIM knob to adjust the right end point Return the steering wheel to the center position 6 Power off the transmitter to save the travel adjust settings The minimum Travel is 75 and the Maximum travel is 150 IMPORTANT If the travel is changed on the DX2E you must rebind and calibrate the SRS6000 SPECIFICATIONS Type Sensorless Constant Peak 60A 90A Resistanc...

Страница 7: ...ax Brake Force Adjusts the maximum braking force A higher value provides stronger braking but can also cause the wheels to lock resulting in loss of control of the car 6 Punch Select from start mode Level 1 Soft to Level 9 Very aggressive If you choose Levels 7 9 use a high quality battery pack with powerful discharge ability Without a high quality battery pack the modes will not give a bursting s...

Страница 8: ...ING GUIDE PROBLEM POSSIBLE CAUSE SOLUTION Vehicle does not operate Battery not charged or plugged in Charge battery plug in ESC switch not ON Turn on ESC switch Transmitter not ON or low battery Turn on replace batteries Motor runs but wheels do not rotate Pinion not meshing with spur gear Adjust pinion spur mesh Pinion spinning on motor shaft Tighten pinion gear setscrew on motor shaft flat spot ...

Страница 9: ...repared to accept the liability associated with the use of the Product purchaser is advised to return the Product immediately in new and unused condition to the place of purchase Law These terms are governed by Illinois law without regard to conflict of law principals This warranty gives you specific legal rights and you may also have other rights which vary from state to state Horizon reserves th...

Страница 10: ...t Federsatz Ressort Set molle LOS233021 Spring Cups and Clip Set Satz mit Federtellern und Clips Lot de coupelles de ressort et d attaches Set molle coppe e clip LOS233022 Shock Seal Set Stoßdämpferdichtungssatz Lot de joints d amortisseurs Set guarnizioni ammortizzatore LOS233023 Shock Caps 2 Stoßdämpferkappen 2 Capuchons d amortisseurs 2 Tappi ammortizzatore 2 LOS233024 Shock Ends Stoßdämpferend...

Страница 11: ...nglish Deutsch Français Italiano DYN2950 8 in 1 HexWrench Kit 8 in 1 Sechskantschlüsselsatz Kit de clés hexagonales 8 en 1 Kit chiave esagonale 8 in 1 DYN4401 GPS Speed Meter GPS Tachometer Indicateur de vitesse GPS Tachimetro GPS DYN9004EC 7 4V 5000mAh 2S 20C LiPo Case EC3 7 4 V 5000 mA 2S 20C LiPo Schale EC3 Batterie Li Po 7 4V 5 000 mAh 2S 20C boîtier EC3 7 4V 5000 mAh 2S 20C LiPo Case EC3 DYN9...

Страница 12: ...ISTRUZIONI 36 22S SCT RTR AVC 1 10 2WD SHORT COURSE TRUCK EXPLODED VIEW EXPLOSIONSZEICHNUNG VUE ÉCLATÉE DES PIÈCES VISTA ESPLOSA DELLE PARTI TLR8202 LOS43006 LOS230054 Maxxis LOS230055 K N LOS230056 Clear Transparent Transparente Trasparente LOS43016 LOS43015 ...

Страница 13: ...S233018 LOS233023 LOS235029 LOS233022 LOS233021 LOS233019 LOS233021 LOSA6937 LOSA6957 LOS232040 LOS232040 LOS232046 LOS232046 LOS232046 LOS232046 LOS232046 LOS232046 LOS232049 LOS232049 TLR5903 LOS232037 LOS232039 LOSA6957 Rear Shock LOS233021 LOS233018 LOS233021 LOS233024 LOS233023 LOS233023 LOS235029 LOS233022 LOS233022 LOS233022 LOS233021 LOS233020 LOS233019 LOS233018 LOS233021 Front Shock LOS2...

Страница 14: ...S231046 TLR5910 LOS234027 LOS234027 SPMS606 LOS231050 LOS231050 TLR336000 LOS231050 LOS231050 LOS231043 LOS231043 LOS231043 TLR5903 TLR5903 TLR5903 TLR5904 TLR6352 TLR5962 TLR5963 LOS232048 LOSA6937 LOSA6937 LOS234033 LOS231047 LOS232044 LOS231043 LOS231043 TLR8202 LOSA6957 Rear Shock LOS233021 LOS233018 LOS233021 LOS233024 LOS233023 LOS233023 LOS235029 LOS233022 LOS233022 LOS233022 LOS233021 LOS2...

Страница 15: ...LOS235024 TLR5911 TLR8202 LOS231047 LOS234031 LOS234026 LOS234027 TLR5910 TLR5904 LOS232048 LOSA6943 LOS232045 LOS232045 LOS234024 TLR5904 LOS234029 LOS234029 LOS234032 TLR5902 VTR235178 TLR5963 TLR5962 LOS232036 S232044 LOS232045 LOS234033 LOS234032 LOSA6943 Rear Shock LOS233021 LOS233018 LOS233021 LOS233024 LOS233023 LOS233023 LOS235029 LOS233022 LOS233022 LOS233022 LOS233021 LOS233020 LOS233019...

Страница 16: ... trademarks or registered trademarks of Horizon Hobby LLC The Spektrum trademark is used with permission of Bachmann Industries Inc Maxxis Magnaflow Kicker K N and associated logos are property of their respective owners and are used with permission US 9 320 977 Other patents pending Created 04 18 54553 LOS03013T1 T2 WWW LOSI COM ...

Отзывы: