background image

General

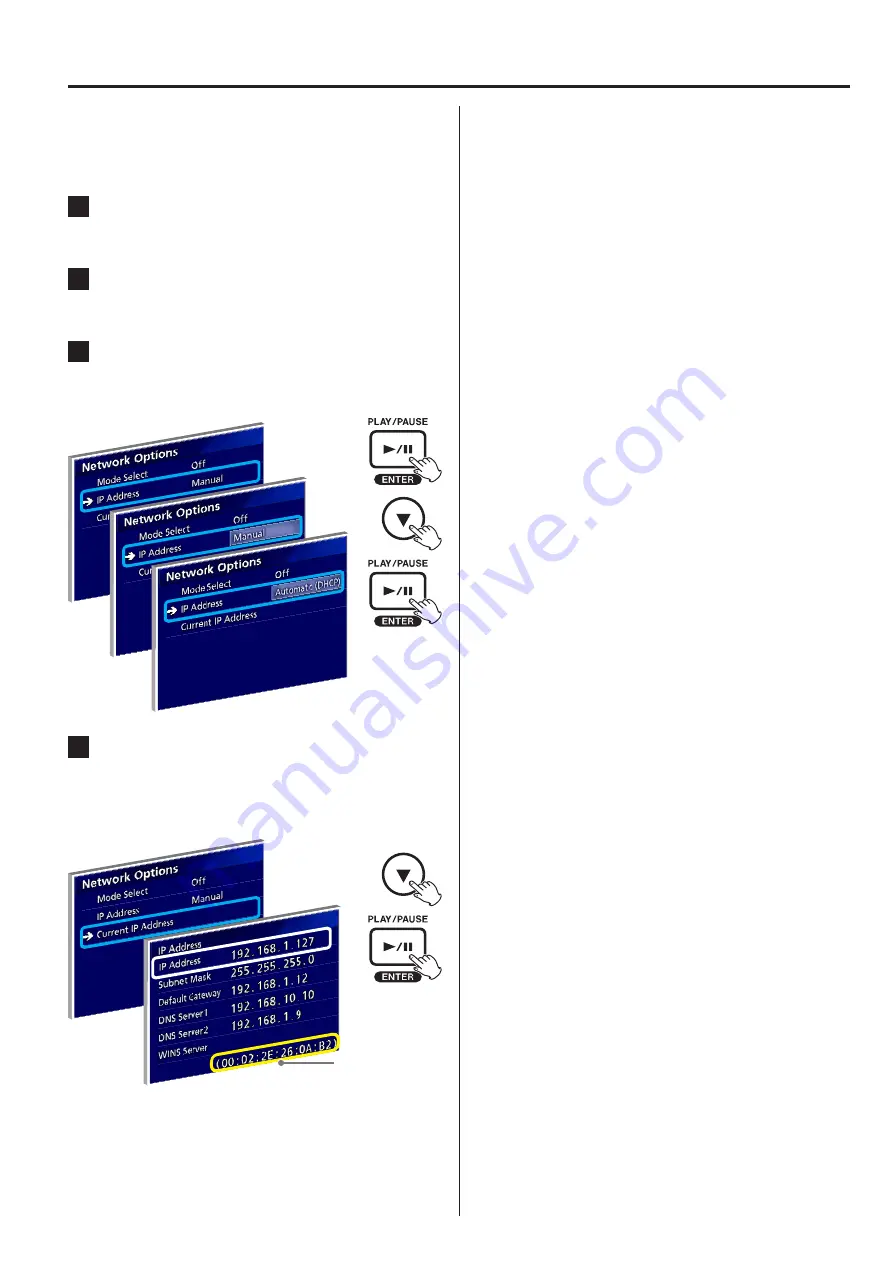
Obtain an IP address automatically (DHCP)

When the network supports DHCP or if not sure, follow 
the steps below.

Press the ENTER button to open the 
Network Options. 

Move the cursor to “IP Address” and 
select “Automatic (DHCP)”.

Press the ENTER button to determine 
“Automatic (DHCP)” .

“Please wait” dialog is briefly shown.

Move the cursor to “Current IP Address” 
and press the ENTER button to show IP 
Address. Take note of the IP address.

In this example, 192.168.1.127

MAC address


o

If no IP address is shown, the network does not 
support DHCP. Request a support from the network 
administrator and follow the steps in the next page 
to set an IP address manually.

4

Содержание UR-4MD

Страница 1: ...e Z Thank you for choosing TEAC Read this manual carefully to get the best performance from this unit After reading this manual keep it in a safe place for future reference UR 4MDDICOM Digital Video R...

Страница 2: ...ault address conflicts with any existing address a usable address can be manually assigned General Contents General 2 Settings 3 Getting started 3 How to obtain an IP address 3 Obtain an IP address au...

Страница 3: ...Ethernet Cable connecting to an Ethernet Port in the back Computer UR 4MD Network Server How to obtain an IP address This section describes how to obtain an IP address If the network supports DHCP the...

Страница 4: ...3 Press the ENTER button to determine Automatic DHCP Please wait dialog is briefly shown 4 Move the cursor to Current IP Address and press the ENTER button to show IP Address Take note of the IP addre...

Страница 5: ...ith the existing address connect a USB keyboard to the USB 3 port back of the unit to input a different IP address When finished press the ENTER button to determine the default or newly input address...

Страница 6: ...n the computer 2 Enter the UR 4MD IP address that was obtained in the previous process followed by 10080 in the browser address bar Example http 192 168 0 121 10080 A dialog box shows up asking for a...

Страница 7: ...Activation When the browser shows the UR 4MD screen perform the following steps 1 Click DICOM Service 2 The browser shows the Activation Key input dialog General Continued on the next page e 7...

Страница 8: ...for how to check the MAC address o o Make sure that the UR 4MD is in the idle screen date and time displayed before entering the activation key Otherwise an error message will appear as shown below E...

Страница 9: ...on the browser screen These cannot be set with the settings screen of the unit itself UR4MD Digital Video Recorder About Device status Set up ECHO test DICOM service DICOM settings Administration Cur...

Страница 10: ...n case of blank UR4MD is set Institution Name Manufacturer s Model Name 2 After you have finished entering the setting items click the Save changes button at the bottom of the screen ATTENTION Press t...

Страница 11: ...nter the modality name Storage Transfer Retry Count Enter the number of times to retry when a storage failure occurs Numbering Gender Enter these values when numbers are used for gender with a magneti...

Страница 12: ...cit VR Little Endian IP address Enter the MWM server IP address Port Enter the MWM server port number AE title Enter the MWM server AE title Calling AE title Enter the UR 4MD AE title Requested Date S...

Страница 13: ...settings Administration Current settings Log le Date Time ECHO test DICOM C ECHO C ECHO test Manual setting IP Port Called AE Calling AE OK C ECHO test Storage OK C ECHO test MWM OK Press the OK butt...

Страница 14: ...ity Worklist Management function By enabling the Modality Worklist Management func tion the Worklist can be acquired and shown on the UR 4MD s front display The patient information selected from the d...

Отзывы: